Thursday 17 December 2020

[Solved] CredSSP Encryption Oracle Remediation


A remote code execution vulnerability exists in the Credential Security Support Provider protocol (CredSSP). An attacker who successfully exploited this vulnerability could relay user credentials and use them to execute code on the target system.

CredSSP is an authentication provider which processes authentication requests for other applications; any application which depends on CredSSP for authentication may be vulnerable to this type of attack.

As an example of how an attacker could exploit this vulnerability against Remote Desktop Protocol, the attacker would need to run a specially crafted application and perform a man-in-the-middle attack against a Remote Desktop Protocol session. An attacker could then install programs; view, change, or delete data; or create new accounts with full user rights.

The security update addresses the vulnerability by correcting how Credential Security Support Provider protocol (CredSSP) validates requests during the authentication process.

1. SCENARIO

2. RDP SESSION

An update released by Microsoft (KB 4093492)on May 8, 2018, for Windows 10 Operation System was targeted to change the default settings CredSSP from Vulnerable to Mitigated.

A full list of the update and patches for all platform can be obtained from here.

However, post patching this caused an issue where the patched clients were blocked from communicating with unpatched servers over RDP protocols.

This has been reported to cause an error thrown by Windows RDP as below:

[Solved] CredSSP Encryption Oracle Remediation

Discover a new world of sustainable, trusted cloud infrastructure with Modern Enterprise Data Center

3. WORKAROUND

Use the group policy settings changes described below to rollback the changes to ‘Vulnerable’ state to allow RDP access.

1. Open Group Policy Editor, by executing gpedit.msc

2. Policy path: Computer Configuration -> Administrative Templates -> System -> Credentials Delegation

Run gpedit.msc and expand Administrative Templates

Expand System

[Solved] CredSSP Encryption Oracle Remediation

Expand Credential Delegation

[Solved] CredSSP Encryption Oracle Remediation

Edit Encryption Oracle Remediation

[Solved] CredSSP Encryption Oracle Remediation

Select Enabled and change Production Level to Vulnerable

[Solved] CredSSP Encryption Oracle Remediation

3. Run the command gpupdate /force to apply group policy settings.

4. Your remote desktop connection will be working fine now.

CONCLUSION

This is just a workaround and defeats the purpose of the patching. However, we need to ensure that future updates are installed as and when released by Microsoft so that the vulnerability is not exposed.

, , , , ,


Source : https://www.netwoven.com/2018/05/15/solved-credssp-encryption-oracle-remediation/ 

Saturday 12 December 2020

Remote Desktop Client Ubuntu

apt-get install freerdp2-x11 -y

xfreerdp /u:user /p:sapi25 /w:1600 /h:900 /v:202.152.140.37 /smart-sizing

Tuesday 8 December 2020

Cara upgrade kartu XL 3G yang lama ke 4G

 Cara upgrade kartu XL 3G yang lama ke 4G, dapat dilakukan sendiri tanpa perlu ganti nomor. Selengkapnya, akan dijelaskan pada artikel teknoding kali ini.

Bagi kalian user atau pengguna, yang menggunakan operator seluler XL Axiata. Kalian mungkin mempunyai perangkat HP, atau smartphone Android yang mendukung jaringan 4G. Namun kartu XL kalian masih yang lama, dan masih menggunakan jaringan 3G.

Nah, karena syarat utama agar kita dapat menikmati jaringan 4G. HP atau Smartphone kita harus mendukung 4G, dan juga menggunakan kartu XL 4G. Maka kita perlu melakukan langkah Upgrade Kartu XL 3G ke 4G.

Tenang saja, kalian tidak perlu repot-repot ke XL Center untuk sekedar upgrade saja, yang memakan ongkos dan waktu. Dengan menggunakan teknologi OTA (over the air), kalian bisa upgrade kartu XL 3G ke 4G secara mandiri.

Serta kita juga tidak perlu ganti nomor, kita cukup beli nomor kartu XL baru, lalu kita gantikan dengan nomor kartu yang lama. Sehingga kuota, pulsa, kontak di nomor kartu XL yang lama tidak akan terhapus.

Kali Teknoding akan membagikan beberapa langkah, tentang cara upgrade kartu XL 3G ke 4G tanpa perlu ganti nomor HP :

Cara Upgrade Kartu XL 3G ke 4G Tanpa Ganti Nomor

Daftar Isi SHOW

Berikut cara upgrade kartu XL ke 4G :

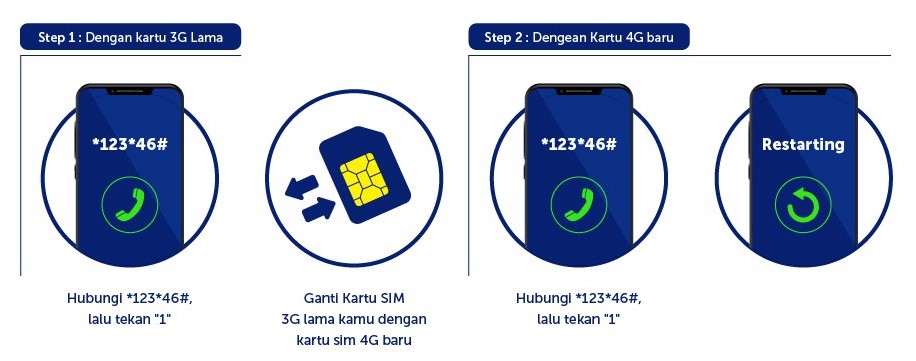
  • Langkah pertama untuk upgrade kartu XL 3G ke 4G, kita beli nomor kartu XL baru, di konter terdekat yang harganya sekitar Rp 5.000 atau Rp 10 ribuan.
  • Selanjutnya, kalian ketikan, atau tekan *123*46#, di smartphone atau hape android kalian. Lalu pilih Call.
Kode USSD Upgrade Kartu XL ke 4G
  • Kemudian, pada menu penukaran SIM card 4G.
  • Kalian pilih 1 (Lanjutkan), dengan menekan tombol 1.
  • Lalu pilih tombol Mengirim.
Menu Penukaran SIM Card 4G XL axiata android
Menu Penukaran SIM Card 4G
  • Tunggu beberapa saat, sampai kalian menerima kiriman sms dari XL-4G.
  • Seperti pada gambar di bawah :
SMS dari XL-4G untuk ugprade kartu xl 3g ke 4g tanpa ganti nomor
SMS dari XL-4G
  • Sekarang kita ikuti perintah kiriman SMS dari XL-4 , dengan mematikan smartphone atau hape android kalian.
  • Lalu mencabut SIM card lama kalian, dengan mengganti SIM card baru, dari nomor kartu XL yang baru saja dibeli.
  • Kemudian  kita nyalakan kembali jika sudah. 
  • Jika terdapat perintah untuk registrasi nomor kartu XL, kalian  bisa abaikan jika nomor kartu XL kalian sudah terdaftar.
  • Untuk mengeceknya kalian bisa ketikan  *123*4444#.
  • Selanjutnya , kita ulangi lagi seperti langkah no 2 dan 3 , dengan mengetikan *123*46#  , di smartphone atau hape android kalian.
  • Pilih 1 dengan menekan tombol 1, lalu pilih tombol Mengirim.
  • Tunggu beberapa saat, kalian akan menerima kiriman SMS dari XL-4G lagi. Seperti pada gambar di bawah :
SMS dari XL-4G untuk ugprade kartu xl 3g ke 4g tanpa ganti nomor
SMS dari XL-4G
  • Ikut perintah seperti yang ada di kiriman sms dari XL-4G , yaitu dengan merestart smartphone atau hape android kalian.
  • Nantinya akan ada 2 kiriman sms lagi dari XL-4G, yang memberi tahu kalian bahwa, proses akvitasi kartu XL 4G kalian telah berhasil.
  • Selesai, sekarang kalian tinggal mengganti mode jaringan 3G menjadi LTE , lewat pengaturan di smartphone atau hape android kalian.


 cara upg

 Source : https://teknoding.com/cara-upgrade-kartu-xl/

Convert mkv to mp4 in terminal

ffmpeg -i foobar.mkv -vcodec copy -acodec copy foobar.mp4

How to Install and Use FFmpeg on CentOS 7

FFmpeg is a free and open-source collection of tools for handling multimedia files. It contains a set of shared audio and video libraries such as libavcodec, libavformat, and libavutil. With FFmpeg, you can convert between various video and audio formats, set sample rates, capture streaming audio/video, and resize videos.

This tutorial walks you through installing FFmpeg on CentOS 7.

Prerequisites

To be able to add new repositories and install packages on your CentOS system, you must be logged in as a user with sudo privileges .

Installing FFmpeg on CentOS 7

FFmpeg is not available in CentOS 7 core repositories. You can choose to build the FFmpeg tools from the source or to install it via yum from a third-party Yum repository.

We’ll go with the second option and install from the RPM Fusion repository:

  1. The RPM Fusion repository depends on the EPEL software repository. If the EPEL is not enabled on your system, enable it by typing:

    sudo yum install epel-release
  2. Next, enable the RPM Fusion repository by installing the rpm package :

    sudo yum localinstall --nogpgcheck https://download1.rpmfusion.org/free/el/rpmfusion-free-release-7.noarch.rpm
  3. Once the repository is enabled, install FFmpeg:

    sudo yum install ffmpeg ffmpeg-devel
  4. Verify the FFmpeg installation by checking its version:

    ffmpeg -version

    At the time of writing this article, the current version of FFmpeg available in the RPM Fusion repository is 3.4.7:

    ffmpeg version 3.4.7 Copyright (c) 2000-2019 the FFmpeg developers
    built with gcc 4.8.5 (GCC) 20150623 (Red Hat 4.8.5-39)
    ...

That’s it. FFmpeg has been installed on your CentOS machine and you can start using it.

FFmpeg Examples

In this section, we will look at some basic examples on how to use the ffmpeg utility.

Basic conversion

When converting audio and video files using ffmpeg, you do not have to specify the input and output formats. The input file format is auto-detected, and the output format is guessed from the file extension.

  • Convert a video file from mp4 to webm:

    ffmpeg -i input.mp4 output.webm
  • Convert an audio file from mp3 to ogg:

    ffmpeg -i input.mp3 output.ogg

Specifying codecs

You can specify the codecs you want to use with the -c option. The codec can be the name of any supported decoder/encoder or a special value copy that simply copies the input stream.

  • Convert a video file from mp4 to webm using the libvpx video codec and libvorbis audio codec:

    ffmpeg -i input.mp4 -c:v libvpx -c:a libvorbis output.webm
  • Convert an audio file from mp3 to ogg encoded with the libopus codec.

    ffmpeg -i input.mp3 -c:a libopus output.ogg

Conclusion

We have shown you how to install FFmpeg on CentOS 7 machines. You can now visit the official FFmpeg Documentation page and learn how to use FFmpeg to convert and your video and audio files.

If you hit a problem or have feedback, leave a comment below.


Source : https://linuxize.com/post/how-to-install-ffmpeg-on-centos-7/


Cara Mudah Menampilkan Video di Web dengan HTML5

Masih repot menampilkan file video di halaman web? Kini tidak lagi. Kalau dulu, kita membutuhkan script video player, seperti Flow Player, atau yang lain untuk menampilkan video dan memutarnya di halaman web Anda. Namun kini dengan HTML5, Anda cukup mengupload file videonya saja ke hosting atau web server, lalu membuat tag HTML saja, dan selesai.

Wah mudah banget ya??

So… Bagaimana bentuk tag untuk menampilkan file video ke halaman web dengan HTML5? caranya cukup mudah, cukup membuat tag HTML sebagai berikut:

1
2
3
<video width="..." height="..." controls>
  <source src="namafilemovie" type="mimetype">
</video>

dimana atribut ‘width‘ untuk menentukan panjang frame video playernya (dalam satuan pixel); ‘height‘ menentukan lebarnya (pixel); ‘controls‘ untuk menampilkan panel control pada frame video playernya seperti pengatur volume, full screen, seek bar dll; ‘src‘ untuk menentukan file video yang akan ditampilkan (bisa ditulis dalam bentuk URL); ‘type‘ untuk menentukan mime type dari file video tersebut.

Perhatikan contoh berikut ini ya

1
2
3
4
5
6
7
8
<!DOCTYPE html>
<html>
<body>
<video width="320" height="240" controls>
  <source src="movie.mp4" type="video/mp4">
</video>
</body>
</html>

Penampakan dari kode di atas pada browser adalah sbb:

Web Video Player dengan HTML5

NB: Jangan lupa menuliskan <!DOCTYPE html> pada bagian paling atas HTML Anda, karena kode tersebut merupakan penciri dari HTML5.

Anda dapat mengatur sendiri panjang dan lebar frame videonya, atau menghilangkan/memunculkan controls nya. Lalu format file video apa saja yang disupport HTML5? Format file video yang disupport adalah: *.mp4 (mime type: video/mp4), *.webm (mime type: video/webm), *.ogg (mime type: video/ogg).

Terkadang pula tidak semua jenis browser mensupport ketiga jenis file tersebut, misalnya browser IE dan SAFARI hanya bisa mensupport *.mp4 saja, atau OPERA hanya mensupport *.ogg dan *.webm saja. Sedangkan untuk CHROME dan Firefox mensupport ketiganya.

Penulisan tag <video> bisa juga seperti di bawah ini:

1
2
3
4
5
6
7
8
9
10
11
12
<!DOCTYPE html>
<html>
<body>
 
<video width="320" height="240" controls>
  <source src="movie.mp4" type="video/mp4">
  <source src="movie.ogg" type="video/ogg">
  Your browser does not support the video tag.
</video>
 
</body>
</html>

Apa maksud kode di atas? Maksudnya adalah memberikan alternatif format file video. Jika browser yang digunakan mensupport *.mp4, maka file ‘movie.mp4’ yang akan dijalankan. Apabila tidak support, maka yang akan dijalankan ‘movie.ogg’. Sedangkan apabila keduanya tidak disupport maka akan muncul pesan ‘Your browser does not support the video tag.’. Jika Anda membuat kode seperti di atas, maka tentu saja Anda harus mengupload file ‘movie.mp4’ dan ‘movie.ogg’ ke server web.

Dengan HTML5, kita juga bisa membuat tombol Play, Pause, Reload sendiri untuk mengatur jalannya video. Untuk melakukan hal ini, kita menggunakan javascript. Perhatikan contoh berikut ini:

1
2
3
4
5
6
7
8
9
10
11
12
13
14
15
16
17
18
19
20
21
22
23
24
25
26
27
28
29
30
31
32
33
34
35
<!DOCTYPE html>
<html>
<body>
 
<button onclick="playVid()" type="button">Play Video</button>
<button onclick="pauseVid()" type="button">Pause Video</button>
<button onclick="reloadVid()" type="button">Reload Video</button>
<br>
<video id="video1">
  <source src="mov_bbb.mp4" type="video/mp4">
  <source src="mov_bbb.ogg" type="video/ogg">
  Your browser does not support HTML5 video.
</video>
 
<script>
var myVideo=document.getElementById("video1");
 
function playVid()
{
  myVideo.play();
}
 
function pauseVid()
{
  myVideo.pause();
}
 
function reloadVid()
{
  myVideo.load();
}
</script>
 
</body>
</html>

Keterangan:

  • Untuk menjalankan video, cukup panggil dengan method play(), untuk mempausenya dengan method pause(), dan untuk mereload video gunakan load().
  • Perhatikan kode di atas, untuk tag videonya diberi id=”video1″. ID ini nanti akan digunakan untuk proses pemanggilan elemen di javascriptnya, yaitu myVideo=document.getElementById("video1")

Tampilan dari kode di atas adalah sbb:

Web Video Player dengan HTML5

Mudah bukan membuatnya? selamat mencoba dan semoga bermanfaat. Untuk referensi lebih lengkap, Anda bisa mempelajarinya di w3schools.com.


Jika pakai subtittle VTT

<video width="1280" height="720" controls autoplay>
    <source src="somefile.mp4" type="video/mp4">
    <track default src="somefile.vtt" kind="captions" srclang="de" label="Deutsch">
</video>


Converter srt to vtt online

 https://atelier.u-sub.net/srt2vtt/


Source : https://blog.rosihanari.net/cara-mudah-menampilkan-video-di-web-dengan-html5/