Wednesday, 9 September 2015

Pengertian dan Konsep RAID

RAID merupakan kependekan dari “Redundant Array of Independent Disk”. Konsep RAID diciptakan untuk mendapatkan kapasitas yang lebih besar dan/atau Fault tolerance yang disebabkan oleh kerusakan Harddisk. Fault Tolerance adalah kemampuan dari suatu system untuk dapat tetap berfungsi meskipun mengalami kegagalan.
Fault tolerance dalam suati server dapat berupa:
• Redundant Power supply (power supply cadangan)
• Redundant FAN
• Online spare (Memory & HDD)
• Mirroring (Memory & HDD)
• RAID 1, RAID 5, dan RAID 6

RAID 0 (Disk Striping)
Disk Striping mengijinkan kita untuk menulis data ke beberapa Harddisk daripada menulis data ke satu Harddisk saja. Dengan Disk Striping, setiap Harddisk fisik akan dibagi menjadi beberapa elemen stripe (berkisar antara 8 KB, 16 KB, 32 KB, 64 KB, 128 KB, 256KB, 512KB, to 1024KB). Setiap bagian stripe dalam setiap Harddisk disebut strip.
Disk Striping dapat meningkatkan kinerja karena pengaksesan data diakses dengan lebih dari satu harddisk, sehingga lebih banyak spindle disk yang bekerja dalam melayani I/O data. Namun Disk Striping (RAID 0) tidak memiliki data redundancy / proteksi data terhadap kerusakan harddisk, karena semua data ditulis langsung apa adanya ke semua Harddisk.

Dari sisi kapasitas, maka RAID 0 kita dapat menggunakan 100% dari total jumlah kapasitas harddisk yang terpasang.
Contoh: 4 unit Harddisk 300GB RAID 0 akan menghasilkan total kapasitas yang dapat digunakan sebesar
1.2TB

RAID 1 (Disk Mirroring)
RAID 1 (Disk Mirroring) bekerja dengan prinsip cermin, yaitu berpasang-pasangan dan identik antara satu dengan yang lainnya. Jadi dengan RAID 1, data yang ditulis ke satu Harddisk secara simultan ditulis juga ke Harddisk yang lainnya. Sehingga jika terjadi kerusakan 1 Harddisk pada RAID 1, system server masih memiliki data cadangan di harddisk yang lainnya. Dan pada saat Harddisk yang rusak diganti dengan yang baru, maka secara otomatis, harddisk pengganti yang baru dipasang akan melakukan sinkronisasi data dengan harddisk yang masih berfungsi (rebuilding) Keuntungan dari RAID 1 adalah data memiliki cadangan antara yang ada di harddisk yang satu dengan yang lainnya. Dan karena isi dari kedua Harddisk tersebut adalah identik, tidak jadi masalah harddisk yang mana yang boleh rusak selama pada suatu saat hanya satu Harddisk yang rusak, sampai proses sinkronisasi berikutnya selesai.
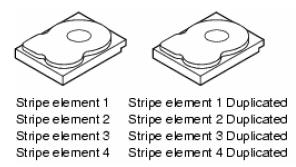
Dari sisi kapasitas, maka RAID 1 kita akan hanya memiliki kapasitas harddisk yang dapat digunakan sebanyak 50% dari total kapasitas Harddisk yang terpasang
Contoh: 4 unit Harddisk 300GB RAID 1 akan menghasilkan total kapasitas yang dapat digunakan sebesar 600GB.

RAID 5 (Disk Striping with Distributed Parity)
Sesuai dengan namaya, cara kerja RAID 5 sama dengan cara kerja RAID 0, yaitu menggunakan disk striping.Yang membedakan anatara keduanya adalah Parity. Parity ini digunakan untuk pengecekan dan perbaikan kesalahan (error checking and correcting). Parity ini disebar di beberapa disk untuk menghindari pengurangan kinerja (Performance bottleneck) pada saat pembuatan parity. Jika Parity disimpan di satu harddisk saja, maka disebut RAID 3 (Disk Striping with Dedicated Parity). Dengan adanya parity ini, maka system RAID 5 tersebut akan tetap berfungsi jika ada salah satu harddisk dalam RAID 5 tersebut itu rusak. Dan harddisk yang rusak tersebut dapat harddisk yang mana saja selama berada dalam satu system RAID 5 yang sama. Karena parity ini berasal dari perhitungan matematik dari suatu beberapa pecahan data, maka, pada saat ada satu bagian pecahan data yang hilang/rusak, system RAID 5 dapat “mengetahui” pecahan data yang hilang tesebut dengan menghitung ulang parity dengan pecahan data yang lainnya.
Secara sederhana, parity bisa dianalogikan dengan perhitungan matematik sbb; 6 + 5 = 11. Dimana angka 6 & 5 adalah data, dan angka 11 adalah parity. Jika suatu saat angka (Harddisk) 5 mengalami kerusakan, maka system dapat menghitung ulang berdasarkan parity (angka 11), angka(Harddisk) apa yang hilang tersebut. Jadi data yang ada pada harddisk yang rusak, tetaplah rusak, hanya saja dengan bantuan parity maka data pada harddisk yang hilang tersebut dapat dihitung ulang kembali. Hal ini juga yang menyebabkan untuk RAID 5 mengalami kerusakan harddisk adalah sebanyak 1 harddisk saja pada suatu saat.Kembali dengan analogi matematik diatas, jika angka (Harddisk) 6 + 5 hilang, maka kemungkinan angka 11 didapat bisa memiliki banyak kemungkinan, seperti 2+9, 3 + 8, dst. komputer tidak dapat membuat suatu perhitungan yang tepat jika data yang tersedia memiliki banyak kemungkinan.

Dari sisi kapasitas, maka RAID 5 kita akan memiliki kapasitas harddisk yang dapat digunakan sebanyak (N-1) x Kapasitas HDD dari total kapasitas Harddisk yang terpasang, dimana N adalah jumlah Harddisk.
Contoh:
• 3 unit Harddisk 300GB RAID 5 akan menghasilkan total kapasitas yang dapat digunakan sebesar 600GB.
• 4 unit Harddisk 300GB RAID 5 akan menghasilkan total kapasitas yang dapat digunakan sebesar 900GB.
• 5 unit Harddisk 300GB RAID 5 akan menghasilkan total kapasitas yang dapat digunakan sebesar 1.2TB, dst.

RAID 6 (Disk Striping with Dual Parity)
(*mulai didukung HANYA di PERC6 dan selanjutnya)
Dapat dilihat dari namanya, RAID 6 menggunakan cara kerja dan konsep yang sama dengan RAID 5 dari sisi penulisan data yang tersebar di beberapa hard disk. Yang membedakan antara RAID 6 dan RAID 5 adalah jumlah parity yang ditulis pada saat penulisan data. Jika RAID 5 menggunakan satu parity, maka RAID 6 menggunakan dua parity. Dengan menulis 2 parity, maka RAID 6 dapat mengakomodasikan kerusakan harddisk maksimal 2 unit pada saat yang bersamaan

Dari sisi kapasitas, maka RAID 6 kita akan memiliki kapasitas harddisk yang dapat digunakan sebanyak (N-2) x Kapasitas HDD dari total kapasitas Harddisk yang terpasang, dimana N adalah jumlah Harddisk.
Contoh:
• 4 unit Harddisk 300GB RAID 6 akan menghasilkan total kapasitas yang dapat digunakan sebesar 600GB.
• 5 unit Harddisk 300GB RAID 6 akan menghasilkan total kapasitas yang dapat digunakan sebesar 900GB.
• 6 unit Harddisk 300GB RAID 6 akan menghasilkan total kapasitas yang dapat digunakan sebesar 1.2TB, dst.
Sekian pembahasan tentang RAID, semoga bermanfaat.

Source : https://nasari.wordpress.com/2010/04/30/pengertian-raid/

Tuesday, 24 March 2015

Open Port 25 to All

[root@server mail]# netstat -vatn
Active Internet connections (servers and established)
Proto Recv-Q Send-Q Local Address           Foreign Address         State      
tcp        0      0 127.0.0.1:25            0.0.0.0:*               LISTEN 
 
After looking through several files I discovered how to fix it:
First you need to edit /etc/mail/sendmail.mc, find the following section:
dnl This changes sendmail to only listen on the loopback device 127.0.0.1 dnl and not on any other network devices. Comment this out if you want dnl to accept email over the network. DAEMON_OPTIONS(`Port=smtp,Addr=127.0.0.1, Name=MTA')
 
You will need to comment out the like with DAEMON_OPTIONS, using "dnl" at the begining of the line:
dnl This changes sendmail to only listen on the loopback device 127.0.0.1 dnl and not on any other network devices. Comment this out if you want dnl to accept email over the network. dnl DAEMON_OPTIONS(`Port=smtp,Addr=127.0.0.1, Name=MTA')
 
You will then need to restart sendmail
/etc/init.d/sendmail restart
 
Once you have done this sendmail will listen on all IP address on the system:

[root@server mail]# netstat -vatn
Active Internet connections (servers and established)
Proto Recv-Q Send-Q Local Address           Foreign Address         State      
tcp        0      0 0.0.0.0:25              0.0.0.0:*               LISTEN 
 
And you can recieve mail from others, and send mail from your clients.

Saturday, 21 February 2015

Installing FFMpeg

yum install ffmpeg ffmpeg-devel

If you get package not found, then you will need to add few lines in the yum repository for dag packages installation. Create a file named  /etc/yum.repos.d/dag.repo with the following contents on it

[dag]
name=Dag RPM Repository for Red Hat Enterprise Linux
baseurl=http://apt.sw.be/redhat/el$releasever/en/$basearch/dag
gpgcheck=1
enabled=1

then

yum install ffmpeg ffmpeg-devel

Saturday, 17 January 2015

Linux Change Default User Home Directory While Adding A New User

By default base directory for the system user is set to /home directory. I'd like to add user to /iscsi/home/${user} directory instead of the default /home. How do I force useradd command to add user to /iscsi/home under CentOS / RHEL / Fedora Linux server?

Default values for account creation defined in /etc/default/useradd file under CentOS / RHEL / Fedora / Debian / Ubuntu and other Linux distros. Simply open this file using a text editor, type:
# vi /etc/default/useradd

The default home directory defined by HOME variable, find line that read as follows:
HOME=/home

Replace with:
HOME=/iscsi/user

Save and close the file. Now you can add user using regular useradd command:
# useradd vivek
# passwd vivek


Verify user information:
# finger vivek

Output:
Login: vivek                            Name: Vivek Gite
Directory: /iscsi/user/vivek                Shell: /bin/bash
Last login Thu Sep 13 07:58 2007 (IST) on pts/1 from 10.16.15.2
No mail.
No Plan.

How Do I Change Existing User's Home Directory?

You need to use the usermod command to set the user's new login directory. The syntax is as follows:
 
usermod -m -d /path/to/new/home/dir userNameHere
 
Where,
  1. -d dirnanme : Path to new login (home) directory.
  2. -m : The contents of the current home directory will be moved to the new home directory, which is created if it does not already exist.
In this example set the user's new login directory to /users/v/vivek from /home/vivek, enter:
# usermod -m -d /users/v/vivek vivek

 Source : http://www.cyberciti.biz/faq/howto-change-default-home-directory/

Wednesday, 7 January 2015

Firefox browser tool to test Responsive Web design

Modern web browsers are more developer friendly, by providing Developer Tools to make web development easy. Thanks to Mozilla for integrating a feature, which allows to test the Responsive Web design with out using various physical devices.
How to use Responsive Web Design feature in Firefox?
  1. Launch Mozilla Firefox(Latest Version).
  2. Browse the website which you wish to test. For example – i will take – http://tickletheweb.com website, which is developed to have consistent view across the devices.
image
3.   Click on Firefox button on the left top corner of the browser, and select Web Developer –> Responsive Design View.
image
4.  It loads the Responsive Design View chrome -
image
5.  Select different resolutions from the dropdown control on the left corner of the chrome to test the website in different resolutions, which is simple and great.
image
6.  It also allows to test  Portrait or Landscape orientations. Click on rotate button, which toggles between the orientations.
image
Happy Web programming!!!

Source : https://roopeshreddy.wordpress.com/2013/05/26/firefox-browser-tool-to-test-responsive-web-design/

Thursday, 4 December 2014

Getting Started - Installing Git

Installing Git

Before you start using Git, you have to make it available on your computer. Even if it’s already installed, it’s probably a good idea to update to the latest version. You can either install it as a package or via another installer, or download the source code and compile it yourself.
This book was written using Git version 2.0.0. Though most of the commands we use should work even in ancient versions of Git, some of them might not or might act slightly differently if you’re using an older version. Since Git is quite excellent at preserving backwards compatibility, any version after 2.0 should work just fine.

Installing on Linux

If you want to install Git on Linux via a binary installer, you can generally do so through the basic package-management tool that comes with your distribution. If you’re on Fedora for example, you can use yum:
$ yum install git
If you’re on a Debian-based distribution like Ubuntu, try apt-get:
$ apt-get install git
For more options, there are instructions for installing on several different Unix flavors on the Git website, at http://git-scm.com/download/linux.

Installing on Mac

There are several ways to install Git on a Mac. The easiest is probably to install the Xcode Command Line Tools. On Mavericks (10.9) or above you can do this simply by trying to run git from the Terminal the very first time. If you don’t have it installed already, it will prompt you to install it.
If you want a more up to date version, you can also install it via a binary installer. An OSX Git installer is maintained and available for download at the Git website, at http://git-scm.com/download/mac.
Git OS X installer.
Git OS X Installer.
You can also install it as part of the GitHub for Mac install. Their GUI Git tool has an option to install command line tools as well. You can download that tool from the GitHub for Mac website, at http://mac.github.com.

Installing on Windows

There are also a few ways to install Git on Windows. The most official build is available for download on the Git website. Just go to http://git-scm.com/download/win and the download will start automatically. Note that this is a project called Git for Windows (also called msysGit), which is separate from Git itself; for more information on it, go to http://msysgit.github.io/.
Another easy way to get Git installed is by installing GitHub for Windows. The installer includes a command line version of Git as well as the GUI. It also works well with Powershell, and sets up solid credential caching and sane CRLF settings. We’ll learn more about those things a little later, but suffice it to say they’re things you want. You can download this from the GitHub for Windows website, at http://windows.github.com.

Installing from Source

Some people may instead find it useful to install Git from source, because you’ll get the most recent version. The binary installers tend to be a bit behind, though as Git has matured in recent years, this has made less of a difference.
If you do want to install Git from source, you need to have the following libraries that Git depends on: curl, zlib, openssl, expat, and libiconv. For example, if you’re on a system that has yum (such as Fedora) or apt-get (such as a Debian based system), you can use one of these commands to install all of the dependencies:
$ yum install curl-devel expat-devel gettext-devel \
  openssl-devel zlib-devel
$ apt-get install libcurl4-gnutls-dev libexpat1-dev gettext \
  libz-dev libssl-dev
When you have all the necessary dependencies, you can go ahead and grab the latest tagged release tarball from several places. You can get it via the Kernel.org site, at https://www.kernel.org/pub/software/scm/git, or the mirror on the GitHub web site, at https://github.com/git/git/releases. It’s generally a little clearer what the latest version is on the GitHub page, but the kernel.org page also has release signatures if you want to verify your download.
Then, compile and install:
$ tar -zxf git-1.9.1.tar.gz
$ cd git-1.9.1
$ make configure
$ ./configure --prefix=/usr
$ make all doc info
$ sudo make install install-doc install-html install-info
After this is done, you can also get Git via Git itself for updates:
$ git clone git://git.kernel.org/pub/scm/git/git.git
 
Source : http://git-scm.com/book/en/v2/Getting-Started-Installing-Git 

Friday, 5 September 2014

Server KMS


source : http://www.dbuggr.com/smallwei/resolve-windows-error-0xc004d307-maximum-rearms/