Showing posts with label Tunnel. Show all posts

Friday, 7 February 2014

How To Set Up SSH Tunneling on a VPS


Introduction


In this article, you'll learn how to create a safe, encrypted tunnel between your computer and your VPS along with how to bypass limits in a corporate network, how to bypass NAT, etc.

This article will cover some basic theory, which you can skip if you like just by going straight to the examples further down.

Communication in the Internet, Network Protocols and Communication Ports


Every piece of software installed in your computer, that wants to send or receive data through the Internet, has to use a protocol of the application layer from TCP/IP stack. Those protocols define a way to communicate and the format of the messages sent between the hosts over the Internet etc. For instance:
  • HTTP - used to download websites and files from your web browser
  • FTP - used to send files between a client and server
  • DNS - used to change host name into an IP address and vice versa
  • POP3 and (or) IMAP - used to download/browse your e-mail
  • SMTP - used to send e-mail
  • telnet - used to connect remotely to a server
  • SSH - similar to telnet, but in a secure, encrypted version, so nobody can see what we send to a server and what the server sends to us.
Next, messages of the given protocol has to be packed into a TCP segment or UDP datagram (in transport layer). Those protocols are used to transport data through the Internet - they are working in transport layer. TCP protocol is connection-oriented, which means that before sending data, it is required to create a connection between the remote machines. TCP always provides data in the correct order. If any segment will be lost in the network, it will be sent again if it does not receive the confirmation in time. TCP is considered fairly reliable.

UDP protocol is not connection-oriented. It doesn't provide retransmissioning for lost datagrams. If packets are not received in the correct order, UDP will, nonetheless give them to an application in the order that they were received. Because of that, UDP is mainly used to transmit real-time multimedia data - VoIP talks, videoconferences, audio and video. UDP is used sometimes by other protocols in the application layer - for instance, in the case of DNS.

In this case a protocol of the higher layer has to resend a query after not receiving an answer in the given amount of time. UDP is used here mainly, because it has low overhead: sending 1 small query in 1 datagram and receiving an answer takes less time and needs to transmit less data than making a TCP connection (exchanging 3 segment between hosts): sending a query from a client, sending a confirmation from the server, sending an answer from the server, and then sending a confirmation from a client and disconnecting the connection (4 segments).

To identify different connections to and from the same IP address, we use port numbers. Each server of a given application layer protocol binds to a given port number and waits for an incoming connection. The client connects to this port (in the case of a TCP connection) or sends a datagram to that port (in the case of UDP). For the most used, well-known protocols, there are reserved port numbers. For example, the HTTP server usually listens on port 80 TCP (alternatively, clients would have to connect to it by specifying the port number itself in an address - http://example.org:1234/), DNS server usually listens on port 53 UDP (sometimes port 53 TCP, too). The client needs to use a port on its side, too. They are "high ports" like 52044 and are randomly generated.

Here, you can see more reserved ports that we use everyday.

The segments and datagrams are then packed into IP packets, in the network layer. In the packets, the source and target computer are identified by IP addresses. They are global - only 1 host can use the same address at a time (excluding a magic like NAT used in home routers with private IP addresses: 192.168.x.x, 10.x.x.x, 172.16-31.x.x; x is a number between 1 and 255). Based on those addresses, routers can decide how to send the packet to get to the target computer.

The packets are then packed into frames/cells in the data link layer and then transmitted in a cable or in the form of radio waves on the local network. In the data link layer, in the frames, the computers are identified by their MAC addresses. Frames with MAC addresses are completely deleted from the routers which extract packets from them. They decide which network to send the packets to, pack them into new frames and send them on their way. If a network between both routers uses MAC addresses, addresses of those routers are included in the frame - the source one and the target one. It's not possible to communicate between two computers in different networks using only MAC addresses, even if they are not duplicated - the producer associates only one address with one card, so any manufactured carts can have the same MAC address as a card made by another producer.

TCP/IP (DoD) model

Encapsulation

About SSH. Theory, Part 1


SSH is a protocol in the application layer. It's the successor of telnet and is used for connecting to your VPS remotely in text mode. Unlike telnet, SSH is encrypted. It uses port 22 TCP, but you can easily change the port in your server's configuration.

SSH allows the user to authenticate themselves several different ways. For example:

-using a username and password

-using a pair of keys - first, a private one (top secret), and second - a public one (on server): a program that you use to connect with SSH has to solve math problem using a private key and send the solution to the server. The problem is different each time, so it's difficult to break the key using that authentication method.

Nowadays we use version 2 of SSH.

The most popular SSH server implementation is OpenSSH. The most popular clients are PuTTY (for Windows) and OpenSSH (for Linux). Both PuTTY and OpenSHH allow users to create tunnels.

SSH allows users to create a TCP tunnel between the server and client and to send data through that tunnel. SSH supports TCP tunnels only, but you can work around that i.e. via a SOCKS proxy. A tunnel like that is established between a chosen TCP port on server and a chosen local port. It's unencrypted, of course, so anybody can check what we use it for.

Concepts that will be used

Loopback interface - a virtual network card installed in the system with the IP address 127.0.0.1. Only applications installed on the system have access to that address. Remote access is not possible. You can start a VPS on that interface and have remote access only from the same system or via tunnel.

SMTP - an application layer protocol that let you send e-mails. It's used for both communicating between mail servers and the communication between a server and a mail client. SMTP uses port 25 TCP for unencrypted communication and port 587 TCP or 465 TCP (deprecated - not recommended) for an encrypted connection (SSL).

POP3 - protocol in the application layer used to download new e-mails from a server to local mail client. It's rarely used nowadays as it has been superseded by IMAP. For unencrypted connections it uses port 110 TCP, for encrypted connections - port 995 TCP.

IMAP - a protocol similar to POP3, but with support for folders, labels, reading and managing messages and folders on the server without downloading everything to local PC and deleting it from the server. IMAP uses port 143 TCP for unencrypted connections and port 993 TCP for encrypted connections.

Example 1: Tunnel to an IMAP server


A tunnel between local port 143 on the loopback interface - 127.0.0.1 - and the IMAP server for receiving mail (unencrypted connection) on the same remote machine.

Unix and OpenSSH:

ssh abc@def -L 110:127.0.0.1:110
 
abc - username on server
def - server address
110: - local port that will be opened on loopback interface (127.0.0.1) on local machine
127.0.0.1 - IP address of computer that we creating a tunnel to via our SSH tunnel
:110 - port number of target machine we'll get to via tunnel

Windows and PuTTY:

Here you can read how to create connection to your VPS using PuTTY. That connection is required to create a tunnel.
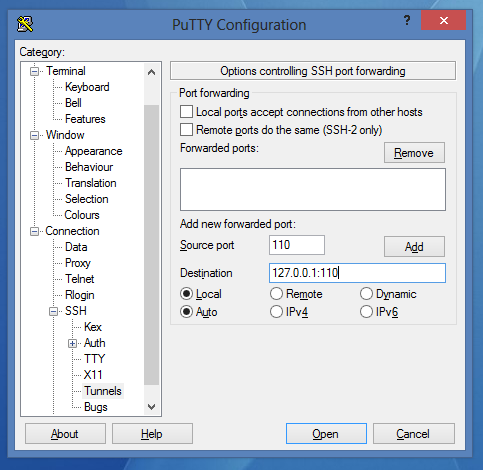
  • Choose your connection, load data and go to Connection->SSH->Tunnels and set it as follows:
    Yay!


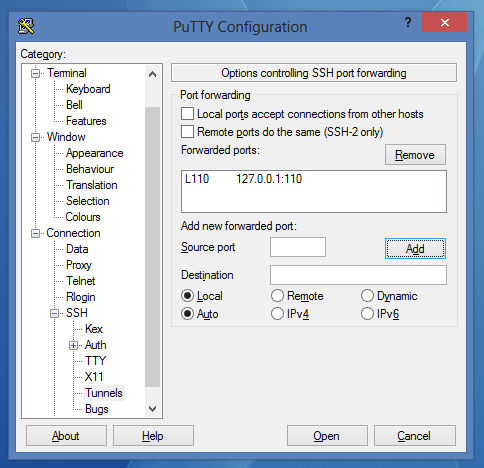
  • Click on Add. After that every protocols it should look like this:
    Yay!


  • Now you can save the session and connect using it.

Now you can just configure your mail client to connect to the VPS not directly, but using port 110 of the loopback interface - 127.0.0.1. You can do the same thing with different protocols - SMTP (25), IMAP (143), etc.

Example 2. Tunnel to a Web Server


A tunnel between local port 8080 on the local interface (127.0.0.1) and the WWW server, bound to a remote machine's port 80. This time we'll connect to it using the loopback interface.

As I said earlier, the HTTP protocol is used to download WWW websites to the browser.

Unix and OpenSSH:


ssh abc@def -L 8080:11.22.33.44:80
 
    abc - username on server
    def - server address
    8080: - port on the local machine that will be opened on loopback interface (127.0.0.1)
    11.22.33.44 - IP address of the server that we'll create a tunnel to using SSH

Windows and PuTTY:


  • Choose the connection and load the settings.
  • Go to Connection->SSH->Tunnels
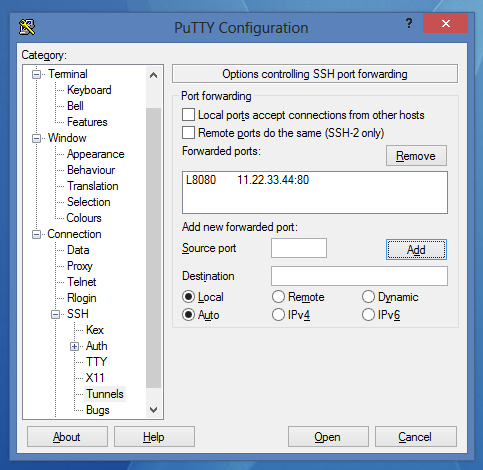
  • Set it like this:

    it looks like this

  • Click on Add:

    it looks like that

  • Now you can save the session and connect.

Theoretically speaking, after going to 127.0.0.1:8080 in your browser, you should see a website located on the remote server we've connected to.

Practically speaking, HTTP 1.1 introduced the Host parameter to queries. This parameter is used to send the DNS domain name of the VPS we're connecting to. If it uses the Virtual Host mechanism, the page you'll get will either be an error page or the server's main page, but not through the tunnel.

In this case, we have to do one more thing: in the hosts file on local PC, add the VPS address and your loopback interface:
127.0.0.1 website
website is the address to site you want to connect to (without the http:// at beginning and the / at the end).

The Hosts file is located at /etc/hosts (Linux) or C:\Windows\system32\drivers\etc\hosts (Windows). To edit this file, you must be an administrator or have administrative privileges.

Important! If you want to create a tunnel on a local port numbered less than 1024 on Unix systems, you must have root privileges.

Example 3. SOCKS proxy


A SOCKS proxy allows you to send traffic from any protocol through a tunnel. It looks, from the outside, like a single TCP connection.

In this example, we'll create a tunnel between an SSH server and a client on port 5555 on the loopback interface. Next, we'll set our browser to use our SOCKS server as proxy server for every outgoing connections.

This solution might be useful to bypass the restrictions on corporate networks. If the port that our SSH uses is locked, we can tell the server to listen on port 443 using the Listen option in the OpenSSH configuration file (/etc/ssh/sshd_config or /etc/openssh/sshd_config).

Unix and OpenSSH:


ssh abc@def -D 5555
 
    abc - username
    def - server address
    5555 - local port number, where the tunnel will be created

Windows and PuTTY:


  • Choose the connection and load the settings.
  • Go to Connection->SSH->Tunnels
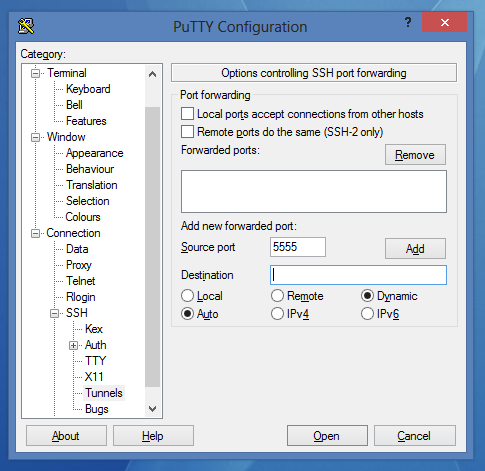
  • Set it like this:

    noname1

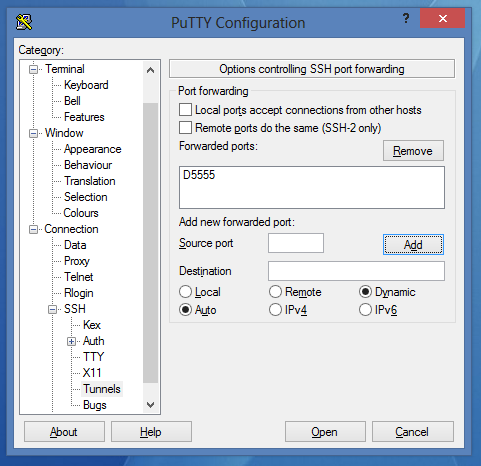
  • Click on Add:

    noname2

  • Save the session and connect to it.

In your browser settings, set up a SOCKS proxy that runs on 127.0.0.1:5555, from now until you close the connection in PuTTY or OpenSSH.

Example 4. Bypassing NAT


NAT (specifically PAT, which is the NAT form used in home routers) is a mechanism that allows many people to use one internet connection. A router that uses NAT has one public address and modifies all private addresses in packets received from internal network to its own public address and sends them to the Internet. Upon receiving packets back, it does the opposite - it remembers the IP addresses and port numbers in a special NAT table.

A connection from the outside is possible only when we set appropriate port forwarding on the router. However, we can bypass that problem and create a tunnel between our computer and the server to connect our computer and server directly.

Part 1.


In the second part, we'll create a tunnel between local port 80 (on our computer - the local HTTP server) and port 8080 on the remote server. However, because of security reasons, the remote port 8080 will be opened only on the loopback interface of the VPS - 127.0.0.1. Because of that, we have to reconfigure our server to open connections on every port. We'll do that now.

  1. In your favorite editor, open the /etc/ssh/sshd_config (or /etc/openssh/sshd_config) file as root.
    nano /etc/ssh/sshd_config

  2. Find:
    #GatewayPorts no

  3. Change that line to:
    GatewayPorts yes

  4. Save the file and close the editor.

  5. Restart SSHD server:
    Debian/Ubuntu:
    service ssh restart
    
    CentOS:
    /etc/init.d/sshd restart

Part 2.


In this section, we will create the tunnel.

Unix and OpenSSH:


ssh abc@def -R 8080:127.0.0.1:80
 
    abc - username
    def - server address
    8080 - port number that will be opened on remote server - our proxy server
    127.0.0.1 - IP address we open tunnel to
    80 - port number we open tunnel to
This time, our tunnel is local, but we can make a tunnel connection to other computers in the same network by using NAT.

Windows and PuTTY:


  • Choose the connection and load the settings.
  • Go to Connection->SSH->Tunnels
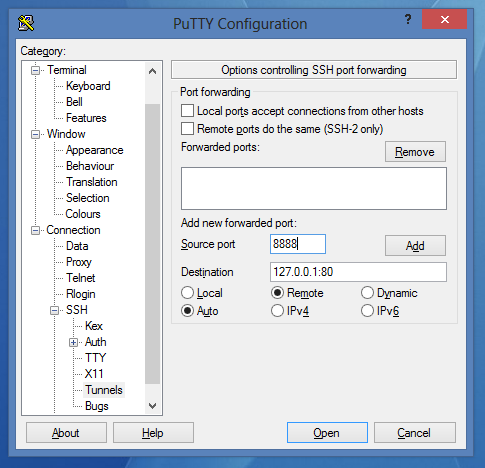
  • Set it like that:

    It looks like that

  • Click on Add:

    noname3

  • Save the session and connect.

After logging in, we can get to our local HTTP server from outside our network through an OpenSSH proxy server that has a public IP address. Open the following in a browser:
http://IP-address-or-domain-of-our-server-change-that-for-your-name:8080/

Theory continued


As you can see, there are three types of SSH tunnels:

  • Local - -L option - a tunnel is opened on our local port and listens for connections that are redirected first to our saved connection to the SSH server, and next to the target host.

  • Remote - -R option - a tunnel is opened on SSH server. After receiving a connection by the server, all transmissions are redirected out our local tunnel.

  • Dynamic - -D option - a tunnel is opened on a local loopback interface. Transmission takes place through the SOCKS protocol. You can tunnel any packets through this - TCP, UDP. It's possible to connect to any server on the Internet through a proxy SSH server. To redirect all system traffic through the SOCKS proxy, you can use a program like proxifier.
Source : https://www.digitalocean.com/community/articles/how-to-set-up-ssh-tunneling-on-a-vps

Thursday, 29 August 2013

Kupas Tuntas SSH Tunneling

SSH Tunneling adalah teknik yang wajib dikuasai hacker. Teknik ini sangat cocok dipakai sebagai backdoor dari  dunia luar langsung menembus ke dalam “behind enemy lines” melewati semua firewall, IDS, IPS atau apapun itu di perbatasan. Dalam artikel ini saya juga menjelaskan bagaimana melakukan chaining tunnel, yaitu menyambung tunnel dengan tunnel lain.

Apa itu Tunneling?
Secara sederhana tunneling berarti mengirimkan data melalui koneksi lain yang sudah terbentuk. Kalau anda buka situs internet banking, pasti anda akan membukanya dengan URL berawalan “https”, yang sejatinya adalah data dalam protokol HTTP yang dikirimkan melalui koneksi dengan protokol SSL, atau “HTTP over SSL”, dalam bahasa gaulnya berarti HTTP digendong sama SSL.
SSH dan SSL adalah dua contoh tunneling protocol, keduanya bisa dipakai untuk menggendong data dalam protokol apa saja (tidak hanya http). Hanya bedanya adalah pada SSL dibutuhkan public key certificate dalam format X.509 yang perlu diverifikasi melalui Certificate Authority resmi. SSH tidak memerlukan public key certificate, sehingga lebih sederhana dan lebih mudah dipakai.

Protocol Encapsulation
Dalam kasus https, data dalam protokol HTTP di-enkapsulasi (dibungkus) dalam protokol SSL sebagai payload. Enkapsulasi juga terjadi dalam layer model TCP/IP, yaitu data pada layer yang lebih atas menjadi payload dan di-enkapsulasi dengan protokol pada layer di bawahnya.
Anda tentu tahu boneka lucu terbuat dari kayu dari Rusia bernama Matryoshka. Keunikan boneka ini adalah boneka yang berukuran kecil bisa dimasukkan ke dalam boneka yang lebih besar, dan boneka yang lebih besar juga bisa dimasukkan ke dalam boneka yang lebih besar lagi hingga pada akhirnya hanya ada satu boneka saja yang paling besar. Bila boneka yang paling besar itu dibuka, maka di dalamnya akan ada satu boneka yang lebih kecil, bila boneka tersebut dibuka, maka akan ditemukan boneka lagi yang lebih kecil, demikian seterusnya hingga boneka yang terkecil.
Gambar di bawah ini sangat tepat menggambarkan apa itu protocol encapsulation.

Gambar di atas menggambarkan bagaimana data ketika dikirim dienkapsulasi dan dikirimkan melalui protokol yang berada pada layer di bawahnya. Pada gambar di atas bisa dikatakan bahwa email message tersebut dikirimkan dalam bentuk paket SMTP over TCP over IP over Ethernet. Jadi pada akhirnya semua data tersebut akan terkirim dalam bentuk paket ethernet.
Dalam ilustrasi boneka matryoshka, pesan email adalah boneka matryoshka terkecil. Boneka ini dimasukkan dalam boneka matryoshka SMTP yang ukurannya lebih besar, kemudian boneka matryoshka SMTP ini dimasukkan dalam boneka matryoshka TCP, kemudian boneka matryoshka TCP ini dimasukkan dalam boneka matryoshka IP, dan akhirnya dimasukkan ke dalam boneka matryoshka ethernet yang berukuran paling besar.
Jadi boneka matryoshka yang diterima lawan biacara adalah boneka matryoshka yang terbesar. Bila boneka ini dibuka, di dalamnya ada boneka Matryoshka IP yang lebih kecil, dan bila boneka ini juga dibuka, di dalamnya ada boneka matryoshka TCP yang semakin kecil ukurannya. Bila boneka matryoshka TCP ini dibuka, di dalamnya ada boneka matryoshka SMTP yang didalamnya ada matryoshka email message. Email message adalah boneka matryoshka terkecil.

Port Forwarding
Port forwarding atau port mapping pengalihan (redirection) koneksi dari suatu IP:Port ke IP:Port yang lain.  Ini artinya adalah semua koneksi yang ditujukan ke IP:Port asal akan dialihkan ke IP:Port tujuan seolah-olah client sedang menghubungi IP:Port tujuan secara langsung.
Contoh: bila kita definisikan port forwarding 127.0.0.1:8080 dipetakan ke 192.168.10.10:80, artinya bila browser di arahkan ke url http://127.0.0.1:8080, maka request HTTP tersebut akan diteruskan ke 192.168.10.10:80. Jadi walaupun pada localhost (127.0.0.1) port 8080 tidak ada web server, namun web browser bisa membuka web pada url http://localhost:8080.
Gambar di bawah ini adalah contoh port forwarding dari web nakahara-informatics.com.
Pada port forwarding tersebut, didefinisikan sehingga klien dari dunia luar bisa mengakses service yang ada pada jaringan internal. Port forwarding yang didefinisikan adalah:
  • 64.130.31.59:10004 –> 192.168.1.103:22
  • Artinya untuk SSH ke host 192.168.1.103, maka client harus ssh ke IP 64.130.31.59 port 10004.
  • 64.130.31.59:10001 –> 192.168.1.100:22
  • Artinya untuk SSH ke host 192.168.1.100, maka client harus ssh ke IP 64.130.31.59 port 10001.
  • 64.130.31.59:8080 –> 192.168.1.102:80
  • Artinya untuk mengakses halaman web di host 192.168.1.102, maka url yang harus dibuka di browser adalah http://64.130.31.59:8080
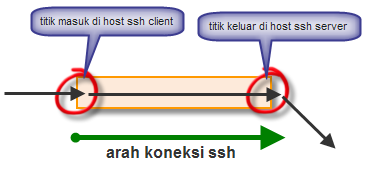
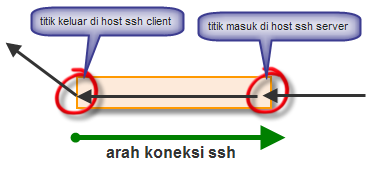
Port forwarding pada ssh, mirip dengan port forwarding pada gambar di atas, namun ada sedikit perbedaan. Pada port forward gambar di atas, titik koneksi masuk dan keluar sama, artinya koneksi masuk ke IP dan port tertentu, dan koneksi tersebut akan diforward ke tempat lain dari titik yang sama juga. Sedangkan port forwarding pada ssh, titik keluarnya berbeda dengan titik masuknya. Agar lebih jelas, silakan lihat gambar di bawah ini.
Pada gambar di atas pada bagian atas, koneksi yang masuk di titik masuk, diforward ke tujuan dari titik itu juga. Ini adalah tipikal port forwarding di router/proxy. Sedangkan pada gambar di bawahnya, koneksi yang masuk di titik masuk, diforward ke tujuan dari titik lain di ujung sebelah kanan. Kotak panjang yang menghubungkan dua titik berwarna oranye tersebut menggambarkan koneksi ssh. Koneksi yang masuk akan diforward dari ujung koneksi ssh, bukan dari titik masuknya.

Konsep SSH Tunneling
SSH adalah protokol yang multiguna, selain untuk menggantikan telnet, SSH juga mendukung fitur tunneling, port forwarding, download/upload file (Secure FTP), SOCKS proxy dsb. Semua fitur tersebut dibungkus dengan enkripsi sehingga data yang lewat melalui protokol ini aman dari jangkauan hacker.
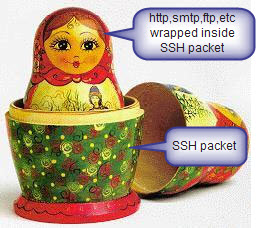
Dalam ssh tunneling, data yang dikirimkan melalui koneksi ssh akan di-enkapsulasi (dibungkus) dalam paket SSH seperti pada gambar di bawah ini.
Selain enkapsulasi paket, dalam ssh tunnel juga dibutuhkan port forwarding. Port forwarding dalam SSH tunnel ada 3 jenis:
  • Local Port Forwarding
  • Remote Port Forwarding
  • Dynamic Port Forwarding
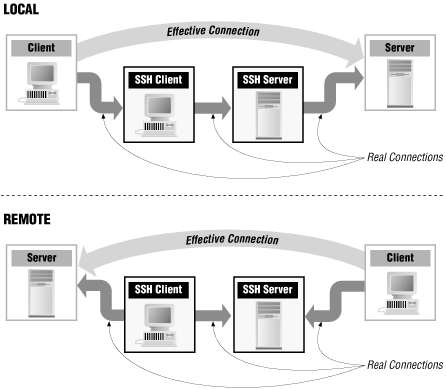
Perhatikan gambar di bawah ini untuk memahami perbedaan antara local port forwarding dan remote port forwarding.
Dari gambar di atas jelas terlihat bahwa perbedaan antara local dan remote port forwarding.
  • Pada local port forwarding, komputer yang bertindak sebagai ssh client akan menjadi titik masuk koneksi yang akan diforward dan komputer yang bertindak sebagai ssh server menjadi titik keluar. Jadi koneksi yang masuk ke titik masuk di komputer ssh client akan diforward ke tujuan dari komputer ssh server. Gambar di bawah ini ilustrasi lain dari ssh local port forwarding.

  • Pada remote port forwarding, komputer yang bertindak sebagai ssh server akan menjadi titik masuk koneksi yang akan diforward dan komputer yang bertindak sebagai ssh client menjadi titik keluar. Jadi koneksi yang masuk ke titik masuk di komputer ssh server akan diforward ke tujuan dari komputer ssh client. Gambar di bawah ini ilustrasi lain dari ssh remote port forwarding.
Jadi yang perlu diingat dalam perbedaan antara local dan remote port forwarding adalah posisi titik masuk koneksi yang akan diforward. Bila titik masuknya ada di komputer yang berperan sebagai ssh client, maka itu adalah local port forwarding, namun bila titik masuknya di komputer ssh server, maka itu adalah remote port forwarding.
Dalam bahasa sederhananya, disebut local karena dari sudut pandang ssh client, titik masuknya ada di localhost, dan disebut remote karena titik masuknya bukan di localhost, tapi di komputer ujung sana.

Static vs Dynamic Port Forwarding
Sebenarnya dynamic port forwarding termasuk local port forwarding juga karena pada dynamic port forwarding, titik masuk koneksi yang akan diforward berada di komputer yang berperan sebagai ssh client. Namun pada local dan remote port forwarding biasa (static), IP address dan port asal dan tujuan harus disetting dulu sebelum bisa dipakai, jadi sifatnya statis.
(static) local port forwarding
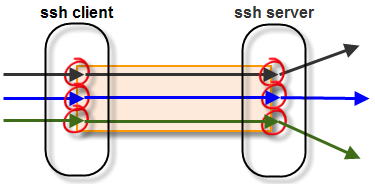
Gambar di atas adalah (static) local port forwarding biasa. Pada local port forwarding biasa (static), setiap pemetaan port asal dan IP:port tujuannya harus disetting satu per satu. Jadi terlihat pada gambar di atas, bila ada 3 tujuan yang ingin dihubungi, maka 3 pemetaan port asal dan IP:port tujuan harus disetting semua sebelum bisa dipakai.
Pada gambar di atas terlihat di ssh client ada 3 port yang LISTEN (3 bulatan merah di sisi ssh client)  untuk 3 tujuan yang berbeda. Perlu dicatat juga bahwa ketiga pemetaan port forwarding tersebut dilakukan di atas satu koneksi ssh yang sama (multiple port forwarding on single ssh conection).
dynamic (local) port forwarding
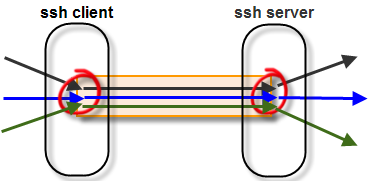
Sedangkan pada dynamic (local) port  forwarding, kita tidak perlu menentukan pemetaan port asal dan IP:tujuan untuk setiap tujuan. Kita hanya perlu menentukan port berapa yang akan LISTEN di localhost (di komputer ssh client), dan semua aplikasi bisa memanfaatkan port tersebut sebagai proxy ke tujuan manapun dengan protokol SOCKS (SOCKS proxy). Berbeda dengan gambar sebelumnya, pada dynamic port forwarding di sisi ssh client hanya ada satu port yang LISTEN (hanya ada satu bulatan merah).

Multiple Port Forwarding on Single SSH Connection
Walaupun jarang dipakai, namun sebenarnya ssh mendukung banyak port forwarding dalam satu koneksi ssh. Kalau kita membutuhkan 3 local port forwarding dan 4 remote port forwarding, kita tidak perlu membuat 7 koneksi ssh, cukup satu koneksi ssh saja.
multi port forwarding on a single ssh connection
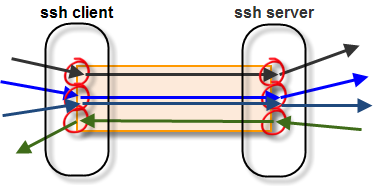
Gambar di atas memperlihatkan ilustrasi multi port forwarding pada satu koneksi ssh yang sama. Dalam satu koneksi ssh tersebut port forwarding yang dibuat adalah:
  • Panah berwarna hitam paling atas adalah local port forwarding.
  • Panah berwarna biru dan biru gelap di tengah adalah dynamic port forwarding.
  • Panah berwarna hijau paling bawah adalah remote port forwarding.
Daripada membuat 3 koneksi ssh untuk masing-masing port forwarding, jauh lebih sederhana dan praktis membuat multi port forwarding pada satu koneksi ssh.

Membuat Local Port Forwarding
Sekarang setelah memahami konseptualnya, kita langsung praktek bagaimana membuat ssh tunnel dengan putty di Windows dan command line ssh di Linux.Command untuk membuat local port forwarding secara umum adalah:
ssh -L localport:servertujuan:porttujuan user@ssh_server
Contohnya adalah:
ssh -L 8888:www.kompas.com:80 admin@serverku.com
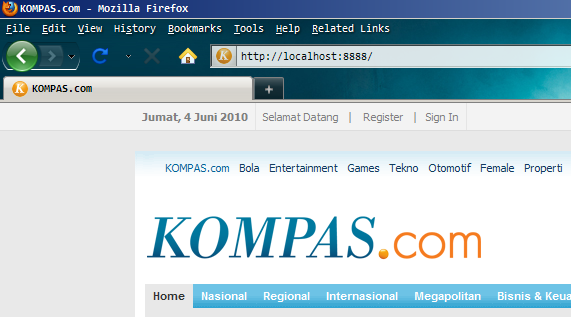
Perintah di atas akan membuat semua koneksi ke port 8888 di localhost, dialihkan ke www.kompas.com port 80 melalui serverku.com. Titik masuknya adalah localhost:8888 dan titik keluarnya adalah serverku.com. Bila kita membuka browser ke URL http://localhost:8888, request HTTP tersebut akan sampai di www.kompas.com:80 melalui serverku.com, artinya dari sudut pandang www.kompas.com koneksi berasal dari serverku.com, bukan dari komputer yang menjalankan perintah tersebut. Dalam log web server www.kompas.com, IP address visitor adalah ip address serverku.com, bukan ip address komputer yang menjalankan perintah tersebut.
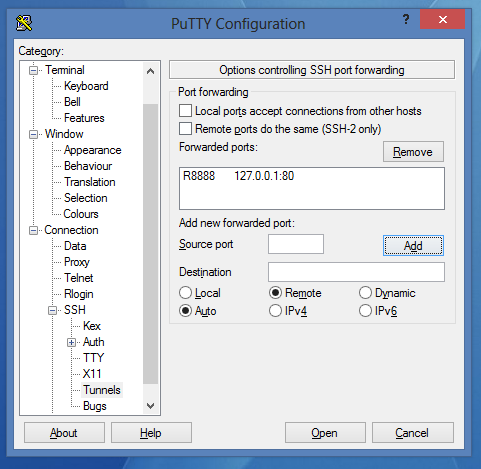
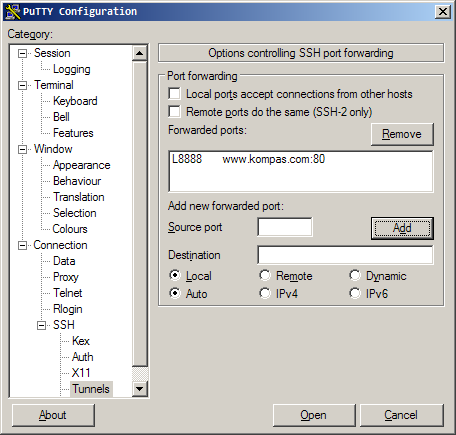
Kalau dalam windows, kita bisa gunakan putty.exe untuk membuat local port forwarding tunnel. Gambar di bawah ini adalah setting untuk forward koneksi localhost:8888 ke www.kompas.com:80. Caranya adalah dengan memasukkan 8888 ke dalam field “Source port”, dan memasukkan www.kompas.com:80 ke dalam field “Destination”. Setelah itu klik “Add”. Anda bisa menambahkan port forwarding yang lain sebanyak yang anda butuhkan dengan mengulang cara yang sama lalu klik “Add” lagi.


Membuat Remote Port Forwarding
Command untuk membuat remote port forwarding di Linux secara umum adalah:
ssh -R remoteport:servertujuan:porttujuan user@ssh_server
Contohnya adalah:
ssh -R 8080:192.168.1.1:80 admin@serverku.com
Perintah di atas akan membuat setiap koneksi ke serverku.com:8080 akan dialihkan ke 192.168.1.1 melalui komputer yang menjalankan perintah tersebut. Pada log server tujuan (192.168.1.1:80) yang terlihat dari koneksi yang masuk bukan ip address serverku.com. Server 192.168.1.1:80 akan melihat koneksi berasal dari komputer yang menjalankan perintah di tersebut (komputer ssh client).
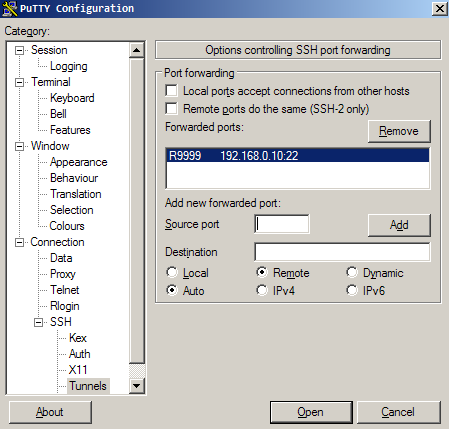
Kalau dengan putty caranya masukkan 9999 ke dalam kolom “Source port”, kemudian masukkan 192.168.1.1:80 sebagai kolom “Destination”, lalu klik Add. Anda bisa menambahkan banyak port forwarding dalam satu koneksi ssh, dengan cara yang sama, lalu klik Add sebanyak yang anda butuhkan.

Remote port forwarding ini sangat cocok dipakai sebagai backdoor. Bila seorang hacker telah berhasil menyusup hingga “behind enemy lines”, dia bisa membuat remote port forwarding tunnel dari “behind enemy lines” ke server di luar milik hacker. Ini artinya hacker telah membuat terowongan, dengan pintu masuk di luar, dan pintu keluar di “behind enemy lines”. Ingat pada Remote port forwarding, titik/pintu masuk adalah di sisi ssh server, dan titik/pintu keluar di ssh sisi client. Dengan memakai terowongan ini, hacker bisa masuk melalui pintu di servernya sendiri yang berada di luar, dan secara otomatis hacker tersebut masuk ke “behind enemy lines” karena pintu keluar dari terowongan ini ada di “behind enemy lines”.

Chaining Tunnel
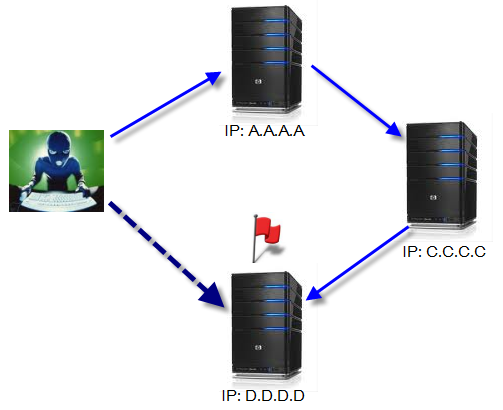
Terkadang ketika melakukan penetrasi, di dunia nyata keadaan tidaklah semulus dan seindah teori atau dalam lab. Firewall seringkali membuat kita tidak bisa bebas membuat koneksi ke server yang kita inginkan. Dalam situasi seperti ini kita harus berputar-putar melalu beberapa server, sampai kita bisa mencapai server target.
Perhatikan gambar di atas, target yang akan diserang hacker adalah server D.D.D.D port 3389, yaitu Remote Desktop connection, hacker ingin melakukan remote desktop komputer tersebut. Namun server D hanya bisa diakses oleh server C, dan server C hanya bisa diakses dari A. Hacker sudah menguasai penuh server A dan C, bagaimana caranya hacker tersebut bisa remote desktop ke D ?
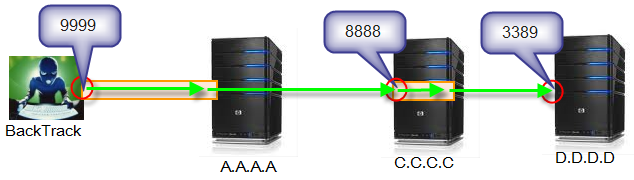
Tujuan akhirnya adalah hacker ingin koneksi ke localhost:9999 di laptop backtracknya, akan diforward ke D.D.D.D:3389. Jadi nanti dia tinggal menjalankan RDP client dengan memasukkan localhost:9999, dan dia otomatis akan terkoneksi ke RDP di server D. Sebagai info tambahan, komputer A dan C adalah linux dengan ssh service diaktifkan.
Mari kita coba membuat semua tunnel ini purely hanya dengan ssh.
1. Buat port forwarding localhost:9999 –> C.C.C.C:8888 via A.A.A.A.
Hacker menjalankan ssh client di backtracknya untuk membuat koneksi ke ssh server A.A.A.A. Dalam koneksi ssh ini, dia membuat local port forwarding 9999:C.C.C.C:8888, yang artinya adalah koneksi ke port 9999 di backtrack si hacker akan diforward ke C.C.C.C:8888 via A.A.A.A.
2. Buat port forwarding C.C.C.C:8888 –> D.D.D.D:3389 via C.C.C.C
Di komputer C, hacker membuat koneksi ssh ke localhost (ke C itu sendiri). Dalam koneksi ssh ke diri sendiri ini dia membuat local port forwarding 8888:D.D.D.D:3389. Artinya adalah koneksi ke C.C.C.C:8888 akan diforward ke D.D.D.D:3389 (via C.C.C.C itu sendiri).
Kita membuat 2 tunnel, yang pertama adalah tunnel dengan pintu masuk di backtrack hacker dan pintu keluar di A.A.A.A. Tunnel kedua adalah denngan pintu masuk dan pintu keluar di C juga.
Pada tunnel pertama, koneksi ke pintu masuk di backtrack hacker (localhost:9999), akan diforward ke C.C.C.C:8888 via A.A.A.A Sedangkan pada server C.C.C.C sudah dibuat port forwarding sehingga semua koneksi yang masuk ke C.C.C.C:8888 akan diforward menuju D.D.D.D:3389.
Jadi akhirnya nanti alurnya adalah:
localhost:9999 –> C.C.C.C:8888 –> D.D.D.D:3389


Gambar di atas menunjukkan chain tunnel yang dibuat. Koneksi ke localhost:9999 akan diteruskan ke C.C.C.C:888 dan koneksi ke C.C.C.C:8888 akan diteruskan ke D.D.D.D:3389. Jadi sama artinya dengan koneksi ke localhost:9999 diteruskan ke D.D.D.D:3389.

Source : http://www.ilmuhacking.com/how-to/kupas-tuntas-ssh-tunneling/

Mempercepat Koneksi dengan ssh Tunnel

Abis liat-liat google akhirnya nemu ssh tunnel. Saya akan mencoba untuk mempercepat koneksi kita dengan ssh tunel.

ssh-tunnel
Syarat-syarat yang diperlukan :
1. Memiliki account ke SSH Server
2. SSH server support tunnel
3. Komputer anda memiliki SSH client
4. Koneksi Internet di SSH Server lebih kencang
5. SANGAT DISARANKAN server SSH terletak pada jalur IIX.

Kita akan mencoba di 2 sistem operasi. Saya pilih windows dan linux. Saya akan mengulas dari windows terlebih dahulu.


A. Percobaan yang di sistem operasi windows Xp sp3, P3 800;

Memory 387; VGA 128 MB Nvidia Gefore 5400, seperti ini:

1. Siapkan putty (software buat konek ke ssh server). Silahkan minta sama mbah google untuk dapetin putty
2. Copy putty ke folder C:WINDOWS
3. Lalu, klik start pilih Run, atau bisa menggunakan tombol kombinasi windows + R, di keyboard.
4. Di run ketikkan:
putty -D port ssh -C userid@ip ssh server
tekan Enter <|
5. Tunggu beberapa saat sampai diminta untuk memasukkan password
6. Lalu masukkan kita masukkan password
7. Sekarang minimize aja putty nya
8. Lalu buka browser, saya akan menggunakan internet explorer 7
9. Selanjutnya klick tool > internet option > pilih tab connection >
pilih LAN setting > cek box pd proxy server > klick advanced >
hilangkan tanda cek bok pd “use same proxy server for all
protocols” > hapus semua settingan yg ada di colum HTTP,Secure,
FTP. > pada socks isikan : localhost portnya 22 > klick OK
10. Sekarang coba kita akan cek koneksi internetnya, masuk ke situs http://speedtest.net untuk mengecek speed, jika speednya bertambah dari yang kita punya maka berhasil, tapi kalau nggak nambah ya berarti gagal deh. :D

B. Percobaan pake linux:
Dari yang saya dapat dari si mbah google settingannya tidak jauh berbeda tapi tergantung dari browser yang dipakai. Mungkin perbedaannya di command aja.
Berikut langkahnya:
1. Buka terminal programnya atau dengan tombol kombinasi ALT+F2 > ketikkkan Konsole
2. Kemudian install putty nya. Kalo belom ada minta sama mbah google aja, minta yang untuk linux
3. Kalo udah diinstal putty nya. Berikutnya langsung konek pake ssh dengan cara ketikkan :
contoh ;
# ssh -D 22 -C  HNaccount at 202.250.32.12

Catatan
* -D : maksudnya untuk membuka socks proxy,
Dan SOCKS ini lah yang kita gunakan untuk tunneling.
-C : untuk compressi data yg lewat.
22 : port ssh yg digunakan ato yg terbuka untuk koneksi ssh Port nya nggak harus 22, bisa berapa aja sesuai setting ssh server nya.

* settingan itu hanya berlaku pada browser yg diset ajah :D, tidak mempengaruhi applikasi yg lain yg sedang berjalan. misal mirc, applikasi yg lain yg konek ke internet akan tetap menggunakan koneksi internet anda yg sudah ada, misal speedy seperti.
* jika browsing atau downlaod anda masih lemot berarti server ssh yg anda gunakan juga lemot juga :D

* koneksi akan terputus jika :
1. Aplikasi putty di close ato terminate karena hang.
2. Koneksi internet yg anda gunakan anda terputus
3. Atau server ssh yang anda gunakan mati atau terputus dari internet, karena kena ddos atau kena trojan atau emang dimatiin. :D atau anda ketahuan sama admin, karena account ssh anda ilegal, jadi anda ditendang dr server ssh. :D
4. Settingan pada browser di hapus. Atau di set ke deafult.
5. Komputer anda kena virus/trojan ato kena flood/ddos, shg tidak bisa konek ke internet dg baik.

* sebaiknya jgn sering sering gunain cara ini jika account ssh anda illegal, krn kemungkinan ketahuan yang punya atau admin server ssh, anda bisa kena banned /block, jadi nggak bisa konek lagi. Tapi nggak papa cari target aja lagi :D.
======================================================================
Beberapa hal yg mungkin terjadi menggunakan ssh tunnel ini, yaitu:
Mungkin browsing anda tidak bisa cepat sesaui dengan harapan, karena tergantung pada server ssh yang digunakan. Tetapi download ke server luar bisa lebih cepat. Atau sebaliknya
======================================================================


Mungkin hanya ini yang bisa saya share, semoga bermanfaat untuk teman-teman semua.

Source : http://adhie70.blogdetik.com/mempercepat-koneksi-dengan-ssh-tunnel/