Showing posts with label CentOS. Show all posts

Saturday, 7 November 2020

Mengatasi The Requested URL Not Found On This Server Pada Linux

 Hari ini dikantor ada sedikit kendala pada saat ingin mengakses website yang ada didalam server. Karena sistem operasi yang digunakan pada server kantor adalah Linux Ubuntu dan juga menggunakan Apache sebagai web servernya ternyata ada sedikit kendala the requested url not found on this server. Jadi pada tutorial Linux kali ini saya akan sharing mengenai bagaimana cara mengatasi the requested url not found on this server pada Linux Ubuntu.

Jadi di kantor itu untuk sistem operasi servernya menggunakan sistem operasi Linux Ubuntu dengan Apache sebagai web servernya, karena biasanya web server akan secara otomatis menyala saat Linux dinyalakan, jadi tidak perlu lagi menyalakan web servernya secara manual.

Kalau kamu ingin mengetahui bagaimana caranya menggunakan Linux dengan Apache langsung sebagai servernya, mungkin tutorial berikut ini dapat membantu kamu untuk melakukan konfigurasinya : Cara Install PHP Apache MySQL dan phpMyAdmin di Ubuntu

Dan berikut ini adalah cara mengatasi masalah erro not found pada website yang berada di Apache Linux :
  • Buka terminal lalu masuk sebagai root dengan perintah seperti dibawah ini :
sudo su
  • Selanjutnya masukan password root pada sistem operasi Linux kamu.
  • Lalu edit file apache2.conf yang biasanya digunakan untuk melakukan konfigurasi Apache2 dengan mengetikan perintah seperti dibawah ini :
nano /etc/apache2/apache2.conf
  • Nanti akan terbuka isi file konfigurasi apache2.conf pada terminal, lalu cari tulisan seperti dibawah ini :
<Directory /var/www/>
Options Indexes FollowSymLinks
AllowOverride none
Require all granted
</Directory>
  • Selanjutnya ganti AllowOverride none menjadi AllowOverride All sehingga tulisannya menjadi seperti berikut ini :
<Directory /var/www/>
Options Indexes FollowSymLinks
AllowOverride All
Require all granted
</Directory>
  • Selanjutnya simpan hasil editan file apache2.conf tersebut dengan menekan tombol CTRL + X, nanti akan muncul konfirmasi lalu pilih Yes dengan menekan tombol CTRL + Y
  • Dan tahap terakhir adalah dengan melakukan restart pada Apache dengan menuliskan perintah seperti dibawah ini :
sudo systemctl restart apache2.service

Setelah langkah diatas selesai, selanjutnya adalah mengaktifkan modul mo_rewrite pada Apache dengan cara mengetikan perintah seperti dibawah ini :

sudo a2enmod rewrite

Langkah terakhir adalah dengan melakukan restart pada Apache dengan mengetikan perintah seperti berikut :

sudo systemctl restart apache2.service

Selanjutnya tinggal refresh browser web kamu untuk melihat apakah masih ada error atau tidak. Kalau error sudah tidak muncul, berarti website yang ada pada server Linux sudah dapat digunakan kembali. Dan kalau error yang sama masih muncul, silahkan ulangi langkah diatas kembali.

Semoga tutorial sederhana ini dapat bermanfaat bagi kalian yang mengalami masalah The Requested URL Not Found On This Server pada website yang disimpan di sistem operasi Linux


Source : https://lebakcyber.net/mengatasi-the-requested-url-not-found-on-this-server-pada-linux/

Monday, 26 October 2020

Make Offline Mirror of a Site using `wget`

 Sometimes you want to create an offline copy of a site that you can take and view even without internet access. Using wget you can make such copy easily:

wget --mirror --convert-links --adjust-extension --page-requisites 
--no-parent http://example.org

Explanation of the various flags:

  • --mirror – Makes (among other things) the download recursive.
  • --convert-links – convert all the links (also to stuff like CSS stylesheets) to relative, so it will be suitable for offline viewing.
  • --adjust-extension – Adds suitable extensions to filenames (html or css) depending on their content-type.
  • --page-requisites – Download things like CSS style-sheets and images required to properly display the page offline.
  • --no-parent – When recursing do not ascend to the parent directory. It useful for restricting the download to only a portion of the site.

Alternatively, the command above may be shortened:

wget -mkEpnp http://example.org

Note: that the last p is part of np (--no-parent) and hence you see p twice in the flags.


Alternative 1

wget --mirror --convert-links --html-extension --wait=2 -o log https://indomtl.com/


Alternative 2

wget -r -p https://indomtl.com/


Source : https://www.guyrutenberg.com/2014/05/02/make-offline-mirror-of-a-site-using-wget/

Monday, 19 October 2020

How to test Internet Speed in Centos 7 using Speedtest-Cli


Testing Speed in Centos is a Really easy job. This needs Python to be Installed on the Server. So before you do anything, Run this Command:

yum install -y python

Installation:

wget https://raw.githubusercontent.com/sivel/speedtest-cli/master/speedtest.py
chmod +x speedtest.py

Executing Test
Run the script to determine your inbound/outbound connection bandwidth.

./speedtest.py

If you want an image of the result, run the following command instead.

./speedtest.py --share

Wednesday, 22 July 2020

Install Cacti (Network Monitoring) on RHEL/CentOS 8/7 and Fedora 30


Cacti tool is an open-source web-based network monitoring and system monitoring graphing solution for IT business. Cacti enable a user to poll services at regular intervals to create graphs on resulting data using RRDtool. Generally, it is used to graph time-series data of metrics such as network bandwidth utilization, CPU load, running processes, disk space, etc.
In this how-to, we are going to show you how to install and set up a complete network monitoring application called Cacti using Net-SNMP tool on RHEL, CentOS and Fedora systems using YUM and DNF package manager tool.

Cacti Required Packages

The Cacti required the following packages to be installed on your Linux operating systems like RHEL / CentOS / Fedora.
  1. Apache : A Web server to display network graphs created by PHP and RRDTool.
  2. MySQL : A Database server to store cacti information.
  3. PHP : A script module to create graphs using RRDTool.
  4. PHP-SNMP : A PHP extension for SNMP to access data.
  5. NET-SNMP : A SNMP (Simple Network Management Protocol) is used to manage the network.
  6. RRDTool : A database tool to manage and retrieve time series data like CPU load, Network Bandwidth, etc.
Note: The installation instructions were shown here are written based on CentOS 7.5 Linux distribution.

Installing Cacti Required Packages on RHEL / CentOS / Fedora

First, we need to install following dependency packages one-by-one using the default package manager tool as shown.

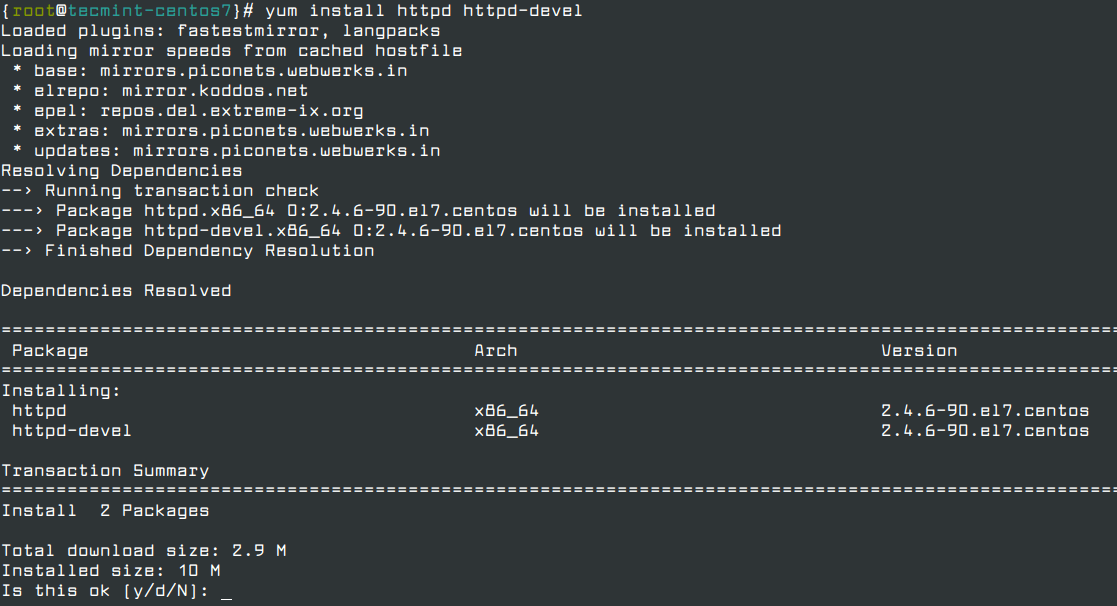
Install Apache

# yum install httpd httpd-devel   [On RHEL/CentOS 7/6]
# dnf install httpd httpd-devel   [On RHEL/CentOS 8 and Fedora 30]

Install Apache Web Server in CentOS

Install MySQL

# yum install mysql mysql-server      [On RHEL/CentOS 6]
MariaDB is a community-developed fork of the MySQL database project and provides a replacement for MySQL. Previously the official supported database was MySQL under RHEL/CentOS and Fedora.
Recently, RedHat makes a new transaction from MySQL to MariaDB, as MariaDB is the default implementation of MySQL in RHEL/CentOS 8/7 and Fedora 19 onwards.
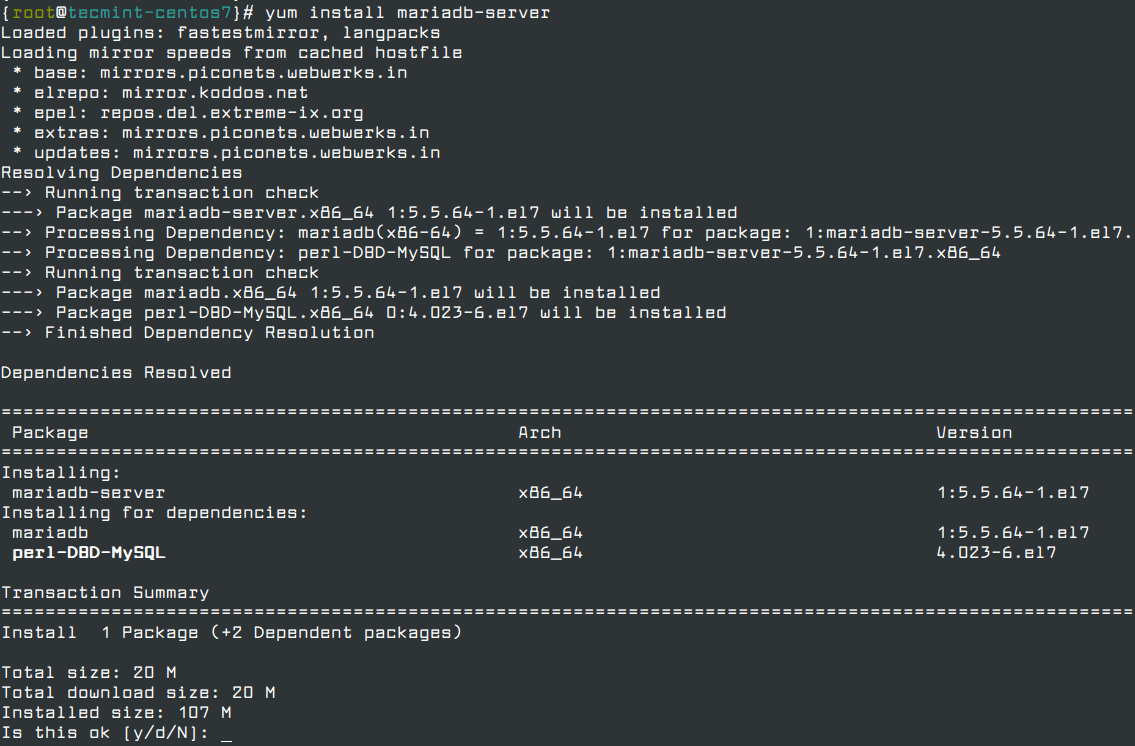
# yum install mariadb-server -y  [On RHEL/CentOS 7]
# dnf install mariadb-server -y         [On RHEL/CentOS 8 and Fedora 30]

Install MariaDB Server in CentOS

Install PHP

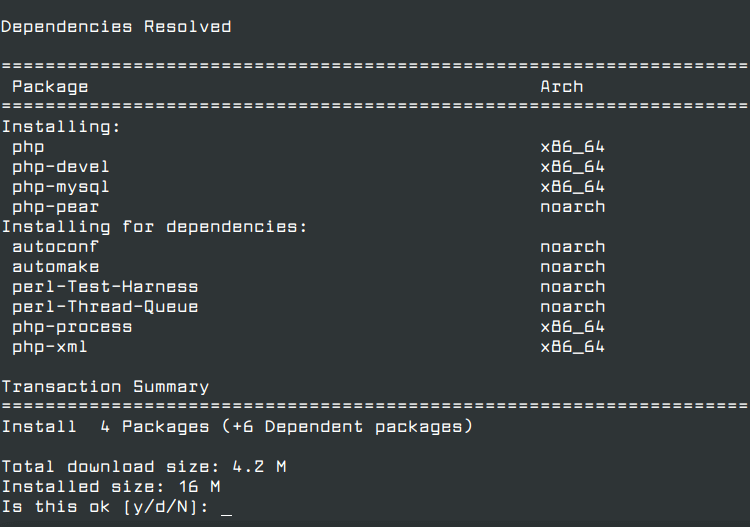
# yum install php-mysql php-pear php-common php-gd php-devel php php-mbstring php-cli
OR
# dnf install php-mysql php-pear php-common php-gd php-devel php php-mbstring php-cli

Install PHP in CentOS

Install PHP-SNMP

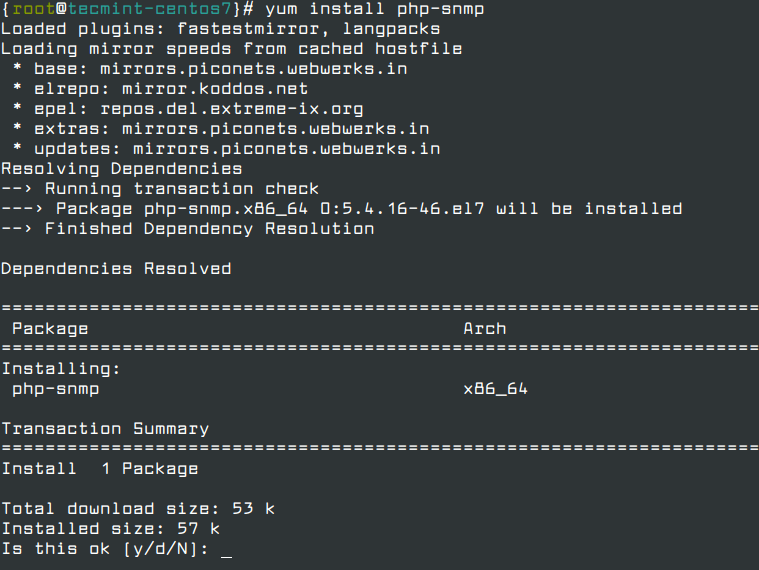
# yum install php-snmp
OR
# dnf install php-snmp         

Install SNMP in CentOS

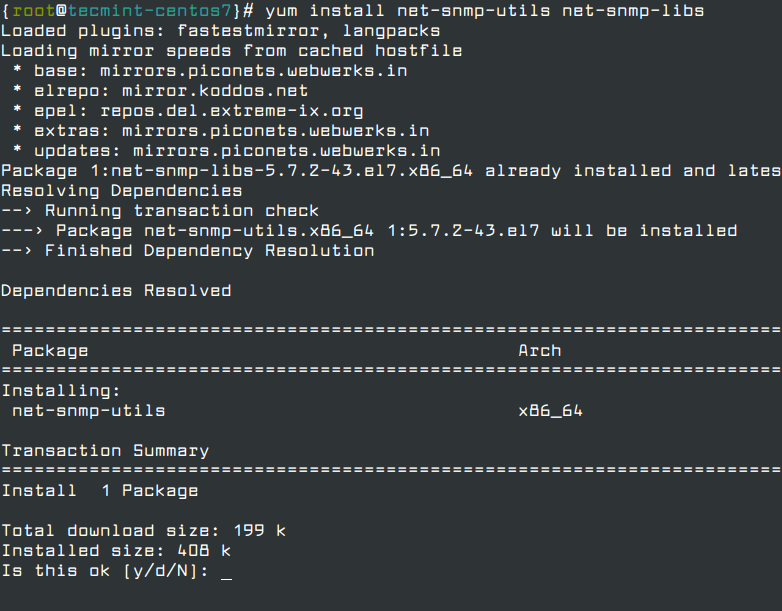
Install NET-SNMP

# yum install net-snmp-utils net-snmp-libs
OR
# dnf install net-snmp-utils net-snmp-libs

Install Net SNMP in CentOS

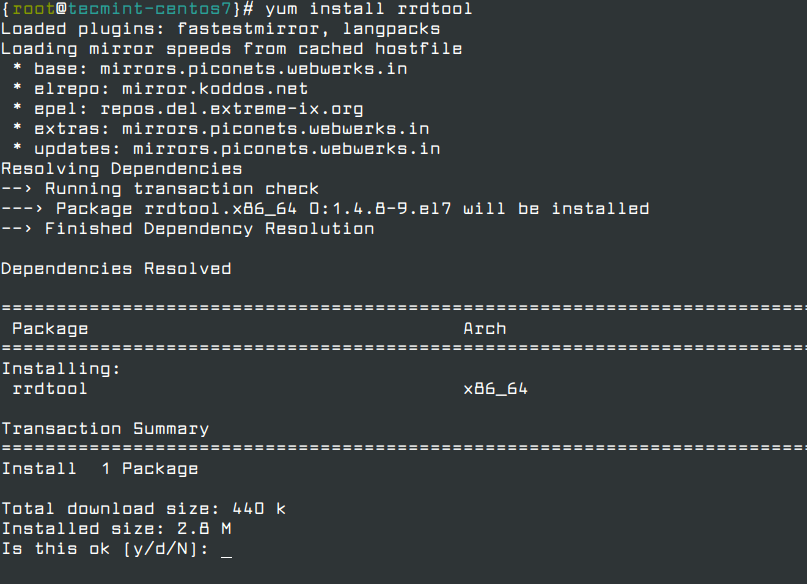
Install RRDTool

# yum install rrdtool
OR
# dnf install rrdtool

Install RRDTool in CentOS

Staring Apache, MySQL, and SNMP Services

Once you’ve installed all the required software’s for Cacti installation, let’s start them one-by-one using following commands.
On RHEL/CentOS 6 and Fedora 18-12
[root@tecmint ~]# service httpd start
[root@tecmint ~]# service mysqld start
[root@tecmint ~]# service snmpd start
On RHEL/CentOS 8/7 and Fedora 19 Onwards
[root@tecmint ~]# systemctl start httpd.service
[root@tecmint ~]# systemctl start mariadb.service
[root@tecmint ~]# systemctl start snmpd.service

Configure System Start-up Links

Configuring Apache, MySQL and SNMP Services to start on boot.
On RHEL/CentOS 6 and Fedora 18-12
[root@tecmint ~]# /sbin/chkconfig --levels 345 httpd on
[root@tecmint ~]# /sbin/chkconfig --levels 345 mysqld on
[root@tecmint ~]# /sbin/chkconfig --levels 345 snmpd on
On RHEL/CentOS 8/7 and Fedora 19 Onwards
[root@tecmint ~]# systemctl enable httpd.service
[root@tecmint ~]# systemctl enable mariadb.service
[root@tecmint ~]# systemctl enable snmpd.service

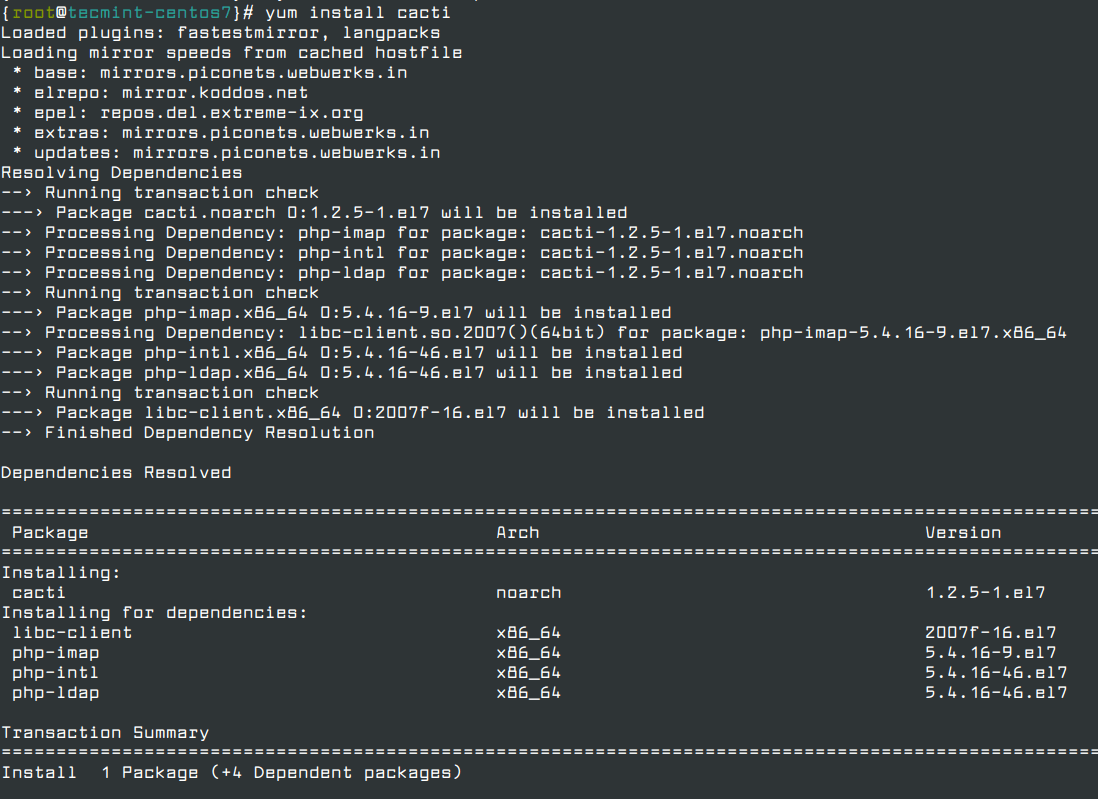
Install Cacti on RHEL / CentOS / Fedora

Here, you need to install and enable the EPEL Repository. Once you’ve enabled the repository, type the following command to install Cacti application.
# yum install cacti         [On RHEL/CentOS 7]
# dnf install cacti         [On RHEL/CentOS 8 and Fedora 30]

Install Cacti in CentOS

Configuring MySQL Server for Cacti Installation

We need to configure MySQL for Cacti, to do this we need to secure a newly installed MySQL server and then we will create Cacti database with user Cacti. If you’re MySQL is already installed and secured, then don’t need to do it again.
# mysql_secure_installation

Create MySQL Cacti Database

Login into MySQL server with a newly created password and create Cacti database with user Cacti and set the password for it.
On RHEL/CentOS 6 and Fedora 18-12
[root@tecmint ~]# mysql -u root -p
Enter password:
Welcome to the MySQL monitor.  Commands end with ; or \g.
Your MySQL connection id is 3
Server version: 5.1.73 Source distribution
Copyright (c) 2000, 2013, Oracle and/or its affiliates. All rights reserved.
Oracle is a registered trademark of Oracle Corporation and/or its
affiliates. Other names may be trademarks of their respective
owners.

Type 'help;' or '\h' for help. Type '\c' to clear the current input statement.

mysql> create database cacti;
Query OK, 1 row affected (0.00 sec)

mysql> GRANT ALL ON cacti.* TO cacti@localhost IDENTIFIED BY 'tecmint';
Query OK, 0 rows affected (0.00 sec)

mysql> FLUSH privileges;
Query OK, 0 rows affected (0.00 sec)

mysql> quit;
Bye
On RHEL/CentOS 8/7 and Fedora 19 Onwards
[root@tecmint ~]# mysql -u root -p
Enter password:
Welcome to the MariaDB monitor.  Commands end with ; or \g.
Your MariaDB connection id is 3
Server version: 5.5.41-MariaDB MariaDB Server
Copyright (c) 2000, 2014, Oracle, MariaDB Corporation Ab and others.
Type 'help;' or '\h' for help. Type '\c' to clear the current input statement.

MariaDB [(none)]> create database cacti;
Query OK, 1 row affected (0.00 sec)

MariaDB [(none)]> GRANT ALL ON cacti.* TO cacti@localhost IDENTIFIED BY 'tecmint';
Query OK, 0 rows affected (0.00 sec)

MariaDB [(none)]> FLUSH privileges;
Query OK, 0 rows affected (0.00 sec)

MariaDB [(none)]> quit;
Bye

Install Cacti Tables to MySQL

Find out the database file path using RPM command, to install cacti tables into newly created Cacti database, use the following command.
# rpm -ql cacti | grep cacti.sql
Sample Output:
/usr/share/doc/cacti-1.2.6/cacti.sql
OR
/usr/share/doc/cacti/cacti.sql
Now we’ve of the location of Cacti.sql file, type the following command to install tables, here you need to type the Cacti user password.
[root@tecmint ~]# mysql -u cacti -p cacti < /usr/share/doc/cacti-0.8.8b/cacti.sql
Enter password:

Configure MySQL settings for Cacti

Open the file called /etc/cacti/db.php with any editor.
# vi /etc/cacti/db.php
Make the following changes and save the file. Make sure you set password correctly.
/* make sure these values reflect your actual database/host/user/password */
$database_type = "mysql";
$database_default = "cacti";
$database_hostname = "localhost";
$database_username = "cacti";
$database_password = "your-password-here";
$database_port = "3306";
$database_ssl = false;

Configuring Firewall for Cacti

On RHEL/CentOS 6 and Fedora 18-12
[root@tecmint ~]# iptables -A INPUT -p udp -m state --state NEW --dport 80 -j ACCEPT
[root@tecmint ~]# iptables -A INPUT -p tcp -m state --state NEW --dport 80 -j ACCEPT
[root@tecmint ~]# service iptables save
On RHEL/CentOS 8/7 and Fedora 19 Onwards
[root@tecmint ~]# firewall-cmd --permanent --zone=public --add-service=http
[root@tecmint ~]# firewall-cmd --reload

Configuring Apache Server for Cacti Installation

Open file called /etc/httpd/conf.d/cacti.conf with your choice of editor.
# vi /etc/httpd/conf.d/cacti.conf
You need to enable access to Cacti application for your local network or per IP level. For example, we’ve enabled access to our local LAN network 172.16.16.0/20. In your case, it would be different.
Alias /cacti    /usr/share/cacti
 
<Directory /usr/share/cacti/>
        Order Deny,Allow
        Deny from all
        Allow from 172.16.16.0/20
</Directory>
In the latest version of Apache (ex: Apache 2.4), you may need to change according to the following settings.
Alias /cacti    /usr/share/cacti

<Directory /usr/share/cacti/>
        <IfModule mod_authz_core.c>
                # httpd 2.4
                Require all granted
        </IfModule>
        <IfModule !mod_authz_core.c>
                # httpd 2.2
                Order deny,allow
                Deny from all
                Allow from all
        </IfModule>
</Directory>
Finally, restart the Apache service.
[root@tecmint ~]# service httpd restart    [On RHEL/CentOS 6 and Fedora 18-12]
[root@tecmint ~]# systemctl restart httpd.service  [On RHEL/CentOS 8/7 and Fedora 19 onwards]

Setting Cron for Cacti

Open file /etc/cron.d/cacti.
# vi /etc/cron.d/cacti
Uncomment the following line. The poller.php script runs every 5mins and collects data of known host which is used by Cacti application to display graphs.
#*/5 * * * *    cacti   /usr/bin/php /usr/share/cacti/poller.php > /dev/null 2>&1

Running Cacti Installer Setup

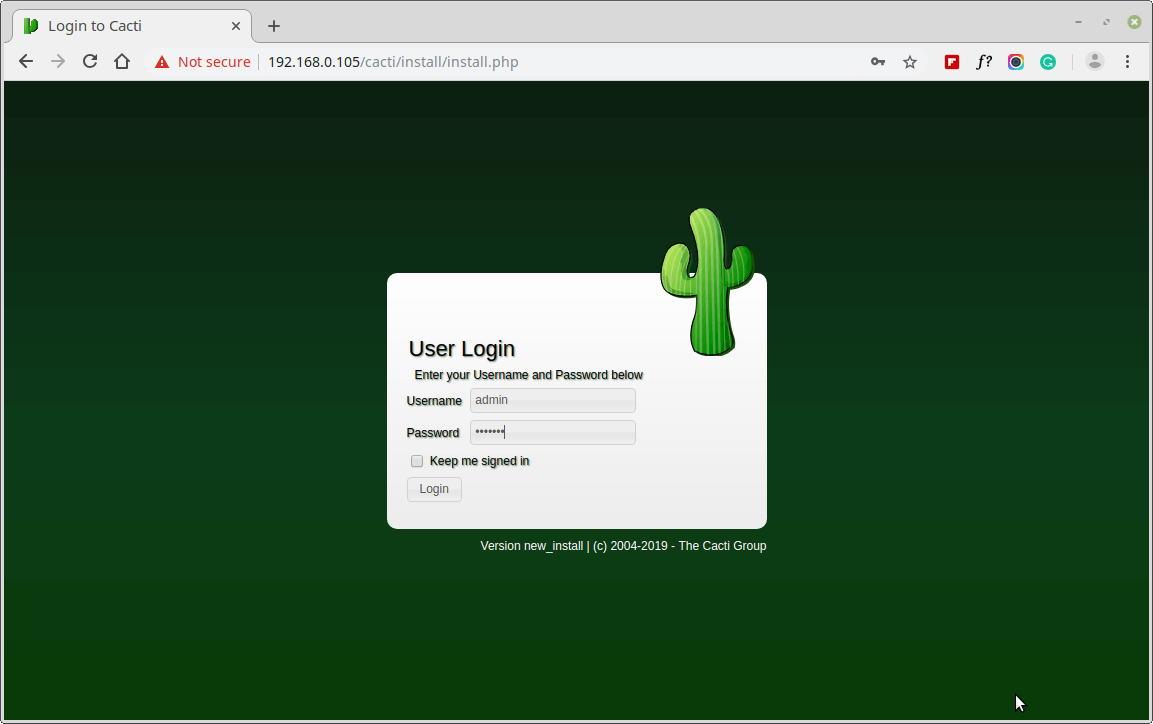
Finally, Cacti is ready, just go to http://YOUR-IP-HERE/cacti/ & follow the installer instruction through the following screens. Enter the default login details and hit Enter button.
User: admin
Password: admin

Cacti User Login
Cacti User Login
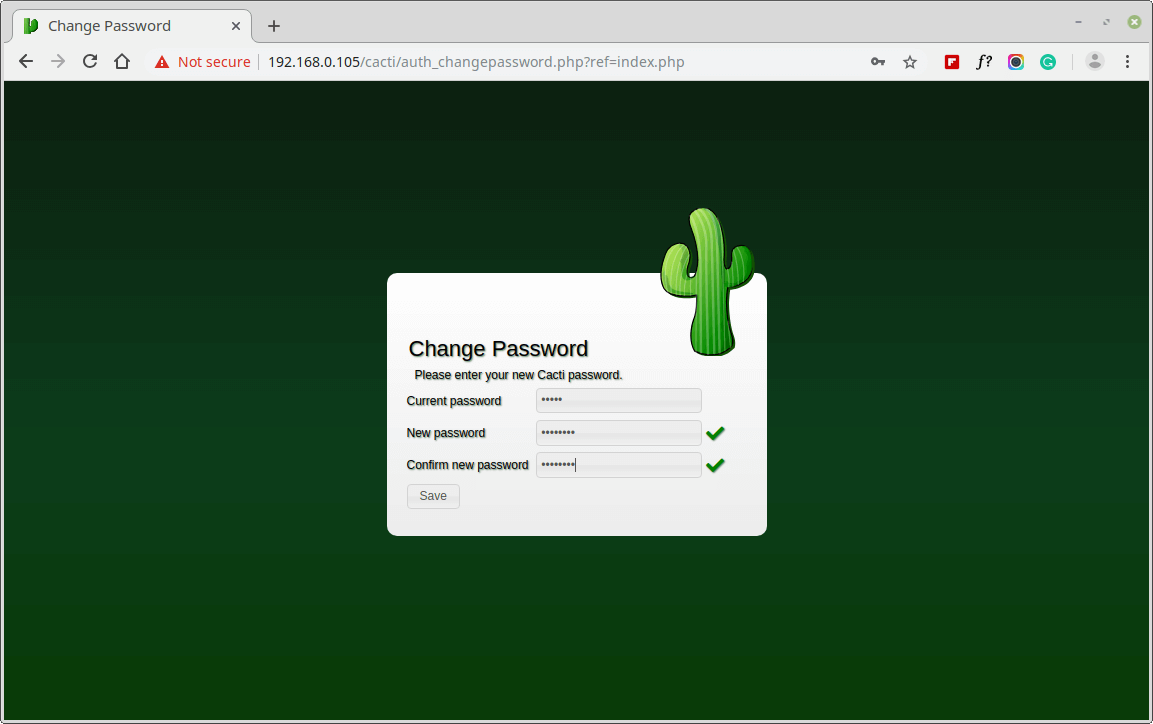
Next, change default Cacti password.

Change Cacti Admin Password
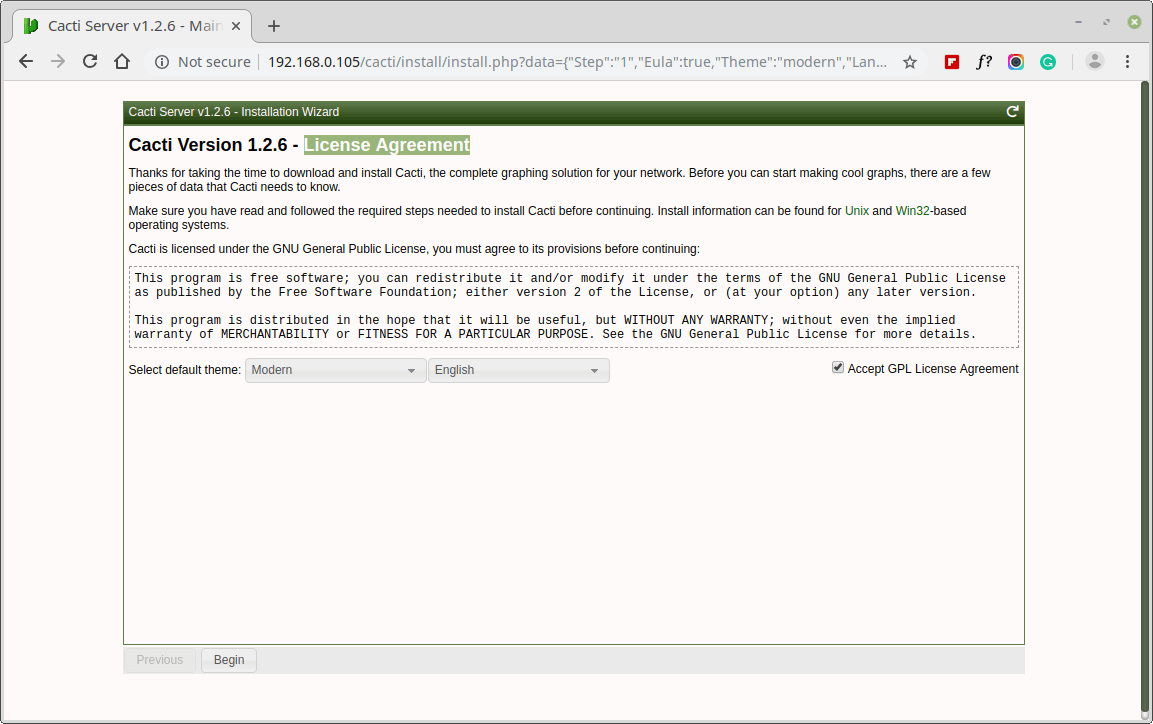
Accept Cacti License Agreement.

Accept Cacti License Agreement
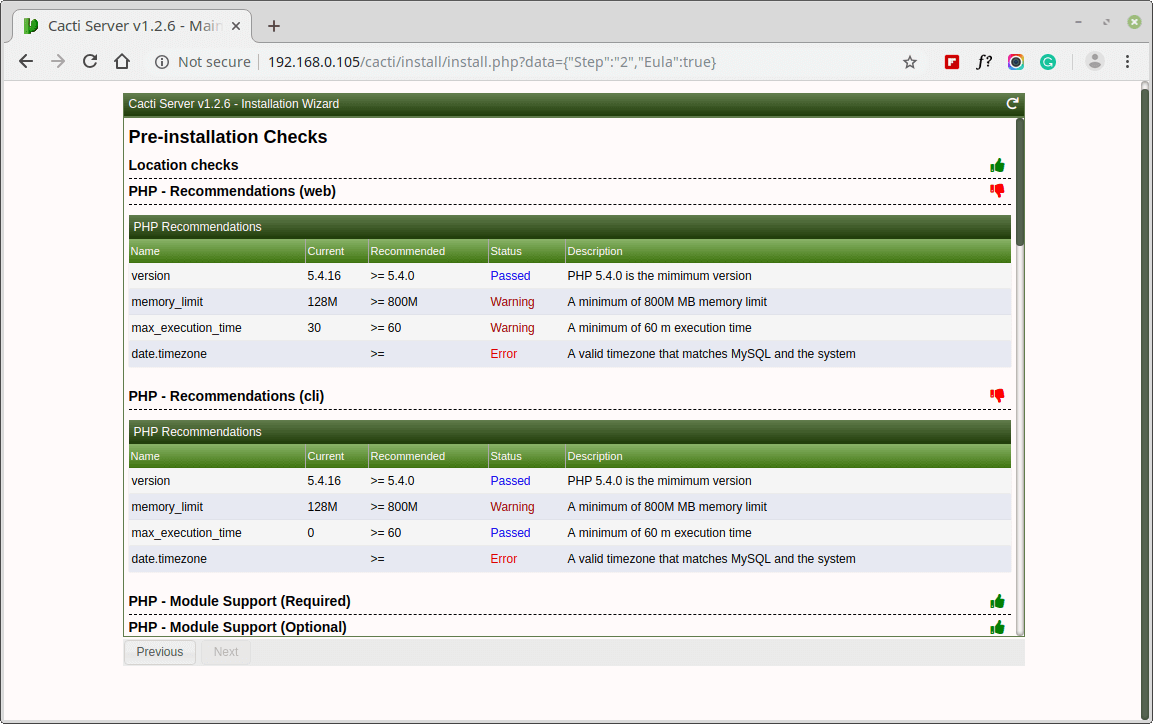
Next, the screen shows Pre-installation Checks for Cacti installation, please correct the suggested settings in your /etc/php.ini file as shown and restart Apache after making changes.
memory_limit = 800M
max_execution_time = 60
date.timezone = Asia/Kolkata

Cacti Pre-installation Checks
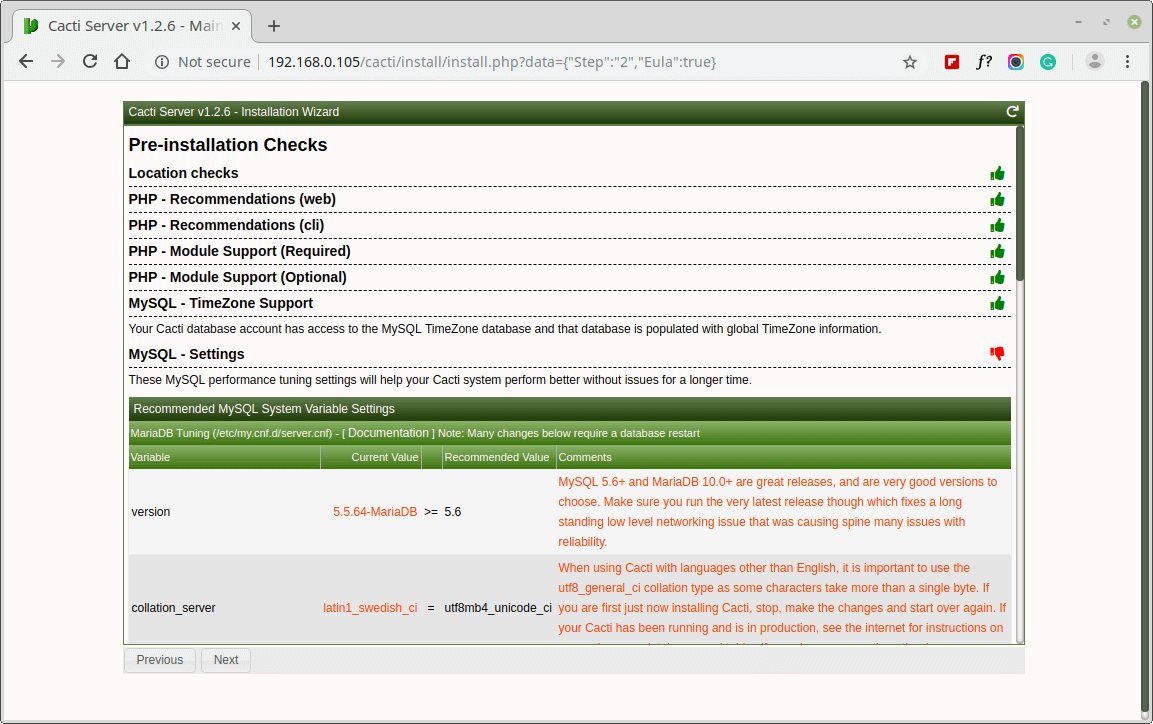
Similarly, you also need to grant access to the MySQL TimeZone database for user Cacti, so that the database is populated with global TimeZone information.
mysql> use mysql;
mysql> GRANT SELECT ON mysql.time_zone_name TO cacti@localhost;
mysql> flush privileges;

Cacti MySQL Pre-Installation Checks
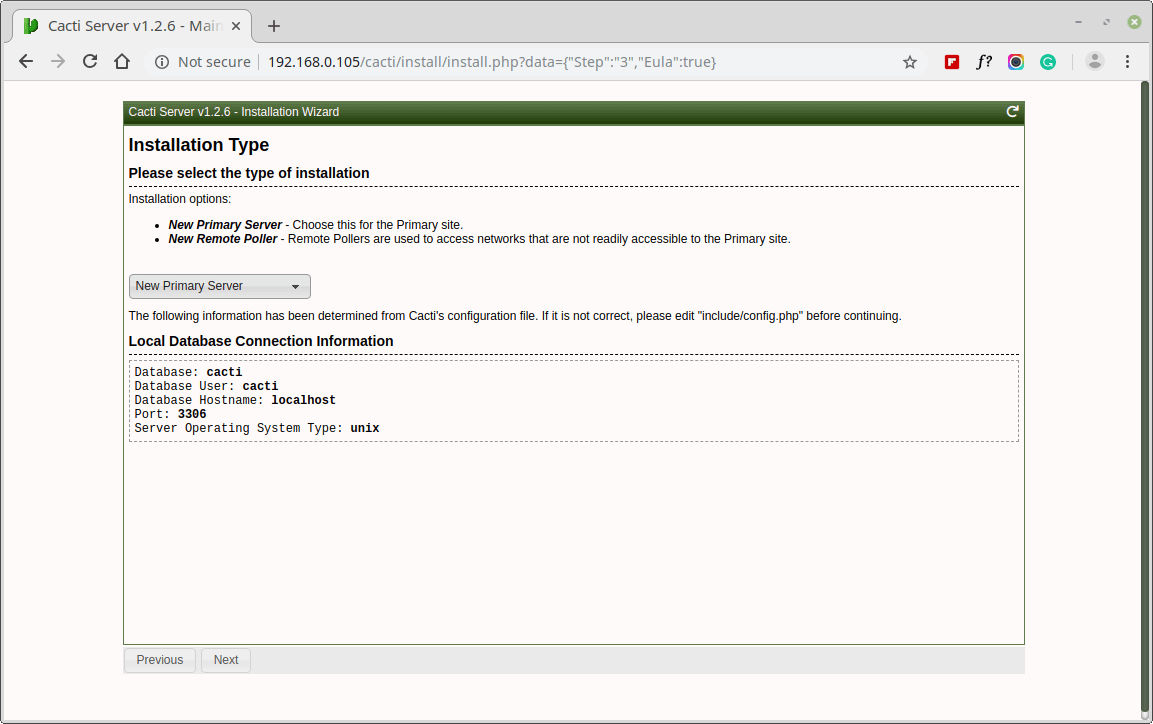
Please choose the installation Type as “New Install“.

Select Cacti Installation Type
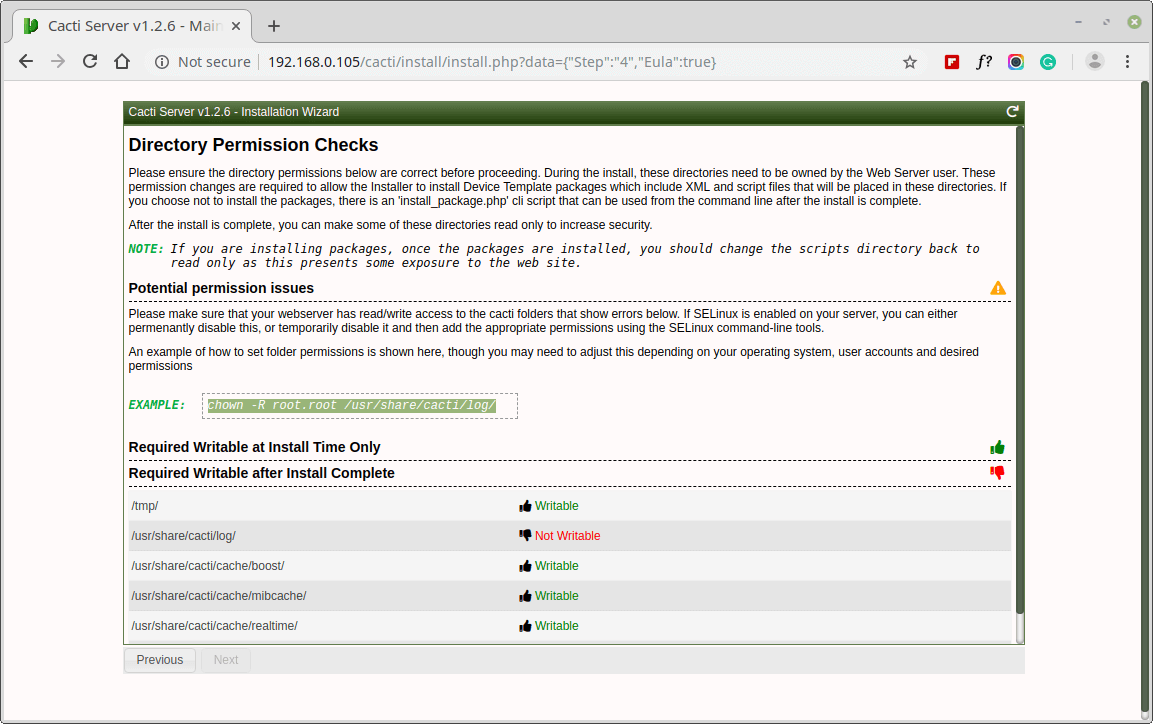
Make sure all the following directory permissions are correct before continuing.

Cacti Directory Permission Checks
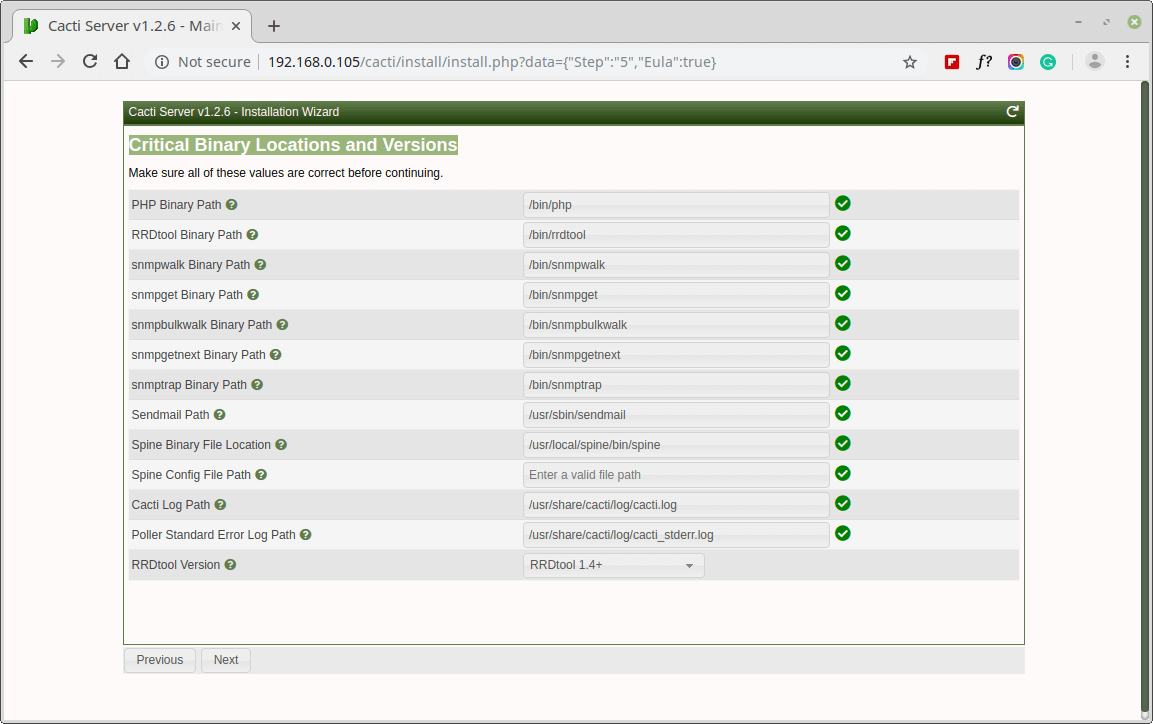
Make sure all of these Critical Binary Locations and Versions values are correct before continuing.

Critical Binary Locations and Versions
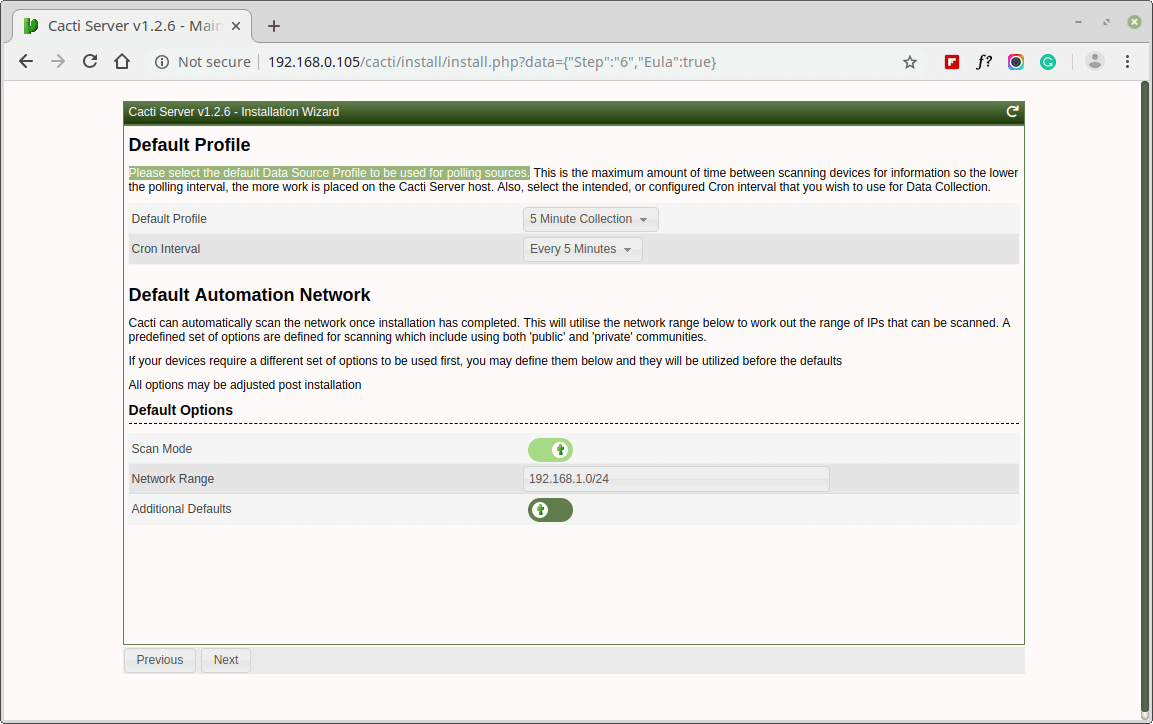
Please choose the default Data Source Profile to be used for polling sources.

Select Data Source Profile
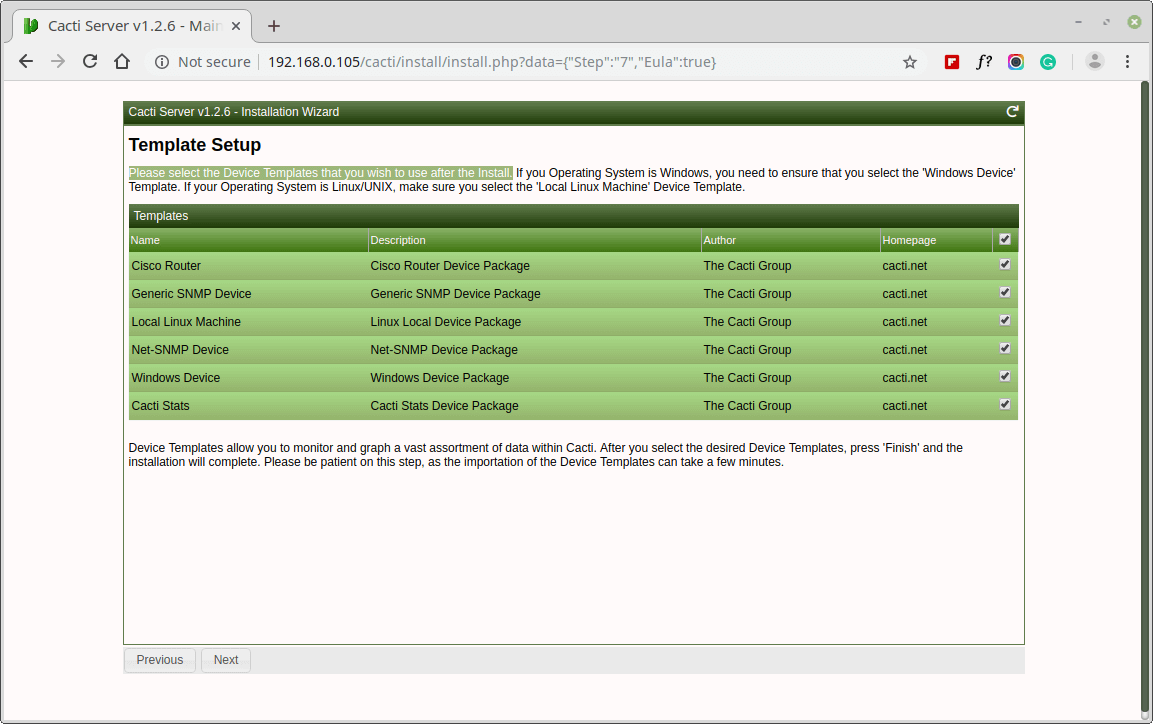
Please, choose the Device Templates that you wish to use after the Cacti Install.

Select Cacti Device Templates
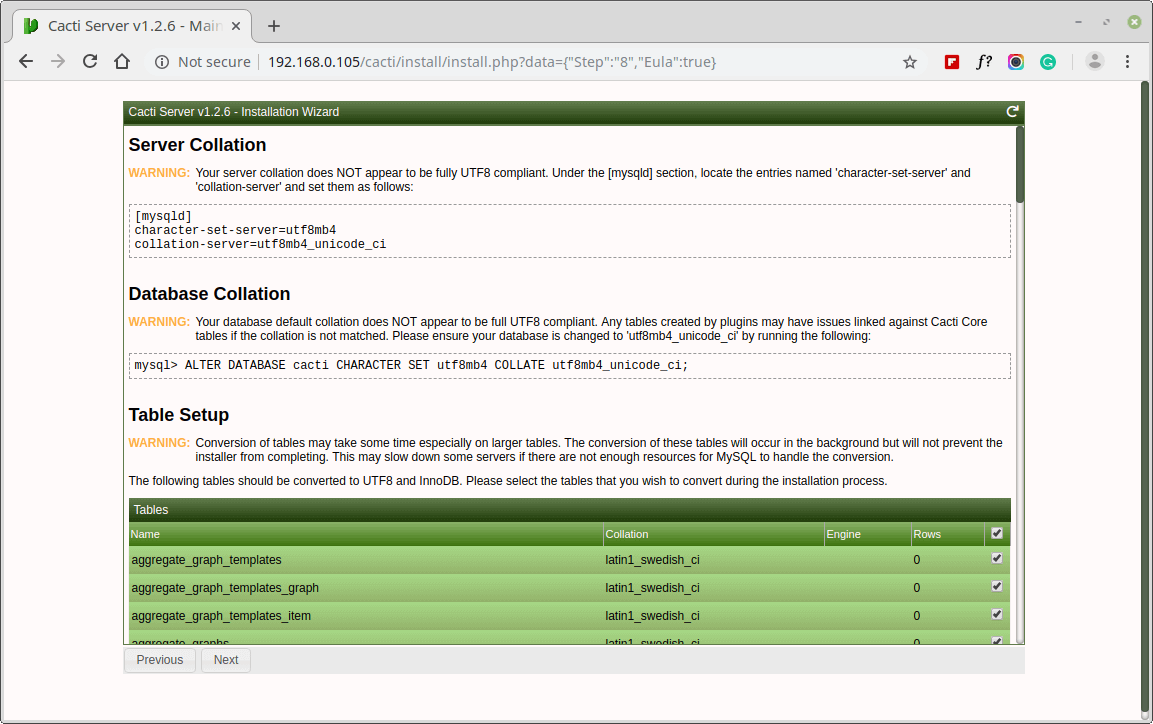
Set the Server Collation in your MySQL configuration file /etc/my.cnf under the [mysqld] section as shown.
[mysqld]
character-set-server=utf8mb4
collation-server=utf8mb4_unicode_ci

Set Server Collation
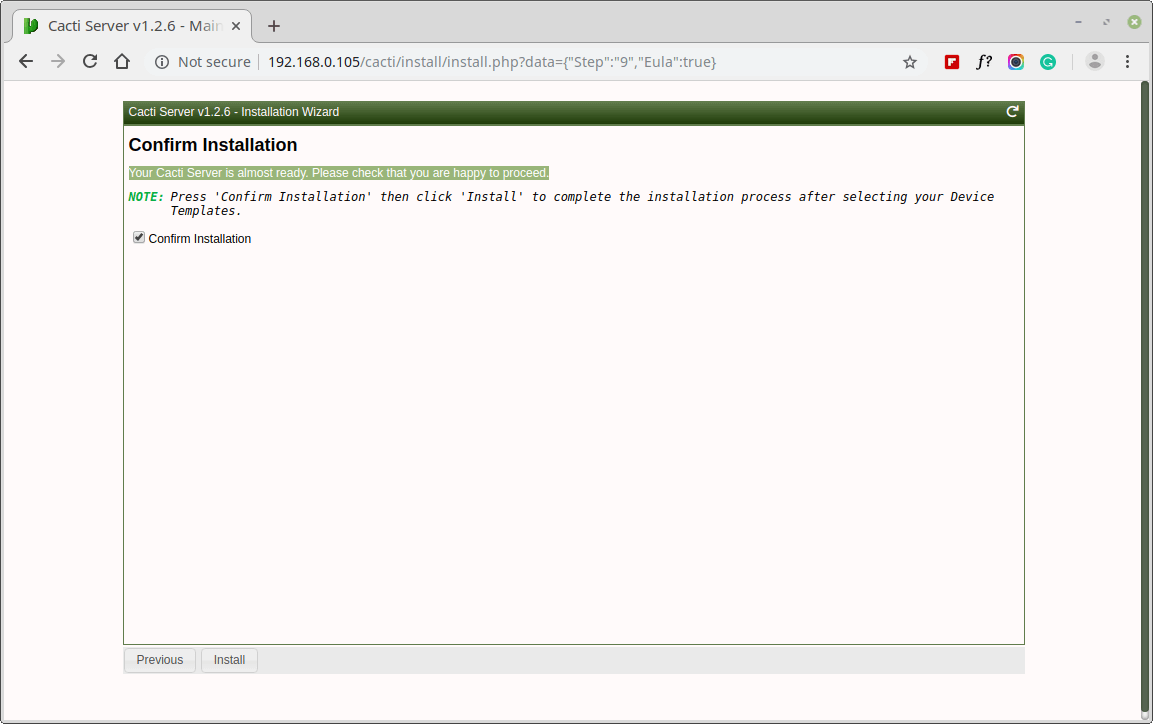
Your Cacti Server is almost ready. Please confirm that you are happy to proceed.

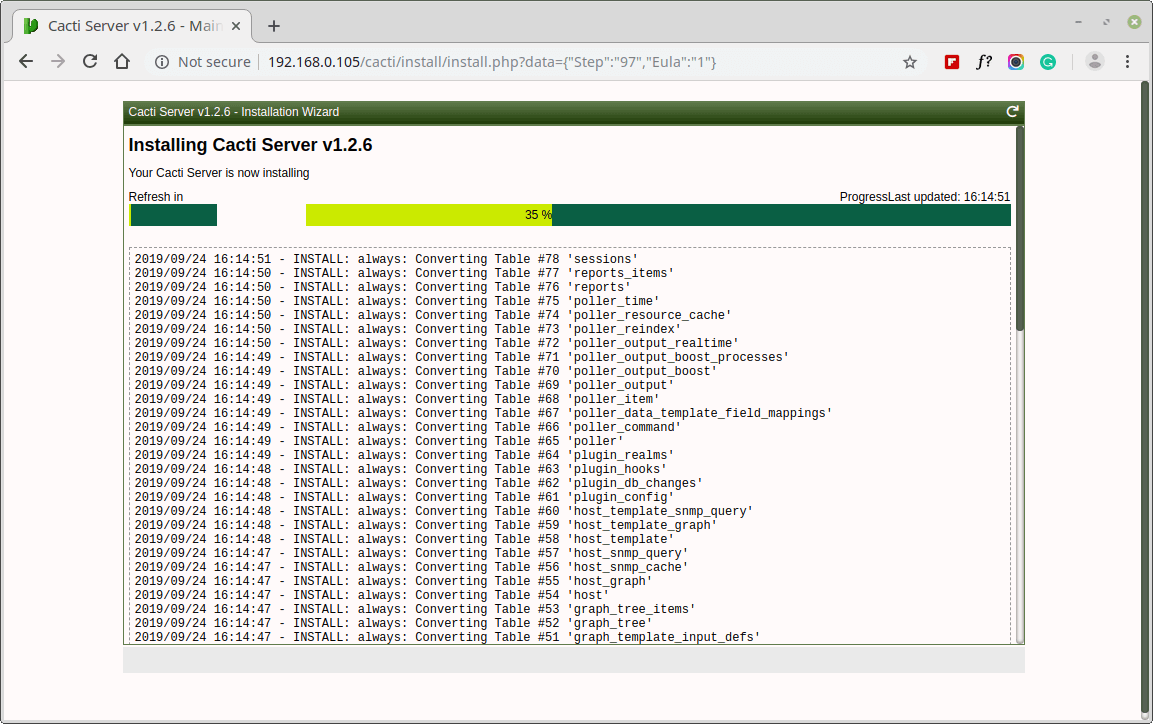
Cacti Installation Process
Installing Cacti Server
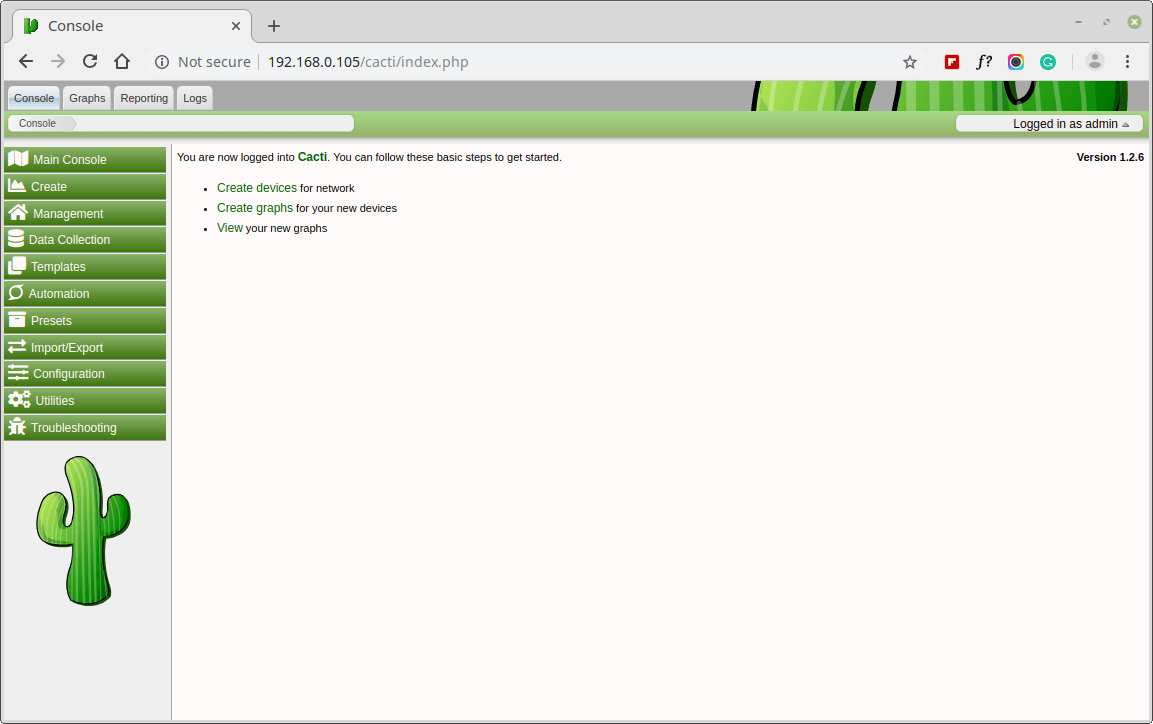
Cacti Dashboard
Cacti Dashboard
For more information and usage please visit the Cacti Page.
Tags ,

Source : https://www.tecmint.com/install-cacti-network-monitoring-on-rhel-centos-fedora/

Update MySQL version from 5.1 to 5.5 in CentOS 6.2

To list Old MySql

yum list installed | grep -i mysql

To remove Old MySql

yum remove mysql mysql-*

Remi Dependency on CentOS 6 and Red Hat (RHEL) 6

rpm -Uvh http://dl.fedoraproject.org/pub/epel/6/i386/epel-release-6-8.noarch.rpm

rpm -Uvh http://rpms.famillecollet.com/enterprise/remi-release-6.rpm

Install MySQL server

yum --enablerepo=remi,remi-test install mysql mysql-server

To list New MySql

yum list installed | grep -i mysql

start MySql server

/etc/init.d/mysqld start ## use restart after update

OR

service mysqld start ## use restart after update
chkconfig --levels 235 mysqld on

Last

mysql_upgrade -u root -p
Now my MySql version is 5.5.32

Ref:

http://www.webtatic.com/packages/mysql55/
http://www.if-not-true-then-false.com/2010/install-mysql-on-fedora-centos-red-hat-rhel/
Hope it help some one

Source : https://stackoverflow.com/questions/9361720/update-mysql-version-from-5-1-to-5-5-in-centos-6-2

Saturday, 15 February 2020

Manage CentOS firewalld with an ncurses tool (GUI Firewall)

Jack Wallen shows you how to make working with CentOS 7 iptables much easier with the help of an ncurses-based GUI.

If you manage a CentOS 7 GUI-less server, you probably know that managing the firewall can be a bit of a hassle. Wouldn't it be nice if there was a handy, ncurses-based tool to make this process a bit easier? Oh wait, there is. That tool is system-config-firewall-tui. With this tool, you can easily set a service/interface/port as trusted, to allow incoming traffic to that port. Only those trusted elements will be allowed in.
Out of the box, system-config-firewall-tui isn't installed. I'm going to walk you through the process of installing the tool, enabling it to run, and then using it to open a port or two. I'll be demonstrating on CentOS7, but this tool is also available for Fedora as well. This tool directly manages iptables rules, so having a simple to use frontend for that is pretty important for some users. Don't get me wrong, system-config-firewall-tui doesn't give you the massive power of iptables (for that you really need to dive into the deep waters of iptables), but it does make the basic task of opening ports (via iptables) quick and easy.
Let's install and use system-config-firewall-tui.

Installation

The installation of the tool is pretty straightforward. Open up a terminal window and issue the command:

sudo yum install system-config-firewall-tui

 That will install the tool. However, when you go to run the command sudo system-config-firewall-tui, you'll be warned that firewalld is running, thus preventing the tool from opening. To get around this, issue the commands:
 
sudo systemctl stop firewalld.service
sudo systemctl disable firewalld.service

Usage

At this point you can issue the command:
 
sudo system-config-firewall-tui

The ncurses interface will open (Figure A). You should immediately notice that the firewall isn't enabled. Tab to the [ ] Enabled section and tap the keyboard spacebar to enable the firewall.
Figure A
Figure A
You must enable the firewall to continue.
With the firewall enabled, you can now tab down to Customize. In the new window (Figure B), you can scroll through the list of services to allow through the firewall.
Figure B
Figure B
Our list of available services.
After you've enabled your services, tab down to Forward. This is not port forwarding, rather the "Next" button. In the next screen (Figure C), you can add, edit, or remove additional ports.
Figure C
Figure C
Adding additional ports to be considered trusted.
If you tab to Add and hit Enter on your keyboard, you can then add a single port or port range, as well as a protocol. Do note, the protocol (tcp/udp) is required. Once you've taken care of that, tab to OK.
After you've added a custom port/protocol, tab down to Forward. In the resulting window (Figure D), you can list an interface as trusted.
Figure D
Figure D
Setting a trusted interface.
Enable as many interfaces as you need to be trusted and tab down to Forward. In the next screen, you can enable ports for port forwarding. Tab to Add and hit Enter on your keyboard. In the resulting screen (Figure E), enter the necessary source and destination information.
Figure E
Figure E
Setting up port forwarding.
In the next screen, you can mark ICMP types that should be rejected (Figure F). Enable each, from the list, and then tab to Forward, and tap your keyboard Enter key.
Figure F
Rejecting ICMP types.
In the next window (Figure H), you can add custom rules if necessary.
Figure H
Figure G
Adding custom rules.
Tab to Forward and hit Enter. Once you've finished with the custom rules, tab to OK and hit Enter. In the resulting screen, tab to Close and hit Enter. You will find yourself on the first screen where you can enable the firewall. Tab to OK and you will be warned that the new rules will override the current set. Tab to Yes and tap Enter on your keyboard. You've just created a new rule to the iptable chain, all with the help of a user-friendly ncurses GUI. If you issue the command sudo iptables -L you should see your new rules listed.

An easier route

Although system-config-firewall-tui isn't quite as flexible as working directly with iptables, if you're not ready to take the plunge into those deeper waters, this GUI is a much easier route to working with the firewall system on CentOS 7. Give system-config-firewall-tui a go and see if it doesn't turn into your go-to for the platform.

Source : https://www.techrepublic.com/article/how-to-easily-manage-centos-firewalld-with-an-ncurses-tool/

Thursday, 15 October 2015

How to Install and Configure phpMyAdmin on CentOS 6

phpMyAdmin is an open source tool used for the administration of MySQL. In addition to offering the capability to perform administration tasks such as creating, editing, or deleting databases, and managing users and permissions, phpMyAdmin provides a graphical user interface to do all of these tasks and more.
Pre-Flight Check
  • These instructions are intended specifically for installing phpMyAdmin on CentOS 6.
  • I’ll be working from a Liquid Web Core Managed CentOS 6.5 server, and I’ll be logged in as root.
  • A LAMP, Linux, Apache, MySQL and PHP, must be installed on your server. If you’re working from a Liquid Web Core Managed CentOS 6.5 server as I am, then the LAMP stack is already installed!

Step 1: Add the EPEL Repository
phpMyAdmin is part of Extra Packages for Enterprise Linux (EPEL), which is a community repository of non-standard packages for the RHEL distribution. First, we’ll install the EPEL repository:

rpm -iUvh http://dl.fedoraproject.org/pub/epel/6/x86_64/epel-release-6-8.noarch.rpm

Step 2: Install phpMyAdmin
First, you’ll follow a simple best practice: ensuring the list of available packages is up to date before installing anything new.

yum -y update

Then it’s a matter of just running one command for installation via apt-get:

yum -y install phpmyadmin

Step 3: Find Your IP Address
Find your IP address with any of the following sites:
Step 4: Basic Configuration for phpMyAdmin
To secure phpMyAdmin we should lock down access to a specific IP address. When the phpMyAdmin package is installed, an Apache Virtual Host file is added to configure web access. Let’s edit that file:
vim /etc/httpd/conf.d/phpMyAdmin.conf
For a refresher on editing files with vim see: New User Tutorial: Overview of the Vim Text Editor
By default, the configuration for phpMyAdmin only allows access from the server on which it is installed. Find the following sections and change each IP address to the one you found in Step 3, or another IP address that will be connecting to phpMyAdmin remotely:
Require ip 127.0.0.1
Allow from 127.0.0.1
Require ip 127.0.0.1
Allow from 127.0.0.1

Then exit and save the file with the command :wq .
Restart Apache:

service httpd restart

Verify that phpMyAdmin is working by visiting http://the_IP_of_your_server/phpmyadmin. For example: http://127.0.0.1/phpmyadmin

source : http://www.liquidweb.com/kb/how-to-install-and-configure-phpmyadmin-on-centos-6/

Tuesday, 29 September 2015

Resize EC2 instance EBS root device

Today I stumbled upon the problem that resizing the root EBS volume of a just launched EC2 instance (running CentOS 6) did not work.

I tried to run the following command:"resize2fs /dev/xvde1"
This returned with:The filesystem is already x blocks long. Nothing to do!

However I was pretty sure that there was still roughly 1TB extra available for me. I figured out how to resolve this, with the following commands:
1. Connect to the instance over ssh2. "fdisk /dev/xvde1"3. Press "p" + ENTER to view the current partitions, remember the ID of your partition4. Fill in "d 999", where 999 represents the partition ID from step 3, hit ENTER (this will delete your partition)5. Press "n" + ENTER to start creating a new partition6. Press "p" + ENTER to mark it as a primary partition7. Select the first cylinder by entering "1" and hitting ENTER8. Your start and end block can be default (e.g. 1 and 1234567)9. Press "a" to mark the partition as bootable10. Now we're done press "w" to write the partition table, this will cause you to get an error, don't worry11. Reboot your instance to reload the partition table (as mentioned in the error you received on step 10)12. Connect to your instance again over ssh13. Run "resize2fs /dev/xvde1", this might take a while, it performs an online grow of the partition14. Once the resize2fs command has finished you can validate the results by running "df -h"
Good luck with resizing your EC2 instance root devices!

Source : http://www.robinverlangen.nl/index/view/5035f20d64fa0-d74cc2/resize-ec2-instance-ebs-root-device.html

Versi lain
=========
1. Stop the instance
 2. Create a snapshot from the volume
 3. Create a new volume based on the snapshot increasing the size
 4. Check and remember the current's volume mount point (i.e. /dev/sda1)
 5. Detach current volume
 6. Attach the recently created volume to the instance, setting the exact mount point
 7. Restart the instance
 8. Access via SSH to the instance and run fdisk /dev/xvde
 9. Hit **p** to show current partitions
 10. Hit **d** to delete current partitions (if there are more than one, you have to delete one at a time) NOTE: Don't worry data is not lost
 11. Hit **n** to create a new partition
 12. Hit **p** to set it as primary
 13. Hit **1** to set the first cylinder
 14. Set the desired new space (if empty the whole space is reserved)
 15. Hit **a** to make it bootable
 16. Hit **1** and **w** to write changes
 17. Reboot instance
 18. Log via SSH and run resize2fs /dev/xvde1
 19. Finally check the new space running df -h
Source : http://stackoverflow.com/questions/11014584/ec2-cant-resize-volume-after-increasing-size

Monday, 12 May 2014

Resetting MySQL Root Password: Red Hat and CentOS

If u have forgot mysql password in centos or redhat , how to change password steps given below..

Stop MySQL:
root#  service mysqld stop

Start MySQL in safe mode:
root#  mysqld_safe  --skip-grant-tables &

Log into MySQL as root:
root#  mysql -u root

Reset the password:
mysql>  update mysql.user set password=PASSWORD("your new password") where User='root';

mysql>  flush privileges; exit;

Log out of MySQL and stop the Safe Mode:
root#  service mysqld stop

Start MySQL in the normal mode:
root#  service mysqld start

Log into MySQL with your new password:
root#  mysql -u root -p
Enter password:
mysql>

Install Bacula Centos 6.5

install bacula

yum install mysql-devel mysql-

server mysql ncurse* gcc gcc-c++

autoconf automake

wget

http://sourceforge.net/projects/bac

ula/files/bacula/7.0.2/bacula-

7.0.2.tar.gz

tar -xzvf bacula-7.0.2.tar.gz

cd bacula-7.0.2

CFLAGS="-g -Wall" ./configure --enable-smartalloc --with-mysql --enable-conio

make

make install

make install-autostart

cd /etc/bacula

./grant_mysql_privileges -p

./create_mysql_database -p

./make_mysql_tables -p

yum -y install bacula-console-bat

Source :

Sunday, 11 May 2014

Setup Backup Server Using Bacula And Webmin On CentOS 6.5/6.4

Bacula is an open source, network backup software, used to allow the System Administrators to manage backup, recovery and send the verification of data’s from any systems in any location across the network.

Install Bacula
In this how-to i am using MySQL for database, you can use either PostgreSQL or MySQL. My Backup server hostname and IP Address are “server.unixmen.local” and “192.168.1.101/24″ respectively. Change the values as per your scenario. This how-to was tested on CentOS 6.5, although it should work with RHEL, Scientific Linux 6.x versions too.
First let us install Bacual and mysql server using command:
# yum install bacula-director-mysql bacula-console bacula-client bacula-storage-mysql mysql-server mysql-devel -y
Start MySQL service and create root password for mysql.
Note: In this tutorial, i am using password as “centos” wherever i need to setup password . Define your own.
# service mysqld start
# chkconfig mysqld on
# mysqladmin -u root password centos
Next run the following commands one by one to create database and necessary tables for Bacula. Here “-u root” means that login with root account and “-p” means prompt for mysql root password i.e “centos” in my case.
# /usr/libexec/bacula/grant_mysql_privileges -u root -p
# /usr/libexec/bacula/create_mysql_database -u root -p
# /usr/libexec/bacula/make_mysql_tables -u root -p
# /usr/libexec/bacula/grant_bacula_privileges -u root -p
Now set bacula user password on MySQL. To do that, log in to your MySQL server with command:
# mysql -u root -p
And set password as shown below:
Welcome to the MySQL monitor.  Commands end with ; or \g.
Your MySQL connection id is 67
Server version: 5.5.35 MySQL Community Server (GPL) by Remi

Copyright (c) 2000, 2013, Oracle and/or its affiliates. All rights reserved.

Oracle is a registered trademark of Oracle Corporation and/or its
affiliates. Other names may be trademarks of their respective
owners.

Type 'help;' or '\h' for help. Type '\c' to clear the current input statement.

mysql> UPDATE mysql.user SET password=PASSWORD("centos") WHERE user='bacula';
Query OK, 2 rows affected (0.00 sec)
Rows matched: 2  Changed: 2  Warnings: 0

mysql> FLUSH PRIVILEGES;
Query OK, 0 rows affected (0.01 sec)

mysql> exit
Bye
Now update all Bacula configuration files with new password and addresses as shown below.
Update Bacula Director
Edit file /etc/bacula/bacula-dir.conf,
# vi /etc/bacula/bacula-dir.conf
Update Bacula server hostname, bacula mysql user password, Bacula console password, Bacula file daemon password etc. Be mindful that you should use a fully qualified domain name for adding clients or simply use the IP address instead.
[...]
Director {                            # define myself
  Name = bacula-dir
  DIRport = 9101                # where we listen for UA connections
  QueryFile = "/usr/libexec/bacula/query.sql"
  WorkingDirectory = "/var/spool/bacula"
  PidDirectory = "/var/run"
  Maximum Concurrent Jobs = 1
  Password = "centos"         # Console password
  Messages = Daemon

[...]

# Client (File Services) to backup
Client {
  Name = bacula-fd
  Address = 192.168.1.101
  FDPort = 9102
  Catalog = MyCatalog
  Password = "centos"          # password for FileDaemon
  File Retention = 30 days            # 30 days
  Job Retention = 6 months            # six months
  AutoPrune = yes                     # Prune expired Jobs/Files
}

[...]
# Definition of file storage device
Storage {
  Name = File
# Do not use "localhost" here
  Address = 192.168.1.101                # N.B. Use a fully qualified name here
  SDPort = 9103
  Password = "centos"
  Device = FileStorage
  Media Type = File
}

[...]
# Generic catalog service
Catalog {
  Name = MyCatalog
# Uncomment the following line if you want the dbi driver
# dbdriver = "dbi:sqlite3"; dbaddress = 127.0.0.1; dbport =
  dbname = "bacula"; dbuser = "bacula"; dbpassword = "centos"
}

[...]

Console {
  Name = bacula-mon
  Password = "centos"
  CommandACL = status, .status
}
Update Bacula Console
Edit file /etc/bacula/bconsole.conf,
# vi /etc/bacula/bconsole.conf
Change the console password:
Director {
  Name = bacula-dir
  DIRport = 9101
  address = localhost
  Password = "centos"
}
Update Storage Daemon
Edit file /etc/bacula/bacula-sd.conf,
# vi /etc/bacula/bacula-sd.conf
Update the password, Find the red lines and delete them, do not uncomment them. Also set your Archive device path.
[...]
Director {
  Name = bacula-dir
  Password = "centos"
}

##Delete the following lines (Do not uncomment). As i installed centos minimal server, i don't have a GUI mode, so that i deleted the following section##

# Restricted Director, used by tray-monitor to get the
#   status of the storage daemon
#
Director {
  Name = bacula-mon
  Password = "@@MON_SD_PASSWORD@@"
  Monitor = yes
}

[...]

Device {
  Name = FileStorage
  Media Type = File
  Archive Device = /mybackup
  LabelMedia = yes;                   # lets Bacula label unlabeled media
  Random Access = Yes;
  AutomaticMount = yes;               # when device opened, read it
  RemovableMedia = no;
  AlwaysOpen = no;
}
[...]
Update file daemon
Edit file /etc/bacula/bacula-fd.conf,
# vi /etc/bacula/bacula-fd.conf
Update the password and delete the lines shown in red colour.
# List Directors who are permitted to contact this File daemon
#
Director {
Name = bacula-dir
Password = "centos"
}

##Delete (do not uncomment) these lines if you only using CUI mode in Backup server ##

# Restricted Director, used by tray-monitor to get the
#   status of the storage daemon
#
Director {
Name = bacula-mon
Password = "@@MON_SD_PASSWORD@@"
Monitor = yes
}
As i mentioned in the above configuration, my archive device path is “/mybackup”. So let me create a directory called “mybackup”.
# mkdir /mybackup
# chown bacula /mybackup
Now we finished all passwords and address modifications. Next restart all bacula daemons and make them to start automatically on every reboot.
# service bacula-dir start
# service bacula-fd start
# service bacula-sd start
# chkconfig bacula-dir on
# chkconfig bacula-fd on
# chkconfig bacula-sd on
Bacula has been successfully installed and configured. You can now add clients, jobs and volumes by updating the bacula config files. Alternatively you can use webmin to make the work more simple. It is quite easier then updating the config files manually.
Manage Bacula With Webmin
Webmin is a web-based interface for system administration for Unix. Using any modern web browser, you can setup user accounts, Apache, DNS, file sharing and much more.
Download and install the latest version of webmin from here.
# wget http://sourceforge.net/projects/webadmin/files/webmin/1.660/webmin-1.660-1.noarch.rpm
# rpm -Uvh webmin-1.660-1.noarch.rpm
# service webmin start
# chkconfig webmin on
Adjust Firewall/Router
If you want to access the bacula server through from a remote system, allow the webmin port “10000″ and bacula ports “9101″, “9102″, “9103″ through your firewall or router.
Edit file /etc/sysconfig/iptables,
# vi /etc/sysconfig/iptables
Add these following lines in your iptables config file.
[...]
-A INPUT -m state --state NEW -m tcp -p tcp --dport 10000 -j ACCEPT
-A INPUT -m state --state NEW -m tcp -p tcp --dport 9101 -j ACCEPT
-A INPUT -m state --state NEW -m tcp -p tcp --dport 9102 -j ACCEPT
-A INPUT -m state --state NEW -m tcp -p tcp --dport 9103 -j ACCEPT
[...]
Restart iptables:
# service iptables restart
Access Webmin
Now you can login through webmin by “//http://server-ip-address:10000″ or “http://domain-name:10000/”.
Login to webmin using your root user and its password.
Login to Webmin - Mozilla Firefox_001You will find the Bacula Backup System in the left pane of webmin console under System -> Bacula Backup System. If not is found there, try in the “unused modules” section.
Selection_002
Click on the “Bacula Backup System” link. Initially the Bacula server won’t start automatically. To start Bacula server click on “Module Configuration” link on the right of the “Bacula Backup System” page.
Webmin 1.660 on server.unixmen.local (CentOS Linux 6.5) - Mozilla Firefox_003Select the database i.e “MySQL” in this case and enter the bacula database user password. Then click save.
Webmin 1.660 on server.unixmen.local (CentOS Linux 6.5) - Mozilla Firefox_004
Now you will get the window like shown below.
Webmin 1.660 on server.unixmen.local (CentOS Linux 6.5) - Mozilla Firefox_005That’s it. From here you can add Backup clients, Volumes and schedule jobs etc.
Good Luck!
Reference Links:


Source : http://www.unixmen.com/install-and-configure-bacula-server-in-centos-6-4-rhel-6-4/

Samba Server Installation and Configuration in CentOS 6.3 / RHEL 6.3

Samba is used to allow users to share and use files, folders and printers between Linux and Windows systems. In this how-to tutorial let us see how to install and configure samba server.

Scenario

In this tutorial, i use two systems as described below

Samba server:

Operating system : CentOS 6.3
Hostname : sambaserver.unixmen.com
IP Address : 192.168.1.50/24

 Samba client:

Operating system : Windows 7 Professional
Hostname : client
IP Address : 192.168.1.51/24

Install Samba package

Check and remove any previously installed samba package
[root@sambaserver ~]# rpm -qa | grep samba
[root@sambaserver ~]# yum list installed | grep samba
If it installed, remove it using the below command
[root@sambaserver ~]# yum remove samba*
Now install samba
[root@sambaserver ~]# yum install samba* -y

Configure a fully accessed anonymous share

Create a directory called ‘/samba/share1′ and set full permission
[root@sambaserver ~]# mkdir -p /samba/share1
[root@sambaserver ~]# chmod -R 0777 /samba/share1/
Edit and add the following lines in samba config file as shown below
[root@sambaserver ~]# vi /etc/samba/smb.conf
## Line no 58 - Add the following lines below line 58 ##
unix charset = UTF-8
dos charset = CP932
## Line no 75 - Change the to windows default workgroup ##
workgroup = WORKGROUP
## Line no 81 - Uncomment and set the IP Range ##
hosts allow = 127. 192.168.1.
## Line 102 - set no authentication ##
security = share
## Add the following lines at the bottom ##
[myshare]
path = /samba/share1
writable = yes
browsable = yes
guest ok = yes
guest only = yes
create mode = 0777
directory mode = 0777
Start samba server
[root@sambaserver ~]# vi /etc/samba/smb.conf
[root@sambaserver ~]# /etc/init.d/smb start
Starting SMB services: [ OK ]
[root@sambaserver ~]# /etc/init.d/nmb start
Starting NMB services: [ OK ]
[root@sambaserver ~]# chkconfig smb on
[root@sambaserver ~]# chkconfig nmb on
Test the Samba server
We can test the Samba server configuration using the command ‘testparm’.
[root@sambaserver ~]# testparm
Load smb config files from /etc/samba/smb.conf
rlimit_max: increasing rlimit_max (1024) to minimum Windows limit (16384)
Processing section "[homes]"
Processing section "[printers]"
Processing section "[myshare]"
Loaded services file OK.
Server role: ROLE_STANDALONE
Press enter to see a dump of your service definitions

[global]
dos charset = CP932
server string = Samba Server Version %v
security = SHARE
log file = /var/log/samba/log.%m
max log size = 50
hosts allow = 127., 192.168.1.
cups options = raw

[homes]
comment = Home Directories
read only = No
browseable = No

[printers]
comment = All Printers
path = /var/spool/samba
printable = Yes
browseable = No

[myshare]
path = /samba/share1
read only = No
create mask = 0777
directory mask = 0777
guest only = Yes
guest ok = Yes
Allow Samba server through firewall
[root@sambaserver ~]# vi /etc/sysconfig/iptables
# Firewall configuration written by system-config-firewall
# Manual customization of this file is not recommended.
*filter
:INPUT ACCEPT [0:0]
:FORWARD ACCEPT [0:0]
:OUTPUT ACCEPT [0:0]
-A INPUT -s 192.168.1.0/24 -m state --state NEW -p udp --dport 137 -j ACCEPT
-A INPUT -s 192.168.1.0/24 -m state --state NEW -p udp --dport 138 -j ACCEPT
-A INPUT -s 192.168.1.0/24 -m state --state NEW -p tcp --dport 139 -j ACCEPT
-A INPUT -s 192.168.1.0/24 -m state --state NEW -p tcp --dport 445 -j ACCEPT
-A INPUT -s 192.168.1.0/24 -m state --state NEW -p tcp --dport 901 -j ACCEPT
-A INPUT -m state --state ESTABLISHED,RELATED -j ACCEPT
-A INPUT -p icmp -j ACCEPT
-A INPUT -i lo -j ACCEPT
-A INPUT -m state --state NEW -m tcp -p tcp --dport 22 -j ACCEPT
-A INPUT -j REJECT --reject-with icmp-host-prohibited
-A FORWARD -j REJECT --reject-with icmp-host-prohibited
COMMIT
Restart iptables to save the changes
[root@sambaserver ~]# service iptables restart
iptables: Flushing firewall rules: [ OK ]
iptables: Setting chains to policy ACCEPT: filter [ OK ]
iptables: Unloading modules: [ OK ]
iptables: Applying firewall rules: [ OK ]
Disable SELINUX
[root@sambaserver ~]# vi /etc/sysconfig/selinux
# This file controls the state of SELinux on the system.
# SELINUX= can take one of these three values:
# enforcing - SELinux security policy is enforced.
# permissive - SELinux prints warnings instead of enforcing.
# disabled - No SELinux policy is loaded.
SELINUX=disabled
# SELINUXTYPE= can take one of these two values:
# targeted - Targeted processes are protected,
# mls - Multi Level Security protection.
SELINUXTYPE=targeted
Restart the server and goto windows client system
Click Start -> Run. Enter the samba Server IP as shown below.
Win7 [Running] - Oracle VM VirtualBox_001
Win7 [Running] - Oracle VM VirtualBox_002
Now create some folders and files
Win7 [Running] - Oracle VM VirtualBox_004
Check whether the newly created files or folders present in the samba server
[root@sambaserver ~]# ls -l /samba/share1/
total 4
drwxrwxrwx 2 nobody nobody 4096 Mar 8 22:59 unixmen

Configure a authenticated share using samba server

Create a user called “sk” and a group called “smbgroup”. Add the user “sk” to the group “smbgroup”
[root@sambaserver ~]# useradd sk
[root@sambaserver ~]# groupadd smbgroup
[root@sambaserver ~]# usermod -a -G smbgroup sk
[root@sambaserver ~]# smbpasswd -a sk
New SMB password:
Retype new SMB password:
Added user sk.
Create a new share called “/samba/share2″ and set the permissions to that share.
[root@sambaserver ~]# mkdir /samba/share2
[root@sambaserver ~]# chmod -R 0755 /samba/share2/
[root@sambaserver ~]# chown -R sk:smbgroup /samba/share2/
Add the below lines at the bottom of samba config file.
[root@sambaserver ~]# vi /etc/samba/smb.conf
[secure]
path = /samba/share2
writable = yes
browsable = yes
guest ok = no
valid users = @smbgroup
Test the configuration for any errors
[root@sambaserver ~]# testparm
Load smb config files from /etc/samba/smb.conf
rlimit_max: increasing rlimit_max (1024) to minimum Windows limit (16384)
Processing section "[homes]"
Processing section "[printers]"
Processing section "[myshare]"
Processing section "[secure]"
Loaded services file OK.
Server role: ROLE_STANDALONE
Press enter to see a dump of your service definitions

[global]
dos charset = CP932
server string = Samba Server Version %v
security = SHARE
log file = /var/log/samba/log.%m
max log size = 50
hosts allow = 127., 192.168.1.
cups options = raw

[homes]
comment = Home Directories
read only = No
browseable = No

[printers]
comment = All Printers
path = /var/spool/samba
printable = Yes
browseable = No

[myshare]
path = /samba/share1
read only = No
create mask = 0777
directory mask = 0777
guest only = Yes
guest ok = Yes

[secure]
path = /samba/share2
valid users = @smbgroup
read only = No
Restart samba server
[root@sambaserver ~]# /etc/init.d/smb restart
Shutting down SMB services: [ OK ]
Starting SMB services: [ OK ]
[root@sambaserver ~]# /etc/init.d/nmb restart
Shutting down NMB services: [ OK ]
Starting NMB services: [ OK ]
Now goto windows client and try to access the secured share.
Win7 [Running] - Oracle VM VirtualBox_005

Configure samba server in GUI mode

If you struggle with command line configuration, you can configure samba server in GUI mode too using “samba-swat” package. I prefer and suggest you command line mode only.
Install the “samba-swat” package if it is not installed.
[root@sambaserver ~]# yum install xinetd samba-swat -y

Configure SWAT

Open the “samba-swat” config file and edit as shown below
[root@sambaserver ~]# vi /etc/xinetd.d/swat
# default: off
# description: SWAT is the Samba Web Admin Tool. Use swat \
# to configure your Samba server. To use SWAT, \
# connect to port 901 with your favorite web browser.
service swat
{
port = 901
socket_type = stream
wait = no
only_from = 127.0.0.1 192.168.1.0/24
user = root
server = /usr/sbin/swat
log_on_failure += USERID
disable = no
}
Restart samba and xinetd services
[root@sambaserver ~]# /etc/init.d/xinetd restart
Stopping xinetd: [ OK ]
Starting xinetd: [ OK ]
[root@sambaserver ~]# /etc/init.d/smb restart
Shutting down SMB services: [ OK ]
Starting SMB services: [ OK ]
[root@sambaserver ~]# /etc/init.d/nmb restart
Shutting down NMB services: [ OK ]
Starting NMB services: [ OK ]
Open the web browser from any client syatems. In the address bar type “http://server-ip-address:901″ and press enter. Now the console screen will open. You can start configure samba server here.
Win7 [Running] - Oracle VM VirtualBox_009
Win7 [Running] - Oracle VM VirtualBox_010
Thats it. Enjoy.

Source : http://www.unixmen.com/samba-server-installation-and-configuration-in-centos-6-3-rhel-6-3/

Thursday, 13 February 2014

Nagios 4.0.1 Released – Install on RHEL/CentOS 6.x/5.x and Fedora 19/18/17

Nagios is an awesome Open Source monitoring tool, its provides you more comprehensive monitoring environment to always keep an eye on your all machines / networks whether you are in a your data center or just your small labs.
With Nagios, you can monitor your remote hosts and their services remotely on a single window. It shows warnings and indicates if something goes wrong in your servers which eventually helps us to detect some problems before they occur. It helps us to reduce downtime and business losses.
Recently, Nagios released its latest versions Nagios 4.0.1 on 15th October 2013, and its latest stable release of Nagios plugins 1.5.
This article is intended to guide you with easy instructions on how to install latest Nagios 4.0.1 from source (tarball) on RHEL 6.4/6.3/6.2/6.1/6/5.8, CentOS 6.4/6.3/6.2/6.1/6/5.8 and Fedora 19,18,17,16,15,14,13,12 distributions. Within 30 minutes you will be monitoring your local machine, no any advanced installation procedure only basic installation that will work 100% on most of the today’s Linux servers.
Please Note: The installation instructions were shown in here are written based on CentOS 6.4 Linux distribution.

Installing Nagios 4.0.1 and Nagios Plugin 1.5

If you follow these instructions correctly, you will end up with following information.
  1. Nagios and its plugins will be installed under /usr/local/nagios directory.
  2. Nagios will be configured to monitor few services of your local machine (Disk Usage, CPU Load, Current Users, Total Processes, etc.)
  3. Nagios web interface will be available at http://localhost/nagios

Step 1: Install Required Dependencies

We need to install Apache, PHP and some libraries like gcc, glibc, glibc-common and GD libraries and its development libraries before installing Nagios 4.0.1 with source. And to do so we can use yum default package installer.
[root@tecmint]# yum install -y httpd php gcc glibc glibc-common gd gd-devel make net-snmp  (RedHat / CentOS)

Step 2: Create Nagios User and Group

Create a new nagios user and nagcmd group account and set a password.
[root@tecmint]# useradd nagios
[root@tecmint]# groupadd nagcmd
Next, add both the nagios user and the apache user to the nagcmd group.
[root@tecmint]# usermod -G nagcmd nagios
[root@tecmint]# usermod -G nagcmd apache

Step 3: Download Nagios Core 4.0.1 and Nagios Plugin 1.5

Create a directory for your Nagios installation and all its future downloads.
[root@tecmint]# mkdir /root/nagios
[root@tecmint]# cd /root/nagios
Now download latest Nagios Core 4.0.1 and Nagios plugins 1.5 packages with wget command.
[root@tecmint nagios~]# wget http://prdownloads.sourceforge.net/sourceforge/nagios/nagios-4.0.1.tar.gz
[root@tecmint nagios~]# wget https://www.nagios-plugins.org/download/nagios-plugins-1.5.tar.gz

Step 4: Extract Nagios Core and its Plugins

We need to extract downloaded package with tar command as follows.
[root@tecmint nagios~]# tar –xvf nagios-4.0.1.tar.gz
[root@tecmint nagios~]# tar –xvf nagios-plugins-1.5.tar.gz
When you extract these tarballs with tar command, two new folders will appear in that directory.
[root@tecmint nagios ~]# ll
total 3712
drwxrwxr-x 18 root root    4096 Oct 17 03:28 nagios-4.0.1
-rw-r--r--  1 root root 1695367 Oct 15 19:49 nagios-4.0.1.tar.gz
drwxr-xr-x 15  200  300    4096 Oct 14 10:18 nagios-plugins-1.5
-rw-r--r--  1 root root 2428258 Oct  2 11:27 nagios-plugins-1.5.tar.gz

Configure Nagios Core

Now, first we will configure Nagios Core and to do so we need to go to Nagios directory and run configure file and if everything goes fine, it will show the output in the end as sample output. Please see below.
[root@tecmint nagios~]# cd nagios-4.0.1
[root@tecmint nagios-4.0.1 ]# ./configure --with-command-group=nagcmd
Sample output:
Nagios executable:  nagios
        Nagios user/group:  nagios,nagios
       Command user/group:  nagios,nagcmd
             Event Broker:  yes
        Install ${prefix}:  /usr/local/nagios
    Install ${includedir}:  /usr/local/nagios/include/nagios
                Lock file:  ${prefix}/var/nagios.lock
   Check result directory:  ${prefix}/var/spool/checkresults
           Init directory:  /etc/rc.d/init.d
  Apache conf.d directory:  /etc/httpd/conf.d
             Mail program:  /bin/mail
                  Host OS:  linux-gnu

 Web Interface Options:
 ------------------------
                 HTML URL:  http://localhost/nagios/
                  CGI URL:  http://localhost/nagios/cgi-bin/
 Traceroute (used by WAP):  /bin/traceroute

Review the options above for accuracy.  If they look okay,
type 'make all' to compile the main program and CGIs.
Now, after configuring we need to Compile and install all the binaries with make command and make install command will install all the needed libraries in your machine and we can proceed further.
[root@tecmint nagios-4.0.1 ]# make all
[root@tecmint nagios-4.0.1 ]# make install
Sample output:
*** Main program, CGIs and HTML files installed ***

You can continue with installing Nagios as follows (type 'make'
without any arguments for a list of all possible options):

  make install-init
     - This installs the init script in /etc/rc.d/init.d

  make install-commandmode
     - This installs and configures permissions on the
       directory for holding the external command file

  make install-config
     - This installs sample config files in /usr/local/nagios/etc
Following command will install the init scripts for Nagios.
[root@tecmint nagios-4.0.1 ]# make install-init
To make nagios work from command line we need to install command-mode.
[root@tecmint nagios-4.0.1 ]# make install-commandmode
Next, install sample nagios files, please run following command.
[root@tecmint nagios-4.0.1 ]# make install-config
Sample output:
/usr/bin/install -c -m 775 -o nagios -g nagios -d /usr/local/nagios/etc
/usr/bin/install -c -m 775 -o nagios -g nagios -d /usr/local/nagios/etc/objects
/usr/bin/install -c -b -m 664 -o nagios -g nagios sample-config/nagios.cfg /usr/local/nagios/etc/nagios.cfg
/usr/bin/install -c -b -m 664 -o nagios -g nagios sample-config/cgi.cfg /usr/local/nagios/etc/cgi.cfg
/usr/bin/install -c -b -m 660 -o nagios -g nagios sample-config/resource.cfg /usr/local/nagios/etc/resource.cfg
/usr/bin/install -c -b -m 664 -o nagios -g nagios sample-config/template-object/templates.cfg /usr/local/nagios/etc/objects/templates.cfg
/usr/bin/install -c -b -m 664 -o nagios -g nagios sample-config/template-object/commands.cfg /usr/local/nagios/etc/objects/commands.cfg
/usr/bin/install -c -b -m 664 -o nagios -g nagios sample-config/template-object/contacts.cfg /usr/local/nagios/etc/objects/contacts.cfg
/usr/bin/install -c -b -m 664 -o nagios -g nagios sample-config/template-object/timeperiods.cfg /usr/local/nagios/etc/objects/timeperiods.cfg
/usr/bin/install -c -b -m 664 -o nagios -g nagios sample-config/template-object/localhost.cfg /usr/local/nagios/etc/objects/localhost.cfg
/usr/bin/install -c -b -m 664 -o nagios -g nagios sample-config/template-object/windows.cfg /usr/local/nagios/etc/objects/windows.cfg
/usr/bin/install -c -b -m 664 -o nagios -g nagios sample-config/template-object/printer.cfg /usr/local/nagios/etc/objects/printer.cfg
/usr/bin/install -c -b -m 664 -o nagios -g nagios sample-config/template-object/switch.cfg /usr/local/nagios/etc/objects/switch.cfg

*** Config files installed ***

Remember, these are *SAMPLE* config files.  You'll need to read
the documentation for more information on how to actually define
services, hosts, etc. to fit your particular needs.

Step 5: Customizing Nagios Configuration

Open the “contacts.cfg” file with your choice of editor and set the email address associated with the nagiosadmin contact definition to receiving email alerts.
# vi /usr/local/nagios/etc/objects/contacts.cfg
Sample Output
###############################################################################
###############################################################################
#
# CONTACTS
#
###############################################################################
###############################################################################

# Just one contact defined by default - the Nagios admin (that's you)
# This contact definition inherits a lot of default values from the 'generic-contact'
# template which is defined elsewhere.

define contact{
       contact_name                    nagiosadmin             ; Short name of user
       use                             generic-contact         ; Inherit default values from generic-contact template (defined above)
       alias                           Nagios Admin            ; Full name of user

       email                           tecmint@tecmint.com     ; *** CHANGE THIS TO YOUR EMAIL ADDRESS ****
       }

Step 6: Install and Configure Web Interface for Nagios

We are done with all configuration in the backend, now we will configure Web Interface For Nagios with following command. The below command will Configure Web interface for Nagios and a web admin user will be created “nagiosadmin”.
[root@tecmint nagios-4.0.1 ]# make install-webconf
In this step, we will be creating a password for “nagiosadmin”. After executing this command, please provide a password twice and keep it remember because this password will be used when you login in the Nagios Web interface.
[root@tecmint nagios-4.0.1]# htpasswd -s -c /usr/local/nagios/etc/htpasswd.users nagiosadmin
New password:
Re-type new password:
Adding password for user nagiosadmin
Restart Apache to make the new settings take effect.
[root@tecmint ]# service httpd start (On RedHat / CentOS)
[root@tecmint ]# systemctl start httpd.service (On Fedora)

Step 7: Compile and Install Nagios Plugin

We have downloaded nagios plugins in /root/nagios, Go there and configure and install it as directed below.
[root@tecmint nagios]# cd /root/nagios
[root@tecmint nagios]# cd nagios-plugins-1.5
[root@tecmint nagios]# ./configure --with-nagios-user=nagios --with-nagios-group=nagios
[root@tecmint nagios]# make
[root@tecmint nagios]# make install

Step 8: Verify Nagios Configuration Files

Now we are all done with Nagios configuration and its time to verify it and to do so please insert following command. If everything goes smooth it will show up similar to below output.
[root@tecmint nagios]# /usr/local/nagios/bin/nagios -v /usr/local/nagios/etc/nagios.cfg
Sample Output
/usr/bin/install -c -m 644 sample-config/httpd.conf /etc/httpd/conf.d/nagios.conf

*** Nagios/Apache conf file installed ***

 /usr/local/nagios/bin/nagios -v /usr/local/nagios/etc/nagios.cfg
...
...
Total Warnings: 0
Total Errors:   0

Step 9: Add Nagios Services to System Startup

To make Nagios work across reboots, we need to add nagios and httpd with chkconfig command.
[root@tecmint ]# chkconfig --add nagios
[root@tecmint ]# chkconfig --level 35 nagios on
[root@tecmint ]# chkconfig --add httpd
[root@tecmint ]# chkconfig --level 35 httpd on
Restart Nagios to make the new settings take effect.
[root@tecmint ]# service nagios start (On RedHat / CentOS)
[root@tecmint ]# systemctl start nagios.service (On Fedora)

Step 10: Login to the Nagios Web Interface

Your nagios is ready to work, please open it in your browser with “http://Your-server-IP-address/nagios” or “http://FQDN/nagios” and Provide the username “nagiosadmin” and password.
Nagios Login
Nagios Login
Nagios Web Interface
Host View
Nagios Host View
Nagios Host View
Nagios Overview
Nagios Overview
Nagios Overview
Service View
Nagios Services
Nagios View Services
Process View
Nagios Process View
Process View
Congratulations! You’ve successfully installed and configured Nagios and its Plugins. You’ve just begin your journey into monitoring.

Upgrade Nagios 3.x to Nagios 4.0.1

If you are already running an older version of Nagios, you can upgrade it anytime. To do so, you just need to download the latest tar archive of it and configure it as shown below.
[root@tecmint ]# service nagios stop
[root@tecmint ]# tar –zxvf nagios-4.0.1.tar.gz
[root@tecmint ]# cd nagios-4.0.1
[root@tecmint ]# ./configure
[root@tecmint ]# make all
[root@tecmint ]# make install
[root@tecmint ]# service nagios start
That’s it for now, in my upcoming articles, I will show you how to add Linux, Windows, Printers, Switches and Devices to Nagios monitoring Server. If you’re having any trouble while installing, please do contact us via comments. Till then stay tuned and connected to Tecmint and don’t forget to Like and Share us to spread around.
Read Also:
  1. How to Add Linux Host to Nagios Monitoring Server
  2. How to Add Windows Host to Nagios Monitoring Server

Source : http://www.tecmint.com/install-nagios-in-linux/