Thursday, 13 July 2017

Cara membuat WiFi Hotspot dari Laptop / Computer

DSG sudah memberikan daftar aplikasi gratis untuk membuat WiFi hotspot. Tapi jika kamu sedang tidak memungkinkan untuk download/lebih suka yang manual, berikut ini cara membuat WiFi hotspot menggunakan Windows Command Prompt.

1. Buka command prompt dengan akses admin (administrative privileges). Klik kanan pada ikon Command Prompt dan pilih Run as Administrator.


Aplikasi WIFI start CMD

2. Sekarang, cek apakah PC kamu support untuk membuat WiFi hotspot. Ketikkan command berikut di command prompt: netsh wlan show drivers 


3. Hasil command tadi akan menunjukkan hasil seperti gambar dibawah. Cek apakah PC kamu mendukung Hosted Network. Jika Ya, kamu bisa lanjut. Jika Tidak, berarti kamu tidak bisa membuat WiFi hotspot menggunakan metode ini.

4. Jika WiFi network card kamu mendukung Hosted Network, kamu dapat membuat hotspot baru dengan sebuah command seperti berikut. Sesuaikan value ssid menjadi nama hotspot yang kamu inginkan, key menjadi password yang kamu inginkan: netsh wlan set hostednetwork mode=allow ssid=Namahotspot key=passwordKamu.

Aplikasi Wifi keypassword

5. Apabila sukses, kamu akan mendapat notifikasi bahwa mode hosted network telah diatur menjadi ‘allow’ dan username serta password berhasil diubah. Sekarang kamu sudah berhasil membuat WiFi hotspot tapi kamu perlu mengaktifkannya dengan command: netsh wlan start hostednetwork 

Aplikasi WIFI start hostednetwork

6. Jika ingin menonaktifkan hotspot: netsh wlan stop hostednetwork 

Aplikasi WIFI Stop Hosted Network

7. Untuk mengetahui detail WiFi hotspot yang telah dibuat, gunakan command netsh wlan show hostednetwork
.
Aplikasi Show Hosted Network

Sip! Kamu sudah bisa membuat WiFi hotspot di PC Windows hanya dengan command prompt! Sekarang ikuti langkah dibawah untuk share koneksi internet.

1. Akses Network and Sharing Center (Control Panel\Network and Internet\Network and Sharing Center) dan klik pada Koneksi Internet Sumber/ Utama

Aplikasi WIFI Network and Sharing Center

2. Klik Properties


3. Akses tab Sharing dan centang Allow other network users through this computer internet connection.

Aplikasi Wifi Shared Connection

4. Pada pilihan dropdown “Home Network Connection” Pilih network/ jaringan yang baru dibuat. Sebagai contoh disini koneksi saya adalah “Local Area Connection* 12”

Source : https://www.downloadsoftwaregratisan.com/5-aplikasi-gratis-terbaik-wifi-hotspot-untuk-windows/

Thursday, 6 July 2017

Reset Password NVR/DVR Infinity dan Hikvision


DVR atau NVR Hikvision / Infinity anda terkunci karena lupa password?,sdh biasa itu hehehehe…
ikutin cara dibawah ini untuk reset passwordnya

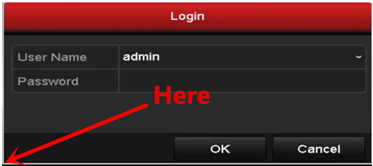
Di NVR/DVR interface, anda dapat me-reset password dengan cara double klik sudut kiri bawah login window. maka password resetting window akan muncul. masukkan secure code dan reset.
perhatikan gambar


Double klik di pojok kiri kotak login seperti pada gambar, maka tampilan akan berubah seperti gambar berikut:


Catat serial numbernya,lalu masukkan serial number tersebut di software calculator DISINI untuk mendapatkan secure codenya.
Setelah dapat secure codenya masukkan pada kolom ” SECURE CODE”.
setelah itu masukkan password baru dvr anda.

Selesai…

Source : http://paketcctv.com/blog/cara-reset-password-dvrnvr-hikvision/

Friday, 17 February 2017

Problem installing .Net Framework 4 (HRESULT 0xc8000222)

JE Jeffer_123 asked on
I have a problem to install the .Net Framework 4 ... this problem is:

HRESULT 0xc8000222

anyome can help me please?

My System OS is Windows 7
854 people had this question
  • The answered status icon Answer
    Jessen P replied on
    Hello,

    1. Does the issue persist only with .netframework?
    2. How are you  installing it? Is it through windows update or manually?
     
    a: Click Start > Run.
    b: Type cmd and press Enter.
    Please run the following command in the opened window.
    net stop WuAuServ
    c: Click Start > Run Type %windir% and press Enter.
    d: In the opened folder, rename the folder SoftwareDistribution to SDold.

    e: Click Start> Run type cmd and press Enter.
    Please run the following command in the opened window.
    net start WuAuServ
     
    Hope this information helps.
    850 people found this helpful 
     
    source : https://answers.microsoft.com/en-us/windows/forum/all/problem-installing-net-framework-4-hresult/bfac5cac-10e8-4eb9-b87d-64a3266522f7 

    Thursday, 1 December 2016

    AXIS M 3006-V


    Source : http://www.cambase.io/vendors/axis/models/m3006-v

    Reset Mikrotik

     Jika reset Mikrotik lewat tombol reset gagal, bisa di coba dengan mengupgrade firmware mikrotik via netinstall dengan cara seperti dibawah ini


    Success! My Mikrotik is back in working condition!! Thank you all

    RB951G2HnD, Thank you so much for your guidance.

    Dallen, You gave me the most important ingredient - hope... Mikrotik support just left me hanging with "Use NetInstall". But hearing your story made me try try and try till it worked...

    Let me post what I did so that anyone else with the same problem may be able to fix it themselves.
    a) Disable Firewall
    b) Connect PC to Port 1 on Mikrotik
    c) Disable all other network interfaces on the PC - LAN, Wireless, Virtualbox
    d) Set static IP of 192.168.88.3 subnet mask 255.255.255.0 gateway 192.168.88.1 on PC
    e) Run NetInstall
    f) Select "Net Booting"
    g) Mark "Boot Serve Enabled"
    h) Selected Client IP address of 192.168.88.1
    i) Keep reset pressed while powering on
    j) Keep holding the reset pin till a beep sounds. Release immediately
    k) Router showed up in Netinstall's list (**)
    l) Unmarked "Keep old configuration" and "Configure Script"
    m) Unzipped "all_packages-mipsbe-6.5.zip"
    n) Selected all packages by browsing to the unzipped directory and using the "Select All" button
    o) Clicked on "Install"
    p) The progress bar moved to 100% as the packages were uploaded (**)
    q) The router rebooted - Beep once, some time later (1 min or so if I recollect) a second beep

    After a while after the second beep short (30 secs or so if I recollect) , the wireless light turned on, and the router configuration was as clean as the day I unpacked it (just 6 days ago!).

    The nightmare was in steps (k) and (p) both marked with (**). The router would just not show up in NetInstall's list - must have tried it 30 times before this worked - But once I got it to work, it started working every time. And then after Clicking on "install" the router status would go to "Installing" and then to "Ready" without doing anything - no idea why the installation worked properly after 20 times of trying!

    Irrespective, my router is back to being better than new - now upgraded to the later version of OS, and now with some additional packages!

    Thanks you for your help and encouragement. Made all the difference for a beginner like me!

    Now I need to get my production network running with dual-WAN and VPN...

    Best regards,
    Pradeep

    Source : http://forum.mikrotik.com/viewtopic.php?t=77999

    Wednesday, 2 November 2016

    Unix Create a Symbolic Link

    How do I create a symbolic links under Linux or Unix like operating systems using command line options?

    You need to use the ln command. It is a standard Unix / Linux / BSD command to create links to files. There are two types of links under UNIX, hard and soft link:

    Hard link vs. Soft link in Linux or UNIX

    [a] Hard links cannot links directories ( cannot link /tmp with /home/you/tmp)
    [b] Hard links cannot cross file system boundaries ( cannot link /tmp mounted on/tmp to 2nd hard disk mounted on /harddisk2)
    [c] Symbolic links refer to a symbolic path indicating the abstract location of another file
    [d] Hard links, refer to the specific location of physical data.

    UNIX create a symbolic link command

    To create a symbolic link, enter:
    $ ln -s {/path/to/file-name} {link-name}
    $ ln -s /shared/sales/data/file.txt sales.data.txt
    $ vi sales.data.txt
    $ ls -l sales.data.txt


    How do I delete a symbolic link?

    To delete a link, enter:
    $ rm {link-name}
    $ rm sales.data.txt
    $ ls -l
    $ ls -l /shared/sales/data/file.txt

    If you delete the soft link itself (sales.data.txt) , the data file would still be there ( /shared/sales/data/file.txt ). However, if you delete /shared/sales/data/file.txt, sales.data.txt becomes a broken link and data is lost.

    UNIX create a hardlink command

    To create hard link, enter (without the -s option):
    $ ln {file.txt} {hard-link}
    $ ln /tmp/file link-here


    How do I delete a hard link?

    You can delete hard link with the rm command itself:
    $ rm {hard-link}
    $ rm link-here

    If you delete a hard link, your data would be there. If you delete /tmp/file your data still be accessible via link-here hard link file.


    Source : http://www.cyberciti.biz/faq/unix-creating-symbolic-link-ln-command/

    Tuesday, 8 March 2016

    How to Create Virtual Disks Greater than 2GB in Xenserver

    I have worked out an unsupported solution to this. This worked on a XenServer 5.5.0 Update 2 "cluster". 4 XenServers, each with 32G RAM and dual quad-core 2.3Ghz processors.

    This method has only briefly been tested, is not in production, and I take no responsibility for it causing your system to explode should you try to replicate these steps.

    I am also very concerned about what may happen if we (or you) upgrade to XenServer "5.6.0" (or whatever the next version will be).

    If a Citrite guru could chime in on the dangers of this process and the harm that may happen during future upgrades, I would love to hear your thoughts.


    *+Begin by finding the uuid of the SR:+
    root@xen1~]# xe sr-list \\ uuid ( RO) : b55e5f09-8fef-4b5d-8dae-9410d630f205 \\ name-label ( RW): SATA_7.2K 20T \\ name-description ( RW): Hardware HBA SR \\ host ( RO): <shared> \\ type ( RO): lvmohba \\ content-type ( RO):


    * Get the volume group device name:
    root@xen1 ~]# vgs | awk '{print $1}' | grep b55e5f09-8fef-4b5d-8dae-9410d630f205
    VG_XenStorage-b55e5f09-8fef-4b5d-8dae-9410d630f205


    * Create the new logical volume, with a proper name:
    Change 3T to 4T or 5T (etc) to specify the size of your giant VDI
    root@xen1 ~]# lvcreate -L3T -n"LV-"$(uuidgen) VG_XenStorage-b55e5f09-8fef-4b5d-8dae-9410d630f205
    Logical volume "LV-4e3da1e4-9e1a-4e12-96a1-d3c233efc0d5" created


    * Tell XenServer to scan the SR
    root@xen1 ~]# xe sr-scan uuid=b55e5f09-8fef-4b5d-8dae-9410d630f205

    * *+After scanning the SR+*, the new VDI magically appeared under the Storage tab for this SR in XenCenter. I then gave it a name and description, and assigned it to a VM just like any other VDI.

    Source : https://joetutorials.wordpress.com/2015/06/03/how-to-create-virtual-disks-greater-than-2gb-in-xenserver/