Introduction
In this article, you'll learn how to create a safe, encrypted tunnel between your computer and your VPS along with how to bypass limits in a corporate network, how to bypass NAT, etc.
This article will cover some basic theory, which you can skip if you like just by going straight to the examples further down.
Communication in the Internet, Network Protocols and Communication Ports
Every piece of software installed in your computer, that wants to send or receive data through the Internet, has to use a protocol of the application layer from TCP/IP stack. Those protocols define a way to communicate and the format of the messages sent between the hosts over the Internet etc. For instance:
- HTTP - used to download websites and files from your web browser
- FTP - used to send files between a client and server
- DNS - used to change host name into an IP address and vice versa
- POP3 and (or) IMAP - used to download/browse your e-mail
- SMTP - used to send e-mail
- telnet - used to connect remotely to a server
- SSH - similar to telnet, but in a secure, encrypted version, so nobody can see what we send to a server and what the server sends to us.
UDP protocol is not connection-oriented. It doesn't provide retransmissioning for lost datagrams. If packets are not received in the correct order, UDP will, nonetheless give them to an application in the order that they were received. Because of that, UDP is mainly used to transmit real-time multimedia data - VoIP talks, videoconferences, audio and video. UDP is used sometimes by other protocols in the application layer - for instance, in the case of DNS.
In this case a protocol of the higher layer has to resend a query after not receiving an answer in the given amount of time. UDP is used here mainly, because it has low overhead: sending 1 small query in 1 datagram and receiving an answer takes less time and needs to transmit less data than making a TCP connection (exchanging 3 segment between hosts): sending a query from a client, sending a confirmation from the server, sending an answer from the server, and then sending a confirmation from a client and disconnecting the connection (4 segments).
To identify different connections to and from the same IP address, we use port numbers. Each server of a given application layer protocol binds to a given port number and waits for an incoming connection. The client connects to this port (in the case of a TCP connection) or sends a datagram to that port (in the case of UDP). For the most used, well-known protocols, there are reserved port numbers. For example, the HTTP server usually listens on port 80 TCP (alternatively, clients would have to connect to it by specifying the port number itself in an address - http://example.org:1234/), DNS server usually listens on port 53 UDP (sometimes port 53 TCP, too). The client needs to use a port on its side, too. They are "high ports" like 52044 and are randomly generated.
Here, you can see more reserved ports that we use everyday.
The segments and datagrams are then packed into IP packets, in the network layer. In the packets, the source and target computer are identified by IP addresses. They are global - only 1 host can use the same address at a time (excluding a magic like NAT used in home routers with private IP addresses: 192.168.x.x, 10.x.x.x, 172.16-31.x.x; x is a number between 1 and 255). Based on those addresses, routers can decide how to send the packet to get to the target computer.
The packets are then packed into frames/cells in the data link layer and then transmitted in a cable or in the form of radio waves on the local network. In the data link layer, in the frames, the computers are identified by their MAC addresses. Frames with MAC addresses are completely deleted from the routers which extract packets from them. They decide which network to send the packets to, pack them into new frames and send them on their way. If a network between both routers uses MAC addresses, addresses of those routers are included in the frame - the source one and the target one. It's not possible to communicate between two computers in different networks using only MAC addresses, even if they are not duplicated - the producer associates only one address with one card, so any manufactured carts can have the same MAC address as a card made by another producer.


About SSH. Theory, Part 1
SSH is a protocol in the application layer. It's the successor of telnet and is used for connecting to your VPS remotely in text mode. Unlike telnet, SSH is encrypted. It uses port 22 TCP, but you can easily change the port in your server's configuration.
SSH allows the user to authenticate themselves several different ways. For example:
-using a username and password
-using a pair of keys - first, a private one (top secret), and second - a public one (on server): a program that you use to connect with SSH has to solve math problem using a private key and send the solution to the server. The problem is different each time, so it's difficult to break the key using that authentication method.
Nowadays we use version 2 of SSH.
The most popular SSH server implementation is OpenSSH. The most popular clients are PuTTY (for Windows) and OpenSSH (for Linux). Both PuTTY and OpenSHH allow users to create tunnels.
SSH allows users to create a TCP tunnel between the server and client and to send data through that tunnel. SSH supports TCP tunnels only, but you can work around that i.e. via a SOCKS proxy. A tunnel like that is established between a chosen TCP port on server and a chosen local port. It's unencrypted, of course, so anybody can check what we use it for.
Concepts that will be used
Loopback interface - a virtual network card installed in the system with the IP address 127.0.0.1. Only applications installed on the system have access to that address. Remote access is not possible. You can start a VPS on that interface and have remote access only from the same system or via tunnel.SMTP - an application layer protocol that let you send e-mails. It's used for both communicating between mail servers and the communication between a server and a mail client. SMTP uses port 25 TCP for unencrypted communication and port 587 TCP or 465 TCP (deprecated - not recommended) for an encrypted connection (SSL).
POP3 - protocol in the application layer used to download new e-mails from a server to local mail client. It's rarely used nowadays as it has been superseded by IMAP. For unencrypted connections it uses port 110 TCP, for encrypted connections - port 995 TCP.
IMAP - a protocol similar to POP3, but with support for folders, labels, reading and managing messages and folders on the server without downloading everything to local PC and deleting it from the server. IMAP uses port 143 TCP for unencrypted connections and port 993 TCP for encrypted connections.
Example 1: Tunnel to an IMAP server
A tunnel between local port 143 on the loopback interface - 127.0.0.1 - and the IMAP server for receiving mail (unencrypted connection) on the same remote machine.
Unix and OpenSSH:
ssh abc@def -L 110:127.0.0.1:110

abc - username on server
def - server address
110: - local port that will be opened on loopback interface (127.0.0.1) on local machine
127.0.0.1 - IP address of computer that we creating a tunnel to via our SSH tunnel
:110 - port number of target machine we'll get to via tunnel
Windows and PuTTY:
Here you can read how to create connection to your VPS using PuTTY. That connection is required to create a tunnel.- Choose your connection, load data and go to Connection->SSH->Tunnels and set it as follows:
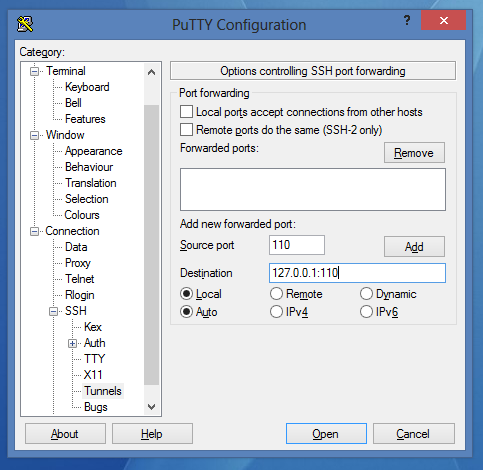
- Click on Add. After that every protocols it should look like this:
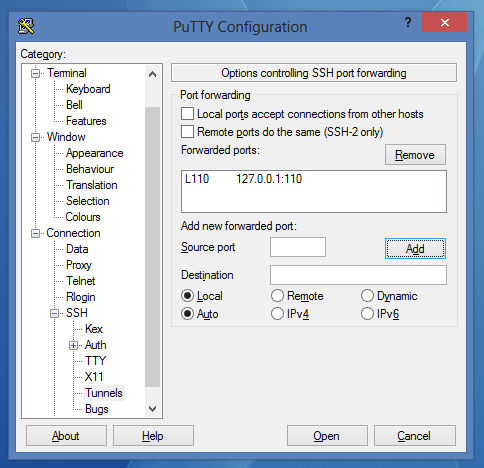
- Now you can save the session and connect using it.
Example 2. Tunnel to a Web Server
A tunnel between local port 8080 on the local interface (127.0.0.1) and the WWW server, bound to a remote machine's port 80. This time we'll connect to it using the loopback interface.
As I said earlier, the HTTP protocol is used to download WWW websites to the browser.
Unix and OpenSSH:
ssh abc@def -L 8080:11.22.33.44:80

    abc - username on server
    def - server address
    8080: - port on the local machine that will be opened on loopback interface (127.0.0.1)
    11.22.33.44 - IP address of the server that we'll create a tunnel to using SSH
Windows and PuTTY:
- Choose the connection and load the settings.
- Go to Connection->SSH->Tunnels
- Set it like this:
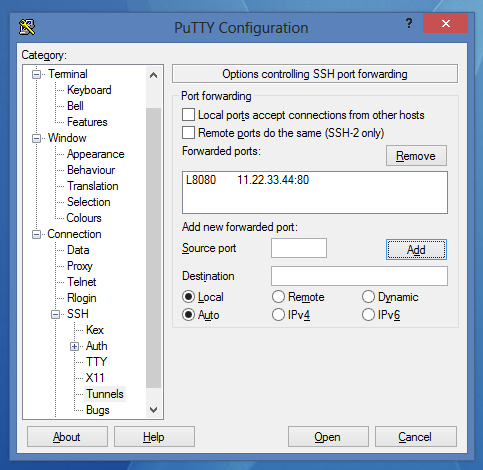
- Click on Add:
- Now you can save the session and connect.
Theoretically speaking, after going to 127.0.0.1:8080 in your browser, you should see a website located on the remote server we've connected to.
Practically speaking, HTTP 1.1 introduced the Host parameter to queries. This parameter is used to send the DNS domain name of the VPS we're connecting to. If it uses the Virtual Host mechanism, the page you'll get will either be an error page or the server's main page, but not through the tunnel.
In this case, we have to do one more thing: in the hosts file on local PC, add the VPS address and your loopback interface:
127.0.0.1 websitewebsite is the address to site you want to connect to (without the http:// at beginning and the / at the end).
The Hosts file is located at /etc/hosts (Linux) or C:\Windows\system32\drivers\etc\hosts (Windows). To edit this file, you must be an administrator or have administrative privileges.
Important! If you want to create a tunnel on a local port numbered less than 1024 on Unix systems, you must have root privileges.
Example 3. SOCKS proxy
A SOCKS proxy allows you to send traffic from any protocol through a tunnel. It looks, from the outside, like a single TCP connection.
In this example, we'll create a tunnel between an SSH server and a client on port 5555 on the loopback interface. Next, we'll set our browser to use our SOCKS server as proxy server for every outgoing connections.
This solution might be useful to bypass the restrictions on corporate networks. If the port that our SSH uses is locked, we can tell the server to listen on port 443 using the Listen option in the OpenSSH configuration file (/etc/ssh/sshd_config or /etc/openssh/sshd_config).
Unix and OpenSSH:
ssh abc@def -D 5555

    abc - username
    def - server address
    5555 - local port number, where the tunnel will be created
Windows and PuTTY:
- Choose the connection and load the settings.
- Go to Connection->SSH->Tunnels
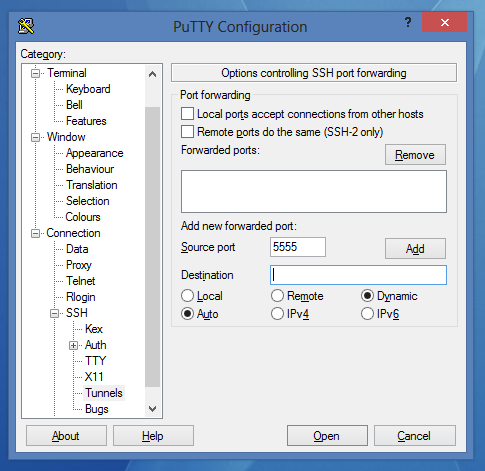
- Set it like this:
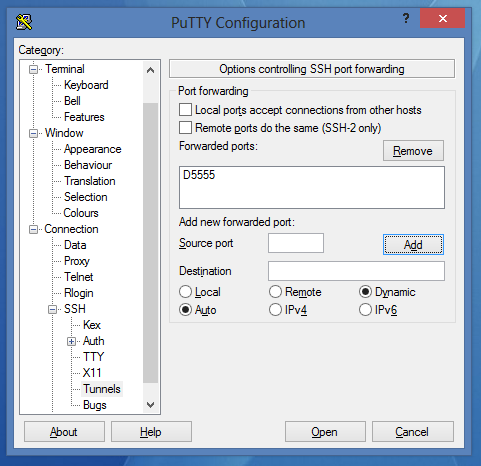
- Click on Add:
- Save the session and connect to it.
In your browser settings, set up a SOCKS proxy that runs on 127.0.0.1:5555, from now until you close the connection in PuTTY or OpenSSH.
Example 4. Bypassing NAT
NAT (specifically PAT, which is the NAT form used in home routers) is a mechanism that allows many people to use one internet connection. A router that uses NAT has one public address and modifies all private addresses in packets received from internal network to its own public address and sends them to the Internet. Upon receiving packets back, it does the opposite - it remembers the IP addresses and port numbers in a special NAT table.
A connection from the outside is possible only when we set appropriate port forwarding on the router. However, we can bypass that problem and create a tunnel between our computer and the server to connect our computer and server directly.
Part 1.
In the second part, we'll create a tunnel between local port 80 (on our computer - the local HTTP server) and port 8080 on the remote server. However, because of security reasons, the remote port 8080 will be opened only on the loopback interface of the VPS - 127.0.0.1. Because of that, we have to reconfigure our server to open connections on every port. We'll do that now.
- In your favorite editor, open the /etc/ssh/sshd_config (or /etc/openssh/sshd_config) file as root.
nano /etc/ssh/sshd_config
- Find:
#GatewayPorts no
- Change that line to:
GatewayPorts yes
- Save the file and close the editor.
- Restart SSHD server:
Debian/Ubuntu:
service ssh restart

CentOS:
/etc/init.d/sshd restart
Part 2.
In this section, we will create the tunnel.
Unix and OpenSSH:
ssh abc@def -R 8080:127.0.0.1:80

    abc - username
    def - server address
    8080 - port number that will be opened on remote server - our proxy server
    127.0.0.1 - IP address we open tunnel to
    80 - port number we open tunnel to
This time, our tunnel is local, but we can make a tunnel connection to other computers in the same network by using NAT.
Windows and PuTTY:
- Choose the connection and load the settings.
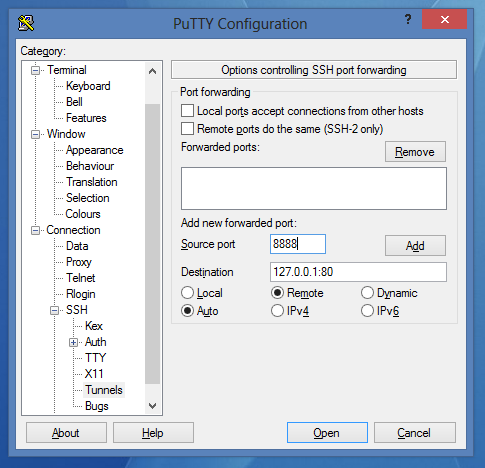
- Go to Connection->SSH->Tunnels
- Set it like that:
- Click on Add:
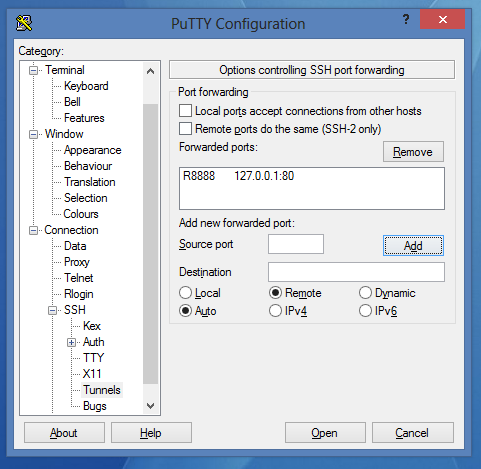
- Save the session and connect.

After logging in, we can get to our local HTTP server from outside our network through an OpenSSH proxy server that has a public IP address. Open the following in a browser:
http://IP-address-or-domain-of-our-server-change-that-for-your-name:8080/
Theory continued
As you can see, there are three types of SSH tunnels:
- Local -
-Loption - a tunnel is opened on our local port and listens for connections that are redirected first to our saved connection to the SSH server, and next to the target host. - Remote -
-Roption - a tunnel is opened on SSH server. After receiving a connection by the server, all transmissions are redirected out our local tunnel. - Dynamic -
-Doption - a tunnel is opened on a local loopback interface. Transmission takes place through the SOCKS protocol. You can tunnel any packets through this - TCP, UDP. It's possible to connect to any server on the Internet through a proxy SSH server. To redirect all system traffic through the SOCKS proxy, you can use a program like proxifier.


