Saturday, 6 November 2021

Shell script to add a user and password + samba on Centos 7

 #!/bin/bash

# Purpose - Script to add a user to Linux system including passsword user samba

# ------------------------------------------------------------------

# Am i Root user?

if [ $(id -u) -eq 0 ]; then

        read -p "Enter username : " username

        read -s -p "Enter password : " password

        egrep "^$username" /etc/passwd >/dev/null

        if [ $? -eq 0 ]; then

                echo "$username exists!"

                exit 1

        else

                pass=$(perl -e 'print crypt($ARGV[0], "password")' $password)

                useradd -m -p "$pass" "$username"

                (echo "$password"; echo "$password") | smbpasswd -a -s "$username"

                [ $? -eq 0 ] && echo "User has been added to system!" || echo "Failed to add a user!"

        fi

else

        echo "Only root may add a user to the system."

        exit 2

fi


Wednesday, 3 November 2021

Closing smb session on Windows client

 net use \\server /delete

We will execute:

net use \\server /delete net use \\server "" /user:"Guest" net use \\server /delete 2>nul

RTSP

 rtsp://username:password@192.168.X.XXX:554


contoh :

rtsp://admin:m3nara354x@192.168.110.216:554

Friday, 22 October 2021

Starting pppd from cron doesn't work

 Tambahi 

=====

SHELL=/bin/sh
PATH=/usr/local/sbin:/usr/local/bin:/sbin:/bin:/usr/sbin:/usr/bin
 */1  * * * * /root/cron/pptp_sapi.sh >> /var/log/pptp_pinger.log 2>&1
 
====== 

Steps to Setup VPN PPTP Client on CentOS7


  1. Install PPTP: sudo yum install pptp pptp-setup
  2. Configuration: sudo pptpsetup –create config –server [server address] –username [username] –password [pwd] –encrypt
    • This command will create a file named config under /etc/ppp/peers/ with server info written inside.
    • This command will also write your username and password into /etc/ppp/chap-secrets
  3. Register the ppp_mppe kernel module: sudo modprobe ppp_mppe
  4. Register the nf_conntrack_pptp kernel module: sudo modprobe nf_conntrack_pptp
  5. Connect to VPN PPTP: sudo pppd call config
    • It will establish PPTP VPN connection. You can type command ip a I grep ppp to find the connection name (e.g. ppp1). No return indicates connection failure.
    • If any error, you can look into /var/log/messages for log info
  6. Check IP routing table info: route -n
  7. Add Network Segment to current connection: route add -net 192.168.1.0 netmask 255.255.255.0 dev ppp1 (192.168.1.0 and ppp1 are taken as example )
  8. You can now ping the destination to check the access
  9. Disconnect the VPN: killall pppd


 Source : https://zlthinker.github.io/Setup-VPN-on-CentOS


Saturday, 16 October 2021

SAMBA sebagai File Server dan Print Server Windows

Sejarah Singkat

Bertahun lalu, di masa awal PC, IBM dan Sytec mengembangkan sebuah sistem network yang disebut NetBIOS (Network Basic Input Operating System). NetBIOS merupakan software yang menyediakan interface antara program dan hardware network. Pengalamatan dalam NetBIOS menggunakan nama 16 bit yang sekarang dikenal sebagai NetBIOS Name. Di dalam lingkungan Windows NT, NetBIOS Name disebut juga Computer Name. 

Kemudian Microsoft menambahkan sebuah feature berupa I/O redirection, sehingga sebuah resource local (printer, hard disk) bisa diakses melalui network oleh komputer lain, dengan bentuk, bau dan rasa seperti recource local di komputer yang sedang mengakses tersebut. Jika anda pengguna LAN Manager atau MS-DOS Client, anda tentu familiar dengan command "Net use drive: \\computer name\share name" atau pengguna Windows dengan perintah Map Network Drive. Keduanya membuat satu remote resource di komputer yang menjalankan perintah tersebut seolah-olah berada di komputer itu.

Microsoft menyebut penambahan feature ini sebagai NetBEUI. Hal ini yang kemudian disalah artikan bahwa NetBEUI merupakan protokol standar dalam lingkungan network dari Microsoft. Padahal nama dari I/O Redirection dari NetBEUI adalah SMB (Server Message Block) atau menurut istilah Microsoft CIFS (Common Internet File System). Keterangan lengkap mengenai protokol SMB ini bisa dibaca di RFC 1001 dan 1002.

Dalam protokol standar LAN Manager dan Windows (NetBEUI, alias SMB, alias CIFS), hal terpenting yang menjadi urat nadinya adalah kemampuan file dan print sharing, serta kemampuan browsing. Kemudian dengan munculnya NT, ditambahkan dua feature tambahan yaitu authentication dan authorization untuk setiap servis yang akan diakses. Jadi jika kita bicara NetBEUI, sebenarnya ada 2 komponen yang terdapat di dalamnya; (1) NetBIOS sebagai pengenal komputer yang satu dengan lainnya dan (2) I/O Redirection sebagai fasilitas untuk memberikan share dan mengakses shared resources komputer lain.

Samba dibuat dengan tujuan menjalankan dua proses tersebut dengan transport protocol TCP/IP. Sebab jika kita mengakses komputer lain, kita pasti membutuhkan satu transport protocol, di dalam lngkungan LAN Manager dan Windows, defaultnya adalah NetBEUI, tapi Samba memakai TCP/IP. Pembuat Samba, Andrew Tridgell mengawali idenya dari upaya untuk mencoba mengakses file di mesin Windows istrinya dari mesin UNIX miliknya pada 1992. Kemudian berkembanglah tim Samba, yang anggotanya antara lain Jeremy Allison, Jochen Hupert, Matthew Harrell, Frank Varnavas dan beberapa orang lain yang tersebar di seluruh dunia.

SAMBA

Samba di dalam LiNUX terdiri dari 2 daemon kunci :

smb dan nmbd, 
keduanya ada di bawah /etc/rc.d/init.d (untuk RedHat)

Kedua daemon ini mampu melakukan 4 tugas dasar dari NetBEUI: 

    File & Print Sharing, 
    Authentication dan Authorization, 
    Name Resolution dan 
    Browsing 
dengan pembagian tugas sebagai berikut:
    smb melakukan proses File & Print Sharing serta Authentication dan Authorization, sedangnmbd melakukan proses Name Resolution dan Browsing

Bagaimana cara Kerja Protokol?

NetBEUI merupakan non-routable protokol yang bersifat broadcast based. Dalam proses file dan print sharing, ada 2 proses yang berjalan:

1. Mailslots
2. Named Pipes

Mailslot adalah proses unidirectional communication, yang memungkinkan setiap kita membuka icon Network Neighborhood di Desktop, kita dapat melihat komputer mana saja yang sedang on-line. Analogi untuk keadaan ini sama seperti kalau satu komputer on-line dia akan terus mengabarkan berita ke teman-temannya dalam satu domain, "Halo saya Workstation satu, di node 5. Hubungi saya, ya?"

Sedang Named Pipes adalah proses bidirectional communication. Proses ini terjadi begitu kita mengakses sebuah komputer, kemudian kita melihat resource apa yang bisa dibuka di komputer tersebut dan begitu kita berhasil masuk ke komputer tersebut dan menggunakan resource-nya, maka terjadilah Named Pipes.

Proses ini mampu dilakukan juga dengan sangat baik oleh Samba. Sebuah Samba server dapat memberi akses pada sebuah komputer yang menjalankan Windows atau LAN Manager, atau MS-DOS Client untuk menggunakan filenya. 

Dengan berkembangnya TCP/IP, maka NT 4.0 menambahkan satu feature yang disebut Windows Socket (Winsock.dll). Gunanya agar protokol NetBEUI yang tidak bisa routing, bisa run-over protokol yang bisa routing seperti TCP/IP. Para pengguna Novell Netware mungkin familiar dengan istilah "IPX encapsulated with TCP/IP"., nah seperti itulah proses NetBEUI yang run over TCP/IP. Di sini letak keunggulan Samba, karena setiap proses RPC (Remote Procedure Call) membutuhkan satu protokol transport, maka begitu kita install protokol TCP/IP di Windows, kemudian kita jadikan IP address Samba sebagai WINS (Windows Internet Name Server) dari komputer itu, maka... voala... Windows akan menganggap mesin LINUX kita sebagai Windows.

WINS itu sendiri tidak lain adalah NetBIOS Name Service (NBNS). Yang melakukan proses Name Resolution dan Browsing...oops, sepertinya di atas saya sudah menulis kalau dua proses ini dijalankan oleh nmbd...

Memang, WINS = NBNS, yang merupakan servis di mana NetBIOS Name di-resolve ke IP address, mirip seperti DNS (Domain Name Service) yang me-resolve IP adress ke host name. 

Mengapa ini Bisa Terjadi?

Disebabkan oleh proses I/O redirection dari LAN Manager dan Windows membutuhkan sebuah transport protocol, yang secara default adalah NetBEUI. Tetapi dengan mengaktifkan WINS di Samba, kita sudah menjalankan proses NBNS. Jadi name resolution yang selama ini disebut Microsoft sebagai ciri khas Microsoft TCP/IP sebenarnya adalah NetBIOS Name Server, yang sudah ada sejak dulu. .

Konfigurasi SAMBA

Samba hanya memiliki satu file konfigurasi yaitu /etc/smb.conf

Struktur /etc/smb.conf

Smb.conf terdiri dari 2 bagian

[global], dan [share]

[global] merupakan konfigurasi dasar dari samba. Di sini kita melakukan setting global seperti Workgroup kita. Setiap kita menghilangkan komentar (yang ada tanda ;), maka baris itu akan dibaca oleh smb dan nmbd.

Di [global] pula kita bisa menunjuk siapa yang bisa mengakses Samba server kita dari Win95. Di baris...

guest account=.....

masukkan nama guest account, seperti guest. Tapi satu hal yang perlu kita ingat, bahwa nama user tersebut terdaftar di /etc/passwd. Sebab jika tidak klien 95 tidak akan bisa mengakses LINUX kita.

Bagaimana cara memasukkan user name?

Kita bisa memasukkan user dengan perintah

adduser nama_user , dari terminal

Dengan memasukkan perintah ini, maka kita menaruh satu input baru di file /etc/passwd. Di dalam file ini setiap user account memiliki 7 field yang dipisahkan oleh titik dua, seperti berikut:

root: *:0:0:root:/root:/bin/bash

bin:*:1:1:bin:/bin

Struktur /etc/passwd adalah seperti ini:

username : password : userID : groupID : komentar : home directory : login command

Periksa apakah user guest ada di bawah, jika ada maka password user itu yang harus kita masukkan saat kita mengakses Samba Server dari Windows 95. Sedang jika dari NT Workstation, kita bisa memilih user siapa yang kita pakai untuk mengakses Samba Server itu. Sebab Windows NT memiliki option Connect As

Jika cara edit itu agak sulit, bagi pengguna RedHat bisa memakai linuxconf atau Control Panel di X Windows untuk menambah dan mengedit user. Bagi pemakai SuSE bisa mengaktifkan yast.

Setelah itu maka mesin Samba kita akan jadi file dan print server untuk Windows client.

Sedang [share] menentukan resource mana saja di komputer kita yang bisa diakses klien.Contoh :

[CDROM]

Path = /mnt/cdrom

guest ok = yes

Dengan adanya baris tersebut di dalam file smb.conf kita, maka kita memberi izin pada user untuk mengakses direktori /mnt/cdrom. Di dalam RedHat /mnt/cdrom adalah direktori tempat kita melakukan mounting terhadap /dev/cdrom atau cdrom kita. 

ENCRYPTED PASSWORD

Salah satu masalah yang mungkin timbul adalah password. Pada prinsipnya UNIX menggunakan "clear text authentication" sedang SMB menggunakan encrypted password. Untuk itu sejak Samba 1.9.X.X, dibuat satu shadow password samba di /etc/smbpasswd atau tergantung setting [global] kita di dalam:

encrypt password = yes

smbpasswd file = /usr/local/samba/private/smbpasswd

Jika kita memilih untuk menggunakan encrypted password, maka jalankan script smbpasswd.sh dengan menggunakan 

cat /etc/passwd | mksmbpasswd > /usr/local/samba/private/smbpasswd

Jika ada NIS di dalam network kita, bisa menggunakan ypcat :

ypcat /etc/passwd | mksmbpasswd > /usr/local/samba/private/smbpasswd

Dengan menggunakan perintah tersebut, kita mengkopi seluruh isi passwd ke dalam file /usr/local/samba/private/smbpasswd. Kemudian jangan lupa untuk memberi protection mode 500 alias r-x------ pada file tersebut.

Jika kita hendak memaksa Windows 95/98 menggunakan plain text password, di mesin Windows kita jalankan registry editor, kemudian di bawah 

\HKEY_LOCAL_MACHINE\System\CurrentControlSet\Services\VxD\VNETSUP

Kita tambahkan DWORD value dari edit menu, di mana entri "New Value #1" menjadi "EnablePlainTextPassword." Kemudian klik dua kali item tersebut dan rubah nilainya menjadi 1

Khusus untuk NT (server dan workstation), di dalam registry cari hive:

\HKEY_LOCAL_MACHINE\System\CurrentControlSet\Services\Rdr\Parameters\

kemudian tambahkan baris EnablePlainTextPassword:REG_DWORD=1

Dengan demikian kita memaksa Windows (NT dan 95) menggunakan sistem plain text password. Jika tidak, atau kembali ke setting standar password Windows ubah nilai 1 menjadi 0. Penggunaan plain text pasword tentu memiliki resiko, yang akan kita bahas di bawah ini.

Password SAMBA dan Plain Text Password

Sekarang kita bicarakan mengenai password dan security. 

Di dalam NT, encrypted password dilakukan lewat mekanisme algoritme MD4 (detail bisa dilihat di RFC 1320, karena MD4 sendiri merupakan standar encryption untuk SMB). Mekanisme sederhana dari MD4 encryption adalah sebagai berikut: saat user memasukkan password dan menekan enter, password dikapitalisasi kemudian sebelum 'on the fly di dalam network, password dipotong-potong (truncated) menjadi nilai bytes dan begitu diterima di server, password tersebut diubah menjadi 16 bytes dalam bentuk hashed (=#) dan dikirim kembali ke client. 

Setiap kali user memasukkan password, pengecekan yang dilakukan adalah kecocokan password di server dan client. Makanya di dalam lingkungan network NT, kita bisa punya pilihan untuk menyimpan password. 

Mekanisme ini juga merupakan dasar dari encryption CHAP (Challenge Handshake Authentication Protocol), di mana server dan client saling mengenali mengirimkan password, dan di dalam perjalanan saat dikirim password dienkripsi menjadi nilai 14 bytes.

Kelemahan dari encrypted passwor SMB adalah password disimpan di komputer client, sehingga dapat dengan mudah diacak. Terutama di dalam Windows, di registry di bawah hive HKEY_CURRENT_USER, terdapat file yang menunjukkan 16 bytes password dalam bentuk encrypted tentunya, tapi sekali satu session terbuka antara server dengan client, maka siapa pun dapat masuk ke dalam network dari komputer dimana user yang sedang membuka session tersebut berada. Satu kelemahan lagi adalah kita bisa mengedit password di dalam mesin yang menjalankan NT lewat network.

UNIX dan variannya, sebelum ditemukannya Kerberos menggunakan plain text password, password yang dikirim ke server tidak dienkripsi, namun dikirim sebagai plain text, akan tetapi password tidak disimpan di mesin client. Kelemahan plain text password adalah pada saat password dalam perjalanan ke server dan ada sniffer menangkap password tersebut, itu merupakan hadiah gratis bagi sniffer tersebut. Untungnya LiNUX sejak kernel 2.2.X telah mendukung penggunaan shadow password dengan encryption level MD5.

Dengan menjalankan script smbpasswd, anda telah membuat satu username dan password yang telah ter-enkripsi. Jadi tidak perlu kuatir password anda di-sniff atau di-hack jika anda menggunakan smbpasswd. Sebab security password-nya sama dengan security password Windows dan LANManager.

Beberapa Tools Pendukung SAMBA

Ada banyak tools yang bisa digunakan sebagai tools tambahan Samba, antara lain SMB2WWW, SWAT (Samba Web Admin Tools), atau LinNeighborhood.

Semua tools (kecuali LinNeighborhood) ini bisa anda dapatkan di homepage resmi samba : www.samba.org

Sebetulnya malah SWAT sudah ada di dalam setiap distribusi Samba. Anda hanya tinggal mengaktifkannya saja, biasanya SWAT ada di dalam /usr/bin/swat.

SWAT merupakan salah satu servis dari inetd, jadi yang harus anda lakukan adalah mengedit 2 file: yaitu /etc/services dan /etc/inetd.conf

Di etc/services tambahkan baris : swat 901/tcp 

Baris tersebut menyatakan bahwa swat akan menggunakan port 901 dari TCP (default Samba), atau bisa juga memakai port kosong yang tidak dipakai (cek ke RFC 1060).

Kemudian di dalam /etc/inetd.conf tambahkan baris

swat stream tcp nowait.400 root /usr/local/samba/bin/swat swat 

Setelah itu, anda harus me-restart inetd, bisa dengan mengirimkan pesan HUP atau cukup inetd restart

Sedang LinNeighborhood bisa anda dapatkan di www.linuxberg.org atau www.freshmeat.net

Dengan adanya tools ini, terutama SWAT, para Network Administrator yang dahulu biasa bekerja memakai NT yang tentunya terbiasa dengan GUI Administrative Tools bisa mendapatkan kemudahan GUI seperti NT di ketiga tools ini. Bahkan dengan SWAT, anda mampu melakukan remote monitoring terhadap network, sekalipun anda di rumah dan tidak punya mesin LiNUX.

Berikut ini adalah scren shot dari SWAT yang diakses dari mesin Windows 95

Penutup

Ada ucapan salah seorang pakar networking Indonesia yang masih penulis ingat, "Kendala pengembangan IT di Indonesia adalah pada masalah biaya. Sekarang solusinya adalah dengan menggunakan resource yang murah dan berdaya guna." Maka di tengah krisis ekonomi sekarang, penggunaan LiNUX maupun Operating System lain yang murah dan berdaya guna tinggi seperti FreeBSD merupakan jawaban yang tepat. Khusus untuk file dan print server, SAMBA merupakan pilihan yang paling tepat sebagai pengganti Windows NT. 

Bahkan anda yang dulu biasa menggunakan tools NFS dan NIS bisa menjadikan SAMBA sebagai alternatif Network File System. Walau resikonya adalah proses brodacast SMB yang tentunya akan menyebabkan network traffic alias kecekek (bottleneck). Juga untuk tren SAN (Storage Area Network) yang kini mulai hangat dibicarakan sebagai satu ektension dari LAN dan WAN, kelihatan SAMBA mampu. Sekarang saatnya kita membuka jendela dan wawasan baru, seperti semboyan SAMBA "Opening Window to a Wider World."

by ZEN el GUAY 


Source : https://www.elektroindonesia.com/elektro/li1099b.html

Saturday, 28 August 2021

Ubuntu Time Management

This page gives useful information about the way that Ubuntu manages time by changing the timezone, setting up synchronization using Network Time Protocol (NTP), and adjusting servers.

Changing the Time Zone

This section shows you how to accomplish this task using either the Graphical User Interface (GUI) or by using the command line (terminal).

Using the GUI

Perhaps the most user friendly way to change the time zone of your Ubuntu system is to use the Graphical User Interface (GUI).

  1. Click on the System menu on the top panel, go into the Administration sub-menu, and click on Time and Date.

  2. Click on the currently selected time zone to bring up the selection map.
    • ntpgui5.png

  3. Click in the general area of your location on the time zone map, the map will zoom in.
    • ntpgui7.png

  4. Select the closest city then choose Close

    • ntpgui8.png

Using the Command Line (terminal)

Using the command line, you can use sudo dpkg-reconfigure tzdata.

  1. Open a terminal window by going to Applications>Accessories>Terminal

  2. sudo dpkg-reconfigure tzdata

  3. Follow the directions in the terminal.
  4. The timezone info is saved in /etc/timezone - which can be edited or used below

Using the Command Line (unattended)

  1. Find out the long description for the timezone you want to configure.
  2. Save this name to /etc/timezone

  3. run sudo dpkg-reconfigure --frontend noninteractive tzdata:

$ echo "Australia/Adelaide" | sudo tee /etc/timezone
Australia/Adelaide 
$ sudo dpkg-reconfigure --frontend noninteractive tzdata

Current default time zone: 'Australia/Adelaide'
Local time is now:      Sat May  8 21:19:24 CST 2010.
Universal Time is now:  Sat May  8 11:49:24 UTC 2010.

This can be scripted if required.

Time Synchronization using NTP

This page describes methods for automatically keeping your computer's time accurate. This is extremely useful for servers, and is also recommended for desktop machines.

Network Time Protocol (NTP) is a UDP/IP protocol for synchronizing time over a network connection. Basically a client requests the current time from a server, and then uses the servers response to set its own clock.

Beyond this simple description, there is a lot of complexity. There are multiple tiers of NTP servers, with the tier one NTP servers connected to atomic clocks (often via GPS), and tier two and three servers spreading the load of actually handling requests across the internet. The client software is a lot more complex than you might think as it has to factor communication delays, and adjust the time in a way that does not affect the other processes that run on the system. Luckily all that complexity is hidden from the user.

Using the GUI

This is how to enable NTP time synchronization using the GUI (Graphical User Interface).

  1. Click on the System menu on the top panel, go into the Administration sub-menu, and click on Date and Time.

  2. Select the configuration option Keep synchronized with Internet servers

    • ntpgui2.png

  3. You may get a dialog box informing you that NTP support has to be installed.
    • ntpgui3.png

  4. After selecting Install NTP Support it will download the needed files.

    • ntpgui4.png

  5. You are now finished and you can click Close or you can customize the NTP servers (default is ntp.ubuntu.com) that your computer uses to synchronize with by choosing Select Servers.

    • ntpgui5.png

Command Line ntpd

ntpdate is a bit of a blunt instrument as it can only adjust the time once a day in one big correction. The ntp daemon ntpd is far more subtle as it calculates the drift of your system clock and continuously adjusts it in small increments. Using ntpd there are no large corrections that could lead to inconsistent logs for instance. The cost is a little processing power and memory, but for a modern system this is negligible.

To setup ntpd in versions of Ubuntu 7.04 and higher

sudo apt-get install ntp

To set up ntpd pre Ubuntu 7.04:

sudo apt-get install ntp-simple

Changing NTP Time Servers

In both cases above, your system will use Ubuntu's NTP server at ntp.ubuntu.com by default. This is OK, but you might want to use several servers to increase accuracy and resilience, and you may want to use time servers that are geographically closer to you.

Using the GUI

  1. Click on the System menu on the top panel, go into the Administration sub-menu, and click on Date and Time.

  2. You may have to enter your password to continue.
    • ntpgui1.png

  3. Select Configure Servers

    • ntpgui5.png

  4. Enable the box next to your choice of server(s) or add your own.
    • ntpgui6.png

ntpd

  • Change the contents of /etc/ntp.conf to include additional server lines:

server ntp.ubuntu.com
server pool.ntp.org


Command Line ntpdate

ntpdate is no longer installed by default on Ubuntu. The file /etc/cron.daily/ntpdate also does not exist anymore

ntpdate, if installed, will run it once at boot time to set up your time according to Ubuntu's NTP server. However, a system's clock is likely to drift considerably between reboots if the time between reboots is long. In that case it makes sense to correct the time occasionally. The easiest way to do this is to get cron to run it every day. With your favorite editor, create (needs sudo) a file /etc/cron.daily/ntpdate containing:

 #!/bin/sh
 ntpdate ntp.ubuntu.com

Make sure that you make this new file executable:

sudo chmod 755 /etc/cron.daily/ntpdate

ntpdate

  • Change the contents of /etc/cron.daily/ntpdate to add the pooled ntp servers:

ntpdate ntp.ubuntu.com pool.ntp.org


You may notice pool.ntp.org in the examples above. This is a really good idea which uses round-robin DNS to return an NTP server from a pool, spreading the load between several different servers. Even better, they have pools for different regions - I am in New Zealand, so I use nz.pool.ntp.org instead of pool.ntp.org. Look at http://www.pool.ntp.org/ for more details.

You can also Google for NTP servers in your region, and add these to your configuration. To test that a server works, just type sudo ntpdate ntp.server.name and see what happens.

Multiple Boot Systems Time Conflicts

Operating systems store and retrieve the time in the hardware clock located on your motherboard so that it can keep track of the time even when the system does not have power. Most operating systems (Linux/Unix/Mac) store the time on the hardware clock as UTC by default, though some systems (notably Microsoft Windows) store the time on the hardware clock as the 'local' time. This causes problems in a dual boot system if both systems view the hardware clock differently.

The advantage of having the hardware clock as UTC is that you don't need to change the hardware clock when moving between timezones or when Daylight Savings Time (DST) begins or ends as UTC does not have DST or timezone offsets.

Changing Linux to use local time is easier and more reliable than changing Windows to use UTC, so dual-boot Linux/Windows systems tend to use local time.

Since Intrepid (8.10), UTC=yes is default.

Make Windows use UTC

Note: This method was not initially supported on Windows Vista and Server 2008, but came back with Vista SP2, Windows 7, Server 2008 R2 and Windows 8/8.1.

To make MS Windows calculate the time from the hardware clock as UTC.

  • Create a file named WindowsTimeFixUTC.reg with the following contents and then double click on it to merge the contents with the registry:

Windows Registry Editor Version 5.00

[HKEY_LOCAL_MACHINE\SYSTEM\CurrentControlSet\Control\TimeZoneInformation]
     "RealTimeIsUniversal"=dword:00000001

Note: Windows Time service will still write local time to the RTC regardless of the registry setting above on shutdown, so it is handy to disable Windows Time service with this command (if time sync is still required while in Windows use any third-party time sync solution):

sc config w32time start= disabled

Reversing the change

You can create a file with the following contents and then double-click it to merge in the original changes, as above:

Windows Registry Editor Version 5.00

[HKEY_LOCAL_MACHINE\SYSTEM\CurrentControlSet\Control\TimeZoneInformation]
     "RealTimeIsUniversal"=-

If Windows Time service was disabled, enable it again with the command:

sc config w32time start= demand

Make Linux use 'Local' time

To tell your Ubuntu system that the hardware clock is set to 'local' time:

Pre-Ubuntu 15.04 systems (e.g. Ubuntu 14.04 LTS):

  1. edit /etc/default/rcS
  2. add or change the following section
    # Set UTC=yes if your hardware clock is set to UTC (GMT)
    UTC=no

Ubuntu 15.04 systems and above (e.g. Ubuntu 16.04 LTS):

  1. open a terminal and execute the following command
    timedatectl set-local-rtc 1

Troubleshooting

Is NTP installed?

Run dpkg-query --list ntp\* and look for ntp-simple (pre 7.04) or ntp. The ntpdate and ntp-doc packages may also be useful.

Which configuration file is it using?

By default NTP uses /etc/ntp.conf. If /etc/ntp.conf.dhcp exists then the NTP daemon assumes you're using DHCP to redefine the NTP settings and it uses that file instead.

How do I configure NTP to use DHCP

Your DHCP server must be configured to supply NTP servers (man dhcpd.conf may be helpful).

Your client must be configured to use the supplied NTP servers. To do this, add ntp-servers to the request (or even require) line in /etc/dhcp3/dhclient.conf. You may wish to use the default and prepend features as well to provide default/additional NTP servers. Please see man dhclient.conf and man dhcp-options for details.

Is NTP running?

NTP most commonly 'fails' if it cannot resolve the servers in its configuration file at startup (this can happen if DNS isn't available during boot). Also, if NTP is unable to keep the local clock reasonably accurate it gives up and terminates (see below).

Try sudo /etc/init.d/ntp status to check if NTP is running, and sudo /etc/init.d/ntp restart to restart it if necessary.

I have various systems on unreliable networks so I use a simple script to bounce NTP if needed:

$ cat /etc/cron.hourly/BOUNCE-NTP
#!/bin/sh

/usr/bin/ntpq -np | /bin/grep '^\*' > /dev/null || ( /usr/bin/ntpq -np ; /etc/init.d/ntp restart )

Which servers are you using?

Run grep ^server /etc/ntp.conf or grep ^server /etc/ntp.conf.dhcp to figure out which servers you're trying to use

If your network or ISP have an NTP server they should be listed here. Failing that, try ntp.ubuntu.com and/or the NTP pool servers (http://www.pool.ntp.org/). 3 or 4 servers is plenty, and don't use a server without permission (see http://en.wikipedia.org/wiki/NTP_vandalism).

Can these servers be resolved?

If host $servername fails then you may have DNS issues that need to be fixed ($servername is the name of a server listed in your configuration file, see above).

Can these servers be reached?

If ntptrace $servername fails then you may have routing/firewall issues that need to be fixed ($servername is the name of a server listed in your configuration file, see above). NTP uses UDP port 123, make sure these packets can are properly NAT-ed through your gateway if necessary.

What's NTP up to?

ntpq --numeric --peers

--numeric removes the DNS lookups. You can leave it off, but don't be surprised if the resolved names don't match names in the ntp.conf file.

Ideally you want a * and a few +'s in the fist column and a reach of 377 (see http://www.ntp.org/ntpfaq/NTP-s-trouble.htm#Q-MON-REACH)

delay is in milliseconds. It should be < 1 for local network servers, < 10 for ISP servers over DSL and ideally < 100 for wireless. offset is in milliseconds and is the current best guess of the time difference between your system and the server. The smaller the better! jitter is an estimate the the local clock frequency error. The smaller the better. If it's consistently high then your system may be drifting (see below)

Why does NTP keep resetting/failing?

NTP attempts to fix your local clock to keep accurate time. If your local clock drifts too fast (usually HW problems or IRQ lockups or somesuch) then NTP either keeps resetting your clock or gives up and terminates. Fix the drift problem and NTP will behave. 


Source : https://help.ubuntu.com/community/UbuntuTime

Saturday, 5 June 2021

LinuxFX Change TimeZone

My solution was to move /etc/localtime out of the way:

Code: Select all

mv /etc/localtime  /etc/wsf-localtime-wsf
Then link /etc/localtime back to the Jakarta timezone:

Code: Select all

ln -s  /usr/share/zoneinfo/Asia/Jakarta   /etc/localtime
This immediately updated my timezone, and then the timedatectl command produced the output I was expecting.

A coworker mentioned that I might have needed to stop ntp (in my case chronyd on RHEL7) temporarily; however, with this new soft-link in place the system was set to my expectation. The change was persistent beyond a reboot too, which I did expect to happen but wanted to be certain.

Tuesday, 25 May 2021

Menambahkan Compliance Test pada UBNT

 Sudah diketahui bahwa firmware UBNT terbaru dengan seri XW maupun XM sudah tidak lagi mencantumkan Compilance test dalam list kode negara. Sudah banyak tulisan yang membahas ini beserta trick agar CT (Compliance Test) dapat digunakan pada perangkat, namun pada umumnya trik penambahan CT ini dilakukan sebelum link running atau dilakukan sebelum pemilihan kode negara.
Bagaimana jika kita membutuhkannya ketika link sudah running, sedangkan kode negara tidak bisa diganti ketika perangkat ini sudah running. Tentunya kita dapat melakukan penambahan CT ini dengan melakukan reset pada setingan yang sudah ada yang mana kita tentunya harus berada dilokasi :D.


Kali ini akan dibahas bagaimana cara penambahan CT tanpa harus melakukan reset, ikuti saja langkahnya sebagai berikut :


Berikut ini contoh screenshot perangkat yang belum dilakukan penambahan CT :


1. Yang harus kita lakukan adalah login ke perangkat via SSH dengan menggunakan Putty ataupun aplikasi remote console kesayangan anda.


2. Setelah sukses login via SSH,lakukan trik penambahan CT dengan cara yang sama pada tutorial yang sudah tersebar di google.

 touch /etc/persistent/ct

3. File konfigurasi yang digunakan pada perangkat UBNT biasanya adalah file /tmp/system.cfg dan /tmp/running.cfg, karena sudah tahu file yang akan dimodifikasi, maka kita cek dulu kode negara dengan mengetikkan perintah:

  cat /tmp/system.cfg | grep code

  hasilnya :

  radio.1.countrycode=360
  radio.countrycode=360

360 adalah kode negara untuk Indonesia, sedangkan untuk CT kodenya 511, maka disini kita akan   merubah 360 menjadi 511 pada kedua file /tmp/system.cfg dan /tmp/running.cfg.

4. Cara merubah kode negara tersebut bisa dilakukan dengan menggunakan vi editor maupun perintah sed, karena saya pemalas maka saya akan menggunakan sed saja :D, ketik saja pada terminal anda :

  sed -i 's/countrycode=360/countrycode=511/g' /tmp/system.cfg

 dan

  sed -i 's/countrycode=360/countrycode=511/g' /tmp/running.cfg

5. Anda bisa skip langkah ini bila sudah yakin, tetapi saya lebih suka mengecek ulang  :D, ketikan perintah dibawah ini untuk melihat apakah kode negara sudah berubah atau belum :

  cat /tmp/system.cfg | grep code

  hasilnya :

  radio.1.countrycode=511
  radio.countrycode=511

yak sudah berubah :D

6. ketik save
7. ketik reboot
8. Tunggu sampai perangkat nyala kembali :D

Dan hasilnya :D


CT siap dengan banyak pilihan channel.


Sekian Terimakasih..

NB: 

Untuk versi baru, compilance test digantikan dengan Licensed 


Source : http://sehitam-kopi.blogspot.com/2017/03/menambahkan-compilance-test-pada-ubnt.html

Thursday, 20 May 2021

Me-Reset Routerbord Mikrotik


Berikut ini langkah-langkah mereset Routerboard Mikrotik pada RB951ui-2nd dan sejenisnya,

  1. Matikan power Routerboard Mikrotik
  2. Tekan tombol reset dengan jarum atau sejenisnya
  3. Nyalakan power (dalam keadaan tombol reset masih ditekan)
  4. Tahan tombol reset sekitar 5-10 detik sampai lampu indikator “USR” selesai berkedip (posisi led hidup)
  5. Lepas tombol reset
  6. Mikrotik akan mereset dan siap digunakan


source : https://klinikit.id/cara-melakukan-reset-mikrotik-rb951ui-2nd/

Thursday, 29 April 2021

How to Enable Long Path Support in Windows 10 (1607) and Higher

Since Windows 10 Anniversary Update (1607), it became possible to disable the MAX_PATH limit on the Windows operation system level without using prefix \\?. By default, this feature is disabled.

To enable the built-in support for long paths in Windows 10/Windows Server 2016, use the Regedit.exe editor to set the LongPathsEnabled parameter of REG_DWORD in the registry key HKLM\SYSTEM\CurrentControlSet\ControlFileSystem with a value 1.

the file name(s) would be too long for the destination folder

You can change this registry parameter with the following PowerShell command:

Set-ItemProperty -Path HKLM:\SYSTEM\CurrentControlSet\ControlFileSystem -Name LongPathsEnabled -Value 1

Or you can enable long path support via Group Policy Editor (Win + R gpedit.msc) Computer Configuration > Administrative Templates > System > Filesystem. Enable the policy Enable NTFS long paths.


Source : https://theitbros.com/destination-path-too-long-error-when-movingcopying-a-file/

Saturday, 16 January 2021

Offline install of .NET Framework 3.5 in Windows 10 using DISM

Windows 10 comes with .NET framework 4.5 pre-installed, but many apps developed in Vista and Windows 7 era require the .NET framework v3.5 installed along with 4.5. These apps will not run unless you will install the required version. When you try to run any such app, Windows 10 will prompt you to download and install .NET framework 3.5 from the Internet. However, this will take a lot of time. You can save your time and install .NET Framework 3.5 from the Windows 10 installation media. This method is much faster and does not even require an Internet connection. Here is how to install it.

To install .NET Framework 3.5 in Windows 10, do the following:
  1. Insert your Windows 10 DVD, or double click its ISO image, or insert your bootable flash drive with Windows 10, depending on what you have.
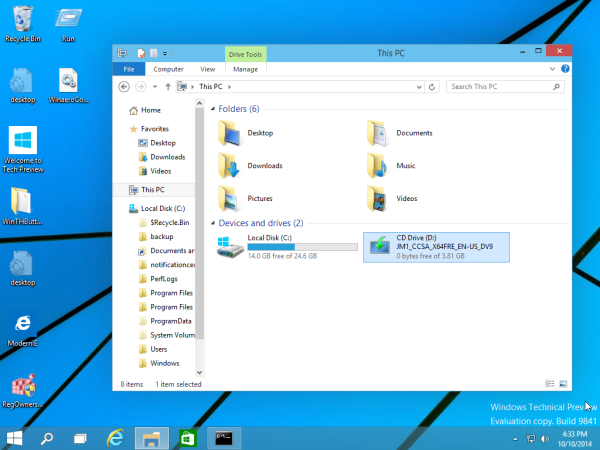
  2. Open 'This PC' in File Explorer and note the drive letter of the installation media you have inserted. In my case it is disk D:
    installation media drive d
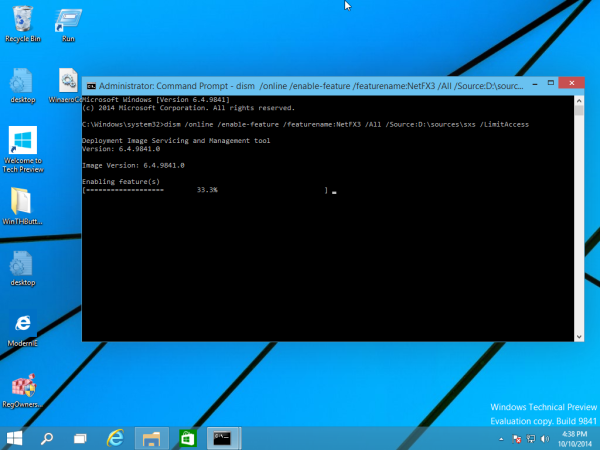
  3. Now open an elevated command prompt and type the following command:
    Dism /online /enable-feature /featurename:NetFX3 /All /Source:D:\sources\sxs /LimitAccess

    Replace D: with your drive letter for Windows 10 installation media.
    dism

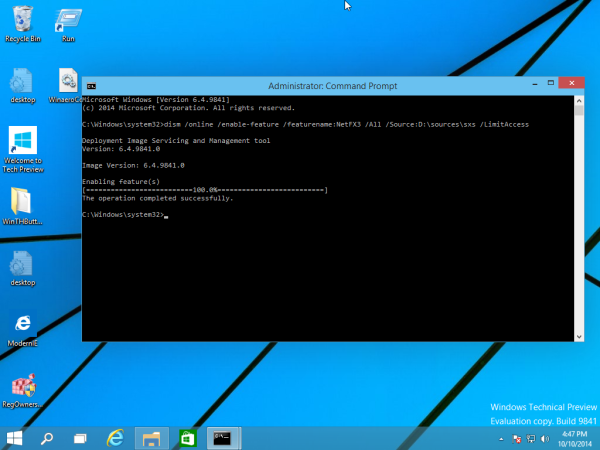
You are done! This will install .NET framework 3.5 in Windows 10.
net installed seccessfully
To save your time, I have prepared a simple batch file which will save your time and will find the inserted installation media automatically. It looks like this:

@echo off
Title .NET Framework 3.5 Offline Installer
for %%I in (D E F G H I J K L M N O P Q R S T U V W X Y Z) do if exist "%%I:\\sources\install.wim" set setupdrv=%%I
if defined setupdrv (
echo Found drive %setupdrv%
echo Installing .NET Framework 3.5...
Dism /online /enable-feature /featurename:NetFX3 /All /Source:%setupdrv%:\sources\sxs /LimitAccess
echo.
echo .NET Framework 3.5 should be installed
echo.
) else (
echo No installation media found!
echo Insert DVD or USB flash drive and run this file once again. 
echo.
)
pause

Download the file, extract it from the ZIP archive to the Desktop, right click it and choose Run as administrator. The file will install .NET Framework 3.5 automatically after finding the drive letter of your Windows 10 installation media.
run as administrator

Source : https://winaero.com/offline-install-of-net-framework-3-5-in-windows-10-using-dism/

PDFZilla

 PDFZilla Serial Key (2021)

  • A6OT9DRLO7W7928

PDFZilla Registration Code (2021)

  • A1Q2SW3D-4GFR5TG6-Y7HIK9IO-LQA2SW3R-5TG6Y7HI
  • K9AQ2WS3-RF5TG6Y7-HJ8IK9AQ-2SW3RF5T-G6FY7HJ8
  • AK90HL2Q-AWS3RF5T-G6Y7HIK9-0JLQ2WS3-RF5TG6Y7

Source : https://freeprosoftz.com/pdfzilla-crack/

Friday, 15 January 2021

Cara Menghilangkan Login Screen di Coreldraw X7 dan X8

CorelDraw adalah editor grafik vektor yang dikembangkan oleh Corel, sebuah perusahaan perangkat lunak yang bermarkas di Ottawa, Kanada. ( Wikipedia


Cara Menghilangkan Jendela Login di Coreldraw :

Perhatian : Sebelumnya tutup dulu Aplikasi Coreldraw kamu

1.Cari Folder tempat kamu menginstall Coreldraw
   C:\Program Files\Corel

2.Ketik RMP pada kolom Search


 3.Hapus file yang berawalan RMP


4.Buka Recycle Bin

 5. , Pastikan bahwa 6 File yang berawalan RMP benar benar terhapus


6.Selesai


Source : https://bedahtips.blogspot.com/2016/06/cara-menghilangkan-login-screen-di.html

Thursday, 14 January 2021

How To Install Ubuntu Alongside Windows 10


Dual Boot Ubuntu Linux with Windows

Brief: This detailed article shows you how to dual boot Ubuntu with Windows 10, step-by-step, accompanied with proper screenshots.

Previously I had written about dual booting Ubuntu Linux with Windows 7 and 8, but those tutorials did not cover systems that come with Windows 10 pre-installed. The newer systems that come with Windows 8 or Windows 8.1, have UEFI instead of BIOS. This makes thing a little different from the conventional way of dual booting.

In this tutorial, we shall see how to install Ubuntu with Windows 10 already installed.

This tutorial is performed on a newly bought Dell Inspiron 7437 that has Core i7 fourth generation processor, 256 GB SSD, 8 GB RAM and built in 1 GB Intel graphics. I’ll cover all the steps you need to do in order to successfully dual boot Linux with Windows 10 UEFI. If you have already done some of these steps, just skip to the next one. If you have a fresh system, even better.

The steps mentioned here are applicable to other Ubuntu based Linux distributions such as Linux Mint, Elementary OS etc. Cutting the chit-chat, let’s see how to dual boot Linux on a UEFI secure boot enabled Windows 10 system.

Dual boot Ubuntu with Windows 10 and Windows 8.1:

Though I have used Ubuntu 14.04 here, it is applicable to all versions of Ubuntu, be it Ubuntu 15.10 or Ubuntu 16.04. There are various prerequisites to install Ubuntu on a UEFI system. I’ll list them for easier read here:

  • Ubuntu ISO burned to a USB or DVD (we’ll see it)
  • Windows backup (optional)
  • Windows 10 bootable USB (optional yet recommended as it will save your day if anything goes wrong)

Let’s see the steps of installing Ubuntu along side Windows 10.

Step 1: Make a backup [optional]

It is always nice to make a back up, just in case if you mess up with the system. There are numerous articles on the web to show you how to backup your system. You can follow this tutorial here.

Step 2: Create a live USB/disk of Ubuntu

The next thing you need to do is to create a live USB or disk. I recommend Universal USB Installer to create a live USB of Linux OS in Windows.

Read this screenshot tutorial to learn how to create a live USB of Ubuntu Linux in Windows.

Step 3: Make a partition where Ubuntu will be installed

Assuming tat you have a fresh system, the first thing we need to do is to make a partition to install Linux. The 256 GB in my system was already had several partitions from manufacturer but mainly for backup and other purposes. Main partition was C drive, of around 220 GB, where Windows 8.1 was installed.

If you have just one partition like this, you need to make some free space out of it for Linux. If you have several partitions of considerable size, use any of them except C drive because it may erase the data.

To make a partition in Windows 8, go to Disk Management tool. You can find disk management tool by searching for ‘disk’ in Control Panel.

disk management tool windows 8

In the Disk Management tool, right click on the drive which you want to partition and select shrink volume. In my case, I shrank the C drive to make some free space:

disk_partition_Windows8

You can leave the free space as it is. We shall use it while installing Ubuntu.

Step 4: Disable fast startup in Windows [optional]

Windows 8 introduced a new feature called “fast startup” for quick boot. While it is not mandatory, it would be better to have it disabled.

Go to Control Panel > Hardware and Sound > Power Options > System Settings > Choose what the power buttons do and uncheck the Turn on fast startup box.

If you need more hints, follow this screenshot tutorial to disable fast startup in Windows.

Step 5: Disable secureboot in Windows 10 and 8.1

This is the most important step. The new secure boot feature of Windows 8, originally intended for security feature for rootkit viruses, prevents dual booting of Windows with Linux. To dual boot Windows 8 with Linux, we must disable secure boot in UEFI.

Step 6: Installing Ubuntu along with Windows 10, 8.1

Once you have disabled secure boot, it’s time to install Ubuntu. I hope you already created the live USB as mentioned in step 2. Plug in the USB and boot the system from it.

To boot from USB, will have to choose boot from USB option from within Windows itself. Either with PC Setting (like for UEFI) or pressing shift key while clicking on Restart.

Once you have booted in the live USB, you will be presented with option to try or install Ubuntu. Click on install. You will be presented with few screen options to choose the language. It will then do some checks on available space, power and internet connection etc. Just click on Continue.

dual booting Ubuntu with Windows 8

The main screen which you should pay attention to is Installation Type. Choose Something else here:

Installing_Windows8_Ubuntu_1

Remember we had created some free space beforehand? We shall use the free space to create Root, Swap and Home. Select the free space and click on the + sign.

partition on Ubuntu Windows 8 dual boot

It will provide you with option to create Linux partition. We are creating the Root partition. Any thing above 20 GB is more than sufficient for it. Choose the size, select Ext 4 as file type and / (means root) as the mount point.

Installing_Windows8_Ubuntu_3

Clicking on OK in previous step will bring you to the partition screen. Next we will create swap. Like previously, click on the + sign again. This time use the file type as Swap area. Suggestible swap size is double of RAM.

Installing_Windows8_Ubuntu_4

In similar fashion, create a Home partition. Allocate it maximum space (in fact allocate it rest of the free space) because this is where you’ll save music, pictures and downloaded files.

Installing_Windows8_Ubuntu_5

Once you are ready with Root, Swap and Home, click on Install Now:

Installing_Windows8_Ubuntu_6

Well, you have almost won the battle. You can smell victory now. Next you will be asked to set username password etc. Basically, you just need to click next now.

Once the installation is completed, restart the computer, you should be welcomed by a purple grub screen. Enjoy Ubuntu along with Windows 10 in dual boot mode.

Note: If after installing Ubuntu, you boot directly in Windows, check in UEFI settings for changing the boot order.

I hope this guide helped you to dual boot Ubuntu with Windows 10 UEFI. If you want to reverse the process, follow this guide to remove Ubuntu from dual boot with Windows. Though this article is written for Ubuntu, it should be helpful for other Linux OS as well. Any questions or suggestions are always welcomed.


Source : https://itsfoss.com/install-ubuntu-1404-dual-boot-mode-windows-8-81-uefi/